Bernadine: 1978 Buick Regal Restoration/Build

69hurstolds

Geezer
Supporting Member
Jan 2, 2006
8,185
17,560
113
Not saying it needs it. It's just that I know this is one HUGE trouble spot on these cars and needs thorough vetting for just accepting the top as is. The quarter window areas doesn't give me 100% confidence that you still have virgin sheetmetal under the vinyl. But I'm not there. If you're happy, we're all happy for you.

For the cost of a vinyl top, it's cheap insurance to actually know.
 
  • Like
  • Agree
Reactions: 4 users

78Regal350

Greasemonkey
Apr 13, 2015
117
402
63
Brookville, IN
Not saying it needs it. It's just that I know this is one HUGE trouble spot on these cars and needs thorough vetting for just accepting the top as is. The quarter window areas doesn't give me 100% confidence that you still have virgin sheetmetal under the vinyl. But I'm not there. If you're happy, we're all happy for you.

For the cost of a vinyl top, it's cheap insurance to actually know.

Yeah, I totally know what you mean. Maybe once I get further along I’ll decide rip the top off and start fresh. But for now I’ll just rejoice in knowing I can get the original vinyl properly clean. haha
 
  • Like
Reactions: 1 user

Durrtyredd

n00b
Jan 21, 2020
3
4
3
Appreciate you taking the time to share what you learn along this project... I’ve got the same exact project going and I’m at a stand still cuz I can’t make up my mind.. Started going 350 direction now I’ve got it in my head to go 383. Please keep sharing...
 

Attachments

  • 439FD39F-0E1E-4B0F-89FB-8C4073EB74DE.jpeg
    439FD39F-0E1E-4B0F-89FB-8C4073EB74DE.jpeg
    2.2 MB · Views: 180
  • D027171F-5A52-42BF-B4A5-93240C53AF03.jpeg
    D027171F-5A52-42BF-B4A5-93240C53AF03.jpeg
    2 MB · Views: 176
  • 44DC0D91-C34F-4804-95E0-F632D8403531.jpeg
    44DC0D91-C34F-4804-95E0-F632D8403531.jpeg
    1.7 MB · Views: 165
  • Like
Reactions: 2 users

78Regal350

Greasemonkey
Apr 13, 2015
117
402
63
Brookville, IN
Appreciate you taking the time to share what you learn along this project... I’ve got the same exact project going and I’m at a stand still cuz I can’t make up my mind.. Started going 350 direction now I’ve got it in my head to go 383. Please keep sharing...
Great looking car! I say go with whatever engine will make you happier in the long run.
 
  • Like
Reactions: 1 user

78Regal350

Greasemonkey
Apr 13, 2015
117
402
63
Brookville, IN
Dec. 2, 2020: I haven't done any actual work on the car since my last post. Between maintaining a newborn & a 2 year old, cooking a Thanksgiving meal for my parents, putting up Christmas decorations, and getting all the remaining "junk" from our old house before closing 2 days ago I've been pretty busy otherwise. I did manage to get most of the big car parts moved from the floor to shelves, as well as build myself a nice rolling workbench. The bench is bigger than I would have made it if I had started from scratch, but there was a bar in the "man cave" area of my new garage (which I took out to better use the space) and I wanted to utilize the stainless steel top it had. Also, and like many of you, my projects aren't limited to just working on cars, so I was also able to carve out a little time to make a cool address plaque for the front of our house. Hopefully after some more necessary garage staightening-up I'll be able to get my hands on the Regal again in the next few days.

Bigger parts off the floor and on shelves finally.
IMG_0894.jpg


My new hoss of a mobile workbench (84" x 30" top).
IMG_0892.jpg


New house number plaque.
IMG_0896.jpg
 
  • Like
Reactions: 5 users

78Regal350

Greasemonkey
Apr 13, 2015
117
402
63
Brookville, IN
Dec. 12, 2020: Still not much to update on in regards to actually working on the car. I was able to get to a "local" junkyard (about an hour away) that I'm pretty fond of to search for goodies. This particular yard is more old school junkyard style, with cars stacked on cars, and where it's sometimes impossible to get inside of cars because they're packed so close side to side. But they have quite a few g bodies (most of which are rusted/stripped out trash though), and they're very laid back about prices, so I like the place. The day I went I had just dropped off my daily driver for front airbag recall work so I was driving a dealer loaner and had no tools, but I found a Cutlass 4 door that will be a perfect donor for the inner rear wheelhouse sections I'll need, so I need to get back to the yard ASAP before the car disappears.

I also picked up a couple cool pieces for the car over the past couple weeks. The first one is an original kick panel litter container & kick panel that I got from OD Showtime here on the board. It needs a few holes filled/repaired, but I've wanted one of these ever since I knew they existed, and even though it's not an option my car originally came with it'll be worth the effort to have in the end. Another piece I just scored this week is an NOS lower headlight chrome trim piece.

Kick panel litter container:
IMG_0960.jpg


NOS left lower headlight trim:
IMG_0963.jpg
 
  • Like
Reactions: 6 users

78Regal350

Greasemonkey
Apr 13, 2015
117
402
63
Brookville, IN
Dec. 18, 2020: I was able to get back to “my” junkyard today, and I think scored pretty well. I got sections cut out to patch the inner wheelhouses (as well as to fix the pieces that rest on the #5 body bushings). I also found a hollow f body front sway bar. It’s a 34mm, so it’s not the biggest one there is, but it does have the additional brace (though I doubt the additional brace would be effective, if even able to mount on the g body frame). Overall not a glorious day of finding major treasures, but I’m super happy to have gotten a bunch of miscellaneous stuff I’ll need, and everything you see in the picture only set me back $54.00.

C3593C60-0957-4AE5-91FA-73EB35CC12A9.jpeg
 
  • Like
  • Winner
Reactions: 5 users

78Regal350

Greasemonkey
Apr 13, 2015
117
402
63
Brookville, IN
Dec. 30, 2020: I guess it’s time for another “look at how much progress I haven’t made lately” post. haha This past Sunday I was able to get the gear selector linkage, speedo cable, driveshaft, and steering column (and wheel) removed, as well as disconnect the front parking brake cable, brake lines at the master cylinder, and engine-to-firewall ground strap, so at this point the only thing holding the body to the frame is gravity.

I’m very anxious to get the body lifted from the frame and start fixing/replacing the few rusty spots, but before I do that I need to pull the engine & trans so I can mock up the new engine. Swapping the Buick 231 for a Buick 350 is overall very straightforward, but a common occurrence with this swap is interference between the HVAC box and passenger side valve cover. Since the new engine isn’t built yet (shocker, right?), I’ll get the heads, valve covers, intake, and oil pan bolted back on the block, set it in place, and figure out how I’ll modify the HVAC box to clear. At that point I’ll be able to take out the mocked-up engine and finally get the damn body lifted.

Oh, and I also got a 20 gallon parts washer from Santa (aka my in-laws).
8F07F111-4784-4723-BDFB-5D9C97120280.jpeg
 
  • Like
Reactions: 6 users

78Regal350

Greasemonkey
Apr 13, 2015
117
402
63
Brookville, IN
Jan. 6, 2021: Happy new year everyone! I was able to get the engine & transmission pulled today. Next step will be bolting the Buick 350 heads, intake, valve covers, & oil pan back onto the “new” block so I can set it in place so I can figure out how/how much I’ll need to modify the HVAC box to clear the passenger side valve cover.

73341117-5DE7-422F-A702-CAB5C9FF1F40.jpeg

2794A66C-DD51-4FB0-AB2D-DABC27679CB4.jpeg
 
  • Like
Reactions: 5 users

78Regal350

Greasemonkey
Apr 13, 2015
117
402
63
Brookville, IN
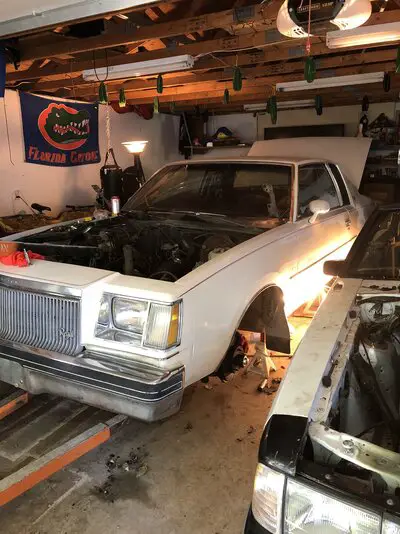
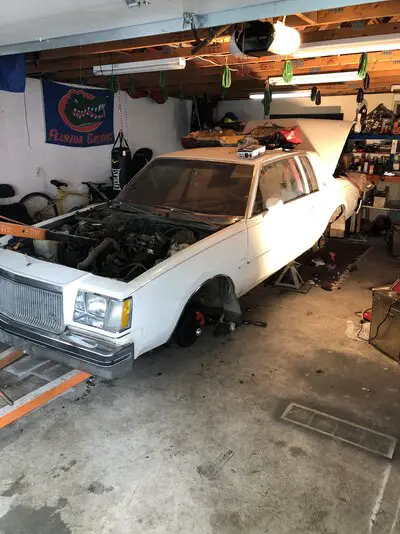
Mar. 11, 2021: Well, it's been quite some time since my last post. And while I'd love to show some massive amount of glorious progress, I don't have a whole lot to show. But over the last 2 months I have been able to make a few more little steps that get me closer to being ready to lift the body and finally start refurbishing the frame. I purchased all new steering componets, all new front & rear suspension parts, and new motor & trans mounts from RockAuto. I also scored a deal on a Saginaw 4 speed trans, so I was able to get the engine/bellhousing/trans mocked up in the car. I got some cuts made in the HVAC box so it clears the passenger side valve cover, and I was also able to lay out exactly where the shifter hump needs to be mounted.

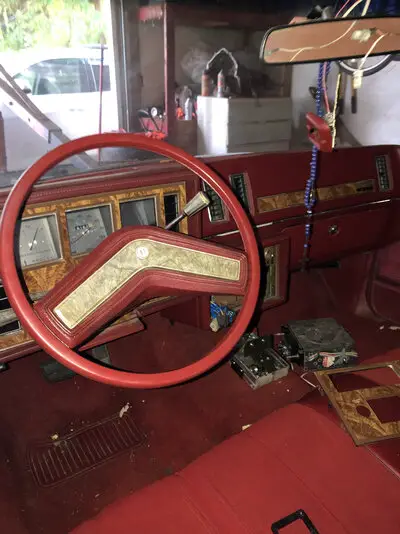
Yesterday I received quite possibly my favorite part ever. It's just a gas gauge, but it's a MANUAL TRANS gas gauge (i.e. no P RND21 at the bottom), and it's NOS! I knew they had existed, but I've never come across one before, and having it makes me super excited about my goal of making this car look, taste, & smell like an orginal manual trans car.

Saginaw 4 speed.
image - 2021-03-11T080905.313.jpg


Engine/Bellhousing/Trans ready to be mocked up.
image - 2021-03-11T080917.519.jpg


Engine/Bellhousing/Trans bolted in (for now)
image - 2021-03-11T080930.193.jpg


HVAC box modifications so far.
image - 2021-03-11T080933.826.jpg

image - 2021-03-11T080937.252.jpg

image - 2021-03-11T080940.744.jpg


Layout for shifter hump placement.
image - 2021-03-11T080944.941.jpg


NOS manual trans gas gauge.
image - 2021-03-11T080947.848.jpg
 
  • Like
  • Winner
Reactions: 9 users

GBodyForum is a participant in the Amazon Services LLC Associates Program, an affiliate advertising program designed to provide a means for sites to earn advertising fees by advertising and linking to amazon.com. Amazon, the Amazon logo, AmazonSupply, and the AmazonSupply logo are trademarks of Amazon.com, Inc. or its affiliates.

Please support GBodyForum Sponsors

Classic Truck Consoles Dixie Restoration Depot UMI Performance

Contact [email protected] for info on becoming a sponsor