BUILD THREAD “The Juggernaut”

Rktpwrd

Builder of Cool Shjt
Supporting Member
Feb 2, 2015
4,166
23,915
113
Calgary, Alberta, Canada
Pretty much got the driver's side lined out tonight.

IMG_1977.JPG


The inside door and fender edges will still need a little more rounding over (same with the passenger's side), but that will have to wait till either the doors or the fenders come off.
There's just not enough room to get the files in there at the proper angles to make the edges match the factory, but they're pretty close for now.

As with the passenger's side, it looks much better in my opinion.

IMG_1976.JPG


Before:
IMG_1968.JPG


After:
IMG_1978.JPG


Next up, fixing the leading edge of the hood so the gap to the header panel is nice too.

Thanks guys,
Donovan
 
  • Like
Reactions: 5 users

Opie Knievel

Rum Fueled Midnight Mechanic and Moderator
Sep 6, 2010
1,512
1,859
113
Brodhead, Kentucky
Nice. I'm wondering, are you worried about getting these panels lined up this perfectly when you take them off and put them back on?
 

Rktpwrd

Builder of Cool Shjt
Supporting Member
Feb 2, 2015
4,166
23,915
113
Calgary, Alberta, Canada
Nice. I'm wondering, are you worried about getting these panels lined up this perfectly when you take them off and put them back on?

Great question!

But short answer, no, not really. I'm using a trick known as "pinning" to ensure the panels get lined back up perfectly each time as they go on and off.

A tiny hole (some use 1/8", but that seems a bit big to me) is drilled thru the panel or hinge and into the structure underneath.

For example: On the hood, 2 holes are drilled just slightly below each hinge to hood mounting bolt on each hinge. They're drilled through the hinge, and through the bottom hood skin.

The panel can be removed and replaced as many times as necessary, but all that's needed to get it back in the same identical spot is to adjust the panels til the holes align again. I do this with the same size drill bit I used to make the holes. 3/64" is what I prefer, it's less noticeable than 1/8" IMO.

It can still be a bit tricky to get the holes perfectly aligned sometimes, but worth it as it takes the guesswork out of the equation (and with no scribing lines around stuff!)

Once the holes are there, they're small and unobtrusive enough that you don't even really see them. If you do happen to notice them, they could easily be mistaken as being there from the factory.

Ive used this same trick on all my panels so far. Doors, fenders, hinges, you name it. It's a neat and effective way to get 'em back in the same spot every time.
:)
 
  • Like
Reactions: 3 users

Injectedcutty

G body LS mafia
Nov 24, 2014
6,057
22,808
113
Louisville, KY
Great question!

But short answer, no, not really. I'm using a trick known as "pinning" to ensure the panels get lined back up perfectly each time as they go on and off.

A tiny hole (some use 1/8", but that seems a bit big to me) is drilled thru the panel or hinge and into the structure underneath.

For example: On the hood, 2 holes are drilled just slightly below each hinge to hood mounting bolt on each hinge. They're drilled through the hinge, and through the bottom hood skin.

The panel can be removed and replaced as many times as necessary, but all that's needed to get it back in the same identical spot is to adjust the panels til the holes align again. I do this with the same size drill bit I used to make the holes. 3/64" is what I prefer, it's less noticeable than 1/8" IMO.

It can still be a bit tricky to get the holes perfectly aligned sometimes, but worth it as it takes the guesswork out of the equation (and with no scribing lines around stuff!)

Once the holes are there, they're small and unobtrusive enough that you don't even really see them. If you do happen to notice them, they could easily be mistaken as being there from the factory.

Ive used this same trick on all my panels so far. Doors, fenders, hinges, you name it. It's a neat and effective way to get 'em back in the same spot every time.
:)
BINGO!!!!! That's exactly what I did to my panels once they were lined up properly. I drilled the 1/8" holes and picked up some long dowel pins that way everything would line up with minimal to no adjustment effort! Yeah the 1/8" can look big, but I put them in areas that wouldn't be noticeable once jambed, painted, etc.
Donovan, your skill and effort on that cutlass is outstanding as usual!!!! Once it gets to paint with a certain color combo it will continue to knock socks off!!!!
I know Jared and myself mentioned something about ridler worthy, and that's no friggin joke brother!!!! With the mods done, level of detail, etc to the exterior....I can only imagine how the damn interior will look when you get to that point!!!!
Keep the pics and detailed posts coming friends, we are tuned in for sure!!!!!
 
  • Like
Reactions: 3 users

Opie Knievel

Rum Fueled Midnight Mechanic and Moderator
Sep 6, 2010
1,512
1,859
113
Brodhead, Kentucky
Great question!

But short answer, no, not really. I'm using a trick known as "pinning" to ensure the panels get lined back up perfectly each time as they go on and off.

A tiny hole (some use 1/8", but that seems a bit big to me) is drilled thru the panel or hinge and into the structure underneath.

For example: On the hood, 2 holes are drilled just slightly below each hinge to hood mounting bolt on each hinge. They're drilled through the hinge, and through the bottom hood skin.

The panel can be removed and replaced as many times as necessary, but all that's needed to get it back in the same identical spot is to adjust the panels til the holes align again. I do this with the same size drill bit I used to make the holes. 3/64" is what I prefer, it's less noticeable than 1/8" IMO.

It can still be a bit tricky to get the holes perfectly aligned sometimes, but worth it as it takes the guesswork out of the equation (and with no scribing lines around stuff!)

Once the holes are there, they're small and unobtrusive enough that you don't even really see them. If you do happen to notice them, they could easily be mistaken as being there from the factory.

Ive used this same trick on all my panels so far. Doors, fenders, hinges, you name it. It's a neat and effective way to get 'em back in the same spot every time.
:)

Awesome. Very good, simple solution. I was thinking you probably had a trick to get them lined up perfectly again. I thought about using some sort of pin or dowel but I assumed that the dowel would be attached to the car. I never thought about just using holes and a drill bit. Good work as usual.
 
  • Like
Reactions: 1 user

Injectedcutty

G body LS mafia
Nov 24, 2014
6,057
22,808
113
Louisville, KY
What I meant to conclude was the dowel pins were used merely to locate the panels. Once lined up, I just removed the dowels and filled the noticeable holes. Sorry Donovan for the thread jack.
 

Rktpwrd

Builder of Cool Shjt
Supporting Member
Feb 2, 2015
4,166
23,915
113
Calgary, Alberta, Canada
BINGO!!!!! That's exactly what I did to my panels once they were lined up properly. I drilled the 1/8" holes and picked up some long dowel pins that way everything would line up with minimal to no adjustment effort! Yeah the 1/8" can look big, but I put them in areas that wouldn't be noticeable once jambed, painted, etc.
Donovan, your skill and effort on that cutlass is outstanding as usual!!!! Once it gets to paint with a certain color combo it will continue to knock socks off!!!!
I know Jared and myself mentioned something about ridler worthy, and that's no friggin joke brother!!!! With the mods done, level of detail, etc to the exterior....I can only imagine how the damn interior will look when you get to that point!!!!
Keep the pics and detailed posts coming friends, we are tuned in for sure!!!!!

Thanks Scott.
I'm still a long ways off from worrying about the interior, but I will admit that I've got a few ideas in mind...

Like most things, one usually leads to another, and plans for the interior need to be somewhat taken into account ahead of time.

My big push as you've probably already noticed is to get the hood fitting well and final bodywork done on it so I can get it into high build primer. A lot of what I'm doing now is dependant on the fit to the header panel, that's why last year I did the composite headlight upgrade and got the header panel in place and done.

This year's work to the hood is really a continuation of last year's work to the header. Once I'm to the point that I can start the bodywork on the topside of the hood, the top of the header panel will have to be worked at the same time as the hood. This will ensure the two work and flow together as one. I'm really anxious to get to that point, but the gaps and the underside of the hood need to be addressed first.

If, by some miracle, I get the hood and top of the header totally done this season, the next mod will likely be the addition of the flares to the front fenders. Which I know you're excited to see, as am I.

The fender flare mod is like most things on the car, by necessity. The Wilwood big brake kit on the front of the car widened my track width by a quarter inch per side, making fender clearance to the sides of the tires non existent. Without some sort of additional clearance, I'm just flirting with disaster every time I air the car down. If the tires aren't perfectly straight and I hit the button, I'll end up with crunched fenders!

The side benefit of having fender flares on a Cutlass is the fact that it should look pretty aggressive and bitchin!
:)

IMG_1575.JPG


Thanks for all the encouragement and praise, it's greatly appreciated. The updates and pics will definitely continue to come!

Donovan
 
  • Like
Reactions: 4 users

Rktpwrd

Builder of Cool Shjt
Supporting Member
Feb 2, 2015
4,166
23,915
113
Calgary, Alberta, Canada
What I meant to conclude was the dowel pins were used merely to locate the panels. Once lined up, I just removed the dowels and filled the noticeable holes. Sorry Donovan for the thread jack.

No apology needed Scott. No thread jack there my friend.
 
  • Like
Reactions: 1 users

liquidh8

Comic Book Super Hero
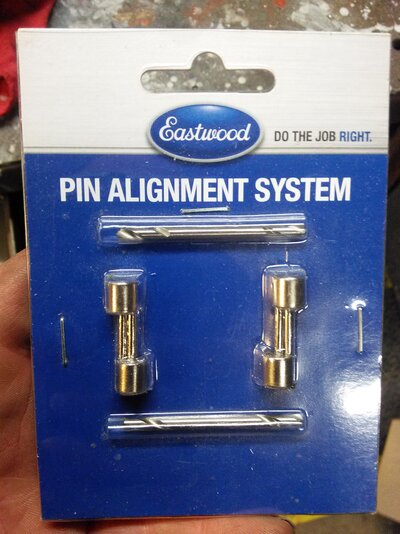
Love the progress Donavan, hard for me to keep up with the quality and attention to detail you have, haha. For those wanting to pin the hinges and such, use these.

1478994832948-551441542.jpg

Same principle, but the pins are magnetic.
 
  • Like
Reactions: 1 users

L.A.X-RATED

Royal Smart Person
Aug 25, 2010
1,387
385
83
if the the new "resident" is not enough to make you relocate up north,DONOVAN is!!!;) as usual checking my 20/20--- niCE updates.looking forward to the fender flare "segment";)
 
  • Agree
Reactions: 1 user

GBodyForum is a participant in the Amazon Services LLC Associates Program, an affiliate advertising program designed to provide a means for sites to earn advertising fees by advertising and linking to amazon.com. Amazon, the Amazon logo, AmazonSupply, and the AmazonSupply logo are trademarks of Amazon.com, Inc. or its affiliates.

Please support GBodyForum Sponsors

Classic Truck Consoles Dixie Restoration Depot UMI Performance

Contact [email protected] for info on becoming a sponsor