

EL CAMINO 1983 El Camino 5.3 Swap / Build Thread
- Thread starter JohnIL
- Start date
You are using an out of date browser. It may not display this or other websites correctly.
You should upgrade or use an alternative browser.
You should upgrade or use an alternative browser.

Update - Rear End Seals, etc.
I only had a half day to work in the garage today, so it seemed like a good time to fix the obvious gear oil leak on the rear end. I think it was leaking from both the pinion seal and the diff cover gasket. The cover was bent from what I assume was a misplaced floor jack. So, I replaced the cover at the same time. The gear oil was low (no surprise there) and it smelled burned. But, the gears and limited slip unit looked clean and undamaged.
Question for the class:
Before I removed the yoke, I marked the position of the yoke and the nut so I would be certain to get it all put back together with the correct preload. But, when I reinstalled the nut, if would not go all the way back to where it started. It acted like the nut bottomed out with almost a quarter turn to go. Everything is tight and there doesn't appear to be any excess play in the pinion. Should I be worried about this?
Rear End Gear Identification:
While I had the cover off the rear end, I counted the teeth to find out what gear ratio it had. Yesterday, I predicted that it would have 2.56:1 gears, but I was hoping for something lower. No such luck. I counted 48 ring teeth and 21 pinion teeth. Assuming I did the arithmetic correctly, that means that we have a 2.29:1 ratio. It won't be a monster off the line, but it should get excellent mileage on the highway. Does anyone know how well this ratio will work with the 4L60E gearing?
No pictures today. Other than a clean flat black diff cover, it all looks pretty much the same as it did yesterday. But, the pile of parts is shrinking and that's progress.
Yeah, it sucks. 3.42s are much better.Does anyone know how well this ratio will work with the 4L60E gearing?
I went with the 7/8" rear wheel Cylinders on mine. they are a common early S-10 item, (82-86)? gives you a little more rear braking power. and yes, I also used a socket to put the clips in.Update - More Suspension Work & Brakes
I spent the day yesterday under the rear of the El Camino.
First, I installed a Hellwig 5815 Anti-Sway Bar. This was possibly the easiest suspension component installation I've ever done. It simply bolts through existing holes between the lower control arms. 10 minutes tops. It took longer to clean the surface rust off and repaint the control arms than it did to install the sway bar. I'm really interested to see how this simple upgrade effects body roll.
Second (and for the rest of the day!), I reworked the back brakes. You can see from the "before" picture below what shape the brakes were in. This is the reason my Dad parked this car 17 years ago. The rear brakes were shot and he was tired of fiddling around with the car. My goal was to replace the brake cylinders and shoes. I've never been a fan of working on drum brakes, but I had my self psyched up for the job until I realized that the brake cylinders were clipped in place instead of bolted. I haven't messed with cylinder retaining clips since I reworked the rear brakes on my own El Camino 25 years ago. I had forgotten how much of a pain in the <insert foul language here> those retaining clips are. As with most brake jobs, the first side took hours and the second side took minutes. I had to relearn how to release the old retaining clips and fabricate a tool to reinstall the new retaining clips. I can see now why the back brakes weren't working. Both of the cylinders had seeping seals and both of the auto-adjusters where rusted. One was rusted solid enough that it required a bench vice and a pair of channel locks to disassemble. A little attention from a wire wheel and some lithium grease got both of the adjusters working smoothly again. On the plus side, I finally learned how to use a pair of drum brake spring pliers correctly. All these years, my Dad and I have been misusing them. It's a wonder that neither one of us has ever been hooked like a fish by a flying spring!
Today, I plan to turn my attention to the front of the car. I have new brake calipers and pads to install. Once that's knocked out, I'll replace the front sway bar end links. The old bushings are shot and one of the links is actually rusted in half!
Progress continues...
I seen in another thread your working on your fuel sender/pump. Did you see this from Dixie restoration?
 www.dixierestorationdepot.com
It's the fuel injection ready sender for the El Camino. I think this is what slot of guys use for the ls swap on El Camino's.
85-87 El Camino 4.3L FI Fuel Sending Unit | Dixie Restoration Depot
www.dixierestorationdepot.com
It's the fuel injection ready sender for the El Camino. I think this is what slot of guys use for the ls swap on El Camino's.

I seen in another thread your working on your fuel sender/pump. Did you see this from Dixie restoration?
85-87 El Camino 4.3L FI Fuel Sending Unit | Dixie Restoration Depot
It's the fuel injection ready sender for the El Camino. I think this is what slot of guys use for the ls swap on El Camino's.
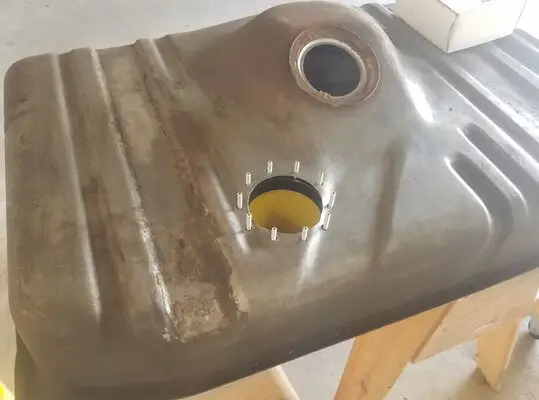
Nope, I'm not replacing the sending unit. I'm using the original sending unit to run the fuel level gauge. The original fuel pickup and vent lines get capped off. I'm adding an Aeromotive in-tank pump kit. This kit calls for an additional 3 1/4" hole in the top of the tank. There is a foam baffle (shaped like a bucket) that gets inserted through this hole. Then, the fuel pump gets inserted inside the baffle and is capped off by a cover with pass-through connectors for power, fuel line, return line, and vent line.
Are you aware of the bolt in brackets for the wheel cylinders? Worth while upgrade.
Are you aware of the bolt in brackets for the wheel cylinders? Worth while upgrade.
I have the new cylinders installed. But, I might be interested in the future. Do you have a link to the bolt in brackets? Thanks.
I have the new cylinders installed. But, I might be interested in the future. Do you have a link to the bolt in brackets? Thanks.


Update - In Tank Fuel Pump
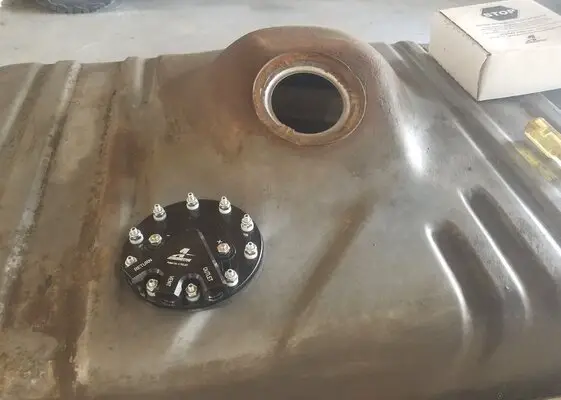
Today's project was to install an Aeromotive Phantom 200 Steath in-tank fuel pump. I was nervous about cutting into the factory tank and my nervousness turned out to be well founded. The installation took about 12 hours and I'm still not entirely happy with the results.
The Aeromotive kit isn't the path we originally intended to take. We're converting a diesel car, so the factory tank isn't "right" for a gas engine. And, since we're going with an EFI LS engine, we needed a completely new EFI-friendly fuel system. So, the natural choice would have been a new after market fuel tank equipped with an in-tank EFI fuel pump. The problem is, nobody seems to make one for an El Camino. All of the after-market tanks on the market are made for G-body coupes/sedans. Station wagons and El Camino's use a different tank. So, our choices were either an external electric fuel pump, or the Aeromotive Phantom in-tank kit.
In theory, this kit is pretty easy. Just cut a hole in the top of the tank with a hole saw and plop the fuel pump in there. In practice, there was lot more to it than that. First, we had to deal with a couple gallons of sour 17 year old diesel fuel. Once we got the tank "clean", it was time to dig into the pump installation. The installation itself really wasn't that difficult. The kit comes with clear instructions and there are a couple of how-to videos on YouTube that walk through the entire process. Like I said, just cut a hole and plop in there. The hard part was trying to figure out WHERE to install it in the tank. And, even after I finished the installation, I'm still not sure where the right location is. The problem is that the factory sending unit is installed in a big hump in the middle of the tank. The straps/supports are directly on either side of that hump. That doesn't leave much "flat" space on the top of the tank. I chose to install the pump just forward and to the right (passenger side) of the hump. This the only location I could find where the mounting bolts wouldn't land directly on a corrugation on the surface of the tank. It seemed like the logical spot for the pump until I attempted to put the tank back under the car. The spot that I chose, put the top of the fuel pump cover in contact with body support above the tank. So, the tank came back out so I could do some custom body work with a cutting wheel to create additional clearance. It's not perfect, but it's installed. The tank is back in the car, at least temporarily, so I can work on the fuel line and wiring details tomorrow. Once I get the lines all sorted out, the tank will come back out to make way for more under carriage rust repair. Then, the tank, fuel lines, and wiring goes in for final installation.
With the tank back in the car, I took another look for a better location for the pump. I don't think there is any way to avoid clearance problems. The body support covers the entire area in front of the hump and there is no flat space behind the hump. Either the body support has to be modified or the tank has to be spaced down away from the body. Would I choose the Aeromotive in-tank kit again? Probably, yes. But, I really wish someone made an alternative in-tank pump option for El Caminos and station wagons. This is a nice kit, there's just no good place to install it in this tank.
Attachments
Similar threads
- Replies
- 0
- Views
- 606
- Replies
- 1
- Views
- 339
- Replies
- 5
- Views
- 874
GBodyForum is a participant in the Amazon Services LLC Associates Program, an affiliate advertising program designed to provide a means for sites to earn advertising fees by advertising and linking to amazon.com. Amazon, the Amazon logo, AmazonSupply, and the AmazonSupply logo are trademarks of Amazon.com, Inc. or its affiliates.