El Camino gas tank retro-fit with Roadmaster Wagon fuel tank

Status
Not open for further replies.

Art Carabio

Not-quite-so-new-guy
Dec 19, 2019
16
15
3
Hello All,
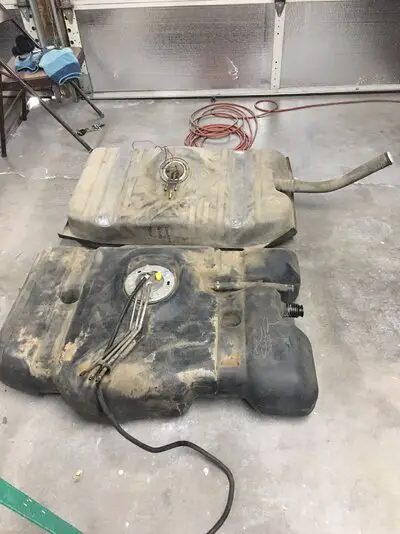
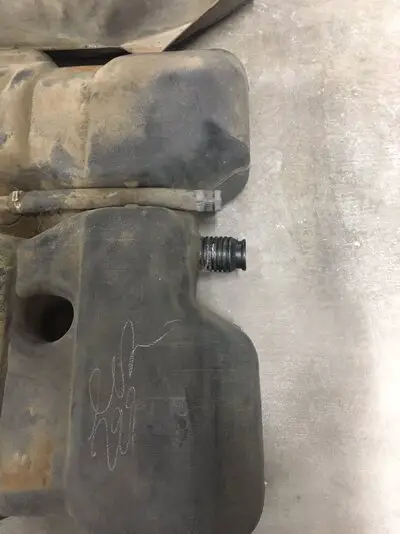
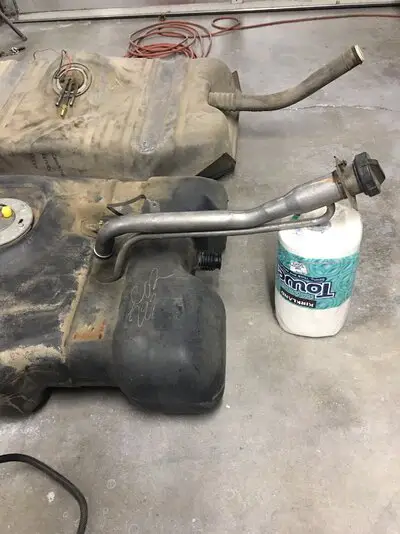
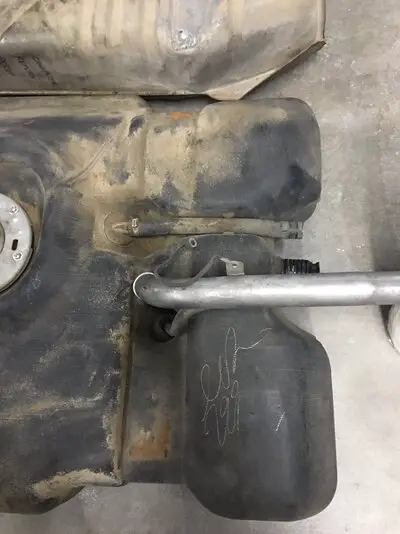
I'm a new member to the group but not to G-bodies. I'm installing a '96 Roadmaster Wagon efi fuel tank in my '80 El Camino. My Elky has a 350 TPI motor that I've been using the original fuel sender that was modified with a return line , an external fuel filter and fuel pump. I've decided to fit a wagon efi tank but noticed the filler neck is longer and taller on the wagon. The original steel Elky tank is solidly connected to the filler neck. The wagon tank is plastic with rubber fuel hose connecting the steel filler pipe to the tank. There is also a vent pipe that is piped into the wagon steel neck near the filler cap. So I'm wondering if I should cut the wagon steel filler and try to fit it. It seems I may be able to cut it, then flip it 180 degrees in order for it to lay similar to the Elky tank filler neck. Or I may be able to cut the filler neck off the Elky tank, near the gas tank and connect the plastic tank to the Elky filler with a fuel hose. The diameter of the Elky filler and the wagon tank nipple are nearly the same diameter. Not sure if anyone has installed one of these wagon tanks in an El Camino. Attached are a few pics of the tanks next to each other. The wagon neck is too long and is taller when installed on the tank. I'm showing the wagon neck on the wagon tank inverted to show how, if I cut it, it may fit onto the wagon tank and fit up to the filler door on the side of the Elky. The wagon tank has a vent hose that I may be able to connect to the modified wagon filler by bending it around the filler neck and connect it to the wagon tank vent nipple with some longer hose. Any help is appreciated.
 

Attachments

  • IMG_1592.JPG
    IMG_1592.JPG
    489.4 KB · Views: 688
  • IMG_1593.JPG
    IMG_1593.JPG
    396.3 KB · Views: 643
  • IMG_1594.JPG
    IMG_1594.JPG
    483.3 KB · Views: 689
  • IMG_1595.JPG
    IMG_1595.JPG
    412.9 KB · Views: 616
Last edited:

Art Carabio

Not-quite-so-new-guy
Dec 19, 2019
16
15
3
I installed the tank under the El Camino and I am truly impressed how easily the tank went in. It fits perfectly with the stock straps locations. I'll be using the original style quick connect fittings on the fuel sender. Originally, the OEM quick connects were connected to plastic 3/8" pipe for the feed side and 5/16" plastic pipe on the return. I bought a 5/16" steel (fuel sender end) to 3/8" hose fitting Dorman part number 800-119. This way, since my feed and return lines are 3/8" fuel injection hose, I can use the stock fuel sender connections. The wagon tank came with the quick connect on the feed side with the plastic pipe cut off. The plastic pipe looks like it's heat shrunk on the factory quick connect which is made of aluminum. I slit the plastic pipe and slipped it off the connector. I can now use the OEM connector with my 3/8" fuel injection hose with fuel injection hose clamps. The return side is low pressure so I might just use regular hose clamps on the new quick connect. Now I have to figure out the filler pipe and vent tube and plumb in my fuel filter for high pressure and remove my external frame mounted high pressure fuel pump. Easy shmeezy. Yeah, right. More to follow.
 

oldsmobile joe

Royal Smart Person
Nov 12, 2015
2,067
3,053
113
mpls
here are some pics on the one i installed into a 79 camino. engine is an lt1 so i used a factory wagon tank from a 95 caprice wagon. installed new fuel pump and used the factory sender for the camino fuel gauge. i found it easier to use a sedan filler neck to connect to the wagon tank. the vent on the sedan neck comes in from the side which give you more room to work. i don't recall if i had to bend or straighten the sedan neck, if i did, it was slight. i then added a couple of angle brackets to fasten the neck to the body seam. i was able to use the factory camino tank straps but i believe the caprice straps work better (tighter) and give better support. 20190505_150557.jpg 20190505_150620.jpg 20190505_150631.jpg 20190505_150650.jpg
 
  • Like
Reactions: 2 users

Art Carabio

Not-quite-so-new-guy
Dec 19, 2019
16
15
3
here are some pics on the one i installed into a 79 camino. engine is an lt1 so i used a factory wagon tank from a 95 caprice wagon. installed new fuel pump and used the factory sender for the camino fuel gauge. i found it easier to use a sedan filler neck to connect to the wagon tank. the vent on the sedan neck comes in from the side which give you more room to work. i don't recall if i had to bend or straighten the sedan neck, if i did, it was slight. i then added a couple of angle brackets to fasten the neck to the body seam. i was able to use the factory camino tank straps but i believe the caprice straps work better (tighter) and give better support. View attachment 131249 View attachment 131250 View attachment 131251 View attachment 131252
I like that setup. I cut the wagon neck down along with the overflow tube and inverted it. It fits, and it will work but I like the way the sedan neck looks. When I get it done I'll post a pic. Thanks for the tip. This whole retro-fit is much easier than I thought it was. I'm using the stock LT1 pump and sending unit that came with the tank. I'm running a stock 350 TPI so the pump should be adequate. I might put some rubber strips on the straps but, really, it fits pretty nice in there with the stock straps.
 

Art Carabio

Not-quite-so-new-guy
Dec 19, 2019
16
15
3
here are some pics on the one i installed into a 79 camino. engine is an lt1 so i used a factory wagon tank from a 95 caprice wagon. installed new fuel pump and used the factory sender for the camino fuel gauge. i found it easier to use a sedan filler neck to connect to the wagon tank. the vent on the sedan neck comes in from the side which give you more room to work. i don't recall if i had to bend or straighten the sedan neck, if i did, it was slight. i then added a couple of angle brackets to fasten the neck to the body seam. i was able to use the factory camino tank straps but i believe the caprice straps work better (tighter) and give better support. View attachment 131249 View attachment 131250 View attachment 131251 View attachment 131252
I was able to use the wagon filler but, as you mentioned, my overflow tube ended up being on the bottom of the filler neck and twisting around to fit the gas tank. Also, the wagon neck has a flange below the gas cap so I was able to use some straps to connect the flange to the gas door opening. I have a question...since the existing hard steel fuel line is designed for low pressure fuel hose, how are you connecting the high pressure fuel injected fuel line to the steel gas line? I've been using two fuel injected hose clamps to hold the rubber fuel hose to the steel factory fuel lines. I guess the flare and the hose clamps seal and hold the fuel line in place. Just a concern of mine. BTW, I used the stock 3/8" fuel line for the feed and the steel 5/16" emissions vent line for the return. I added another steel line on the passenger side to maintain the emissions of the engine carbon canister to the fuel tank. My El Camino had a Buick V6 so the original 3/8" fuel line was on the left side and the 5/16" emissions line ended up on the driver's side even though this line started from the rear right side, along the right frame rail, then crossed over to the driver's side along the front crossmember, and ended up on top of the frame rail just past the upper control arm. It was a perfect location for the tuned port injection fuel lines since both the engine fuel lines and the frame lines were both on the left side...perfect.
 
Last edited:

oldsmobile joe

Royal Smart Person
Nov 12, 2015
2,067
3,053
113
mpls
because i was using an lt1 engine and fuel tank from a matching vehicle, i was able to use the factory nylon feed and return lines and ran them inside the open "C" portion of the left frame rail. the camino and caprice wheel base lengths are close enough that i didn't have to modify the lines. i mounted the factory fuel filter on the left frame rail, just in front of where the lower control arm attaches to the frame. i protected the nylon lines with convolute or rubber hose in the sensitive areas. my emission line is also the nylon line from the caprice and i mounted the lt1 canister under the battery/fender liner, attached to the frame just behind the front bumper. i left all my old steel fuel and emission lines alone at this time. it was mostly plug and play, like some engineer planned it so he could retro fit the combination some day.
 
  • Like
  • Creative
Reactions: 1 users

Art Carabio

Not-quite-so-new-guy
Dec 19, 2019
16
15
3
because i was using an lt1 engine and fuel tank from a matching vehicle, i was able to use the factory nylon feed and return lines and ran them inside the open "C" portion of the left frame rail. the camino and caprice wheel base lengths are close enough that i didn't have to modify the lines. i mounted the factory fuel filter on the left frame rail, just in front of where the lower control arm attaches to the frame. i protected the nylon lines with convolute or rubber hose in the sensitive areas. my emission line is also the nylon line from the caprice and i mounted the lt1 canister under the battery/fender liner, attached to the frame just behind the front bumper. i left all my old steel fuel and emission lines alone at this time. it was mostly plug and play, like some engineer planned it so he could retro fit the combination some day.
That sounds like it worked pretty good. I've seen the plastic fuel line kits available. Someone actually used a tube flaring tool and a caulk gun to install the press fit quick connect fittings on the plastic fuel line. I saw a roadmaster wagon at the junk yard but the fuel lines were cut. My TPI engine uses the fuel rail that has o-rings on the ends of the tubes with nuts that slide that connect to the female fitting on the rubber hose. Since I put this TPI in I cut off one end of the hose and slipped it onto a barbed 3/8" hose fitting that was coupled to another 3/8" barbed fitting that's connected to the stock fuel line with 3/8" fuel injection hose with double clamps. At the gas tank end the sending unit had quick connects. I bought Dorman quick connects to 3/8" barbs that would use the plastic tube. I again used 3/8" FI hose with double clamps for the quick connect fitting end and double clamps on the stock steel fuel line using 3/8" FI fuel line. It seems to work fine it's just that I keep an eye on all the connections and rubber hoses for leaks and cracking. Not a super reliable system but was the best I can do. I'm trying to improve on this by using either some type of adapters on the fuel rail that will allow me to use quick connects. I'm not sure what the size is of the fittings on the stock TPI fuel rail fuel 3/8" and 5/16" connections. LIke I mentioned the fuel rail has flared ends with o-rings and a sliding nut that connects to the factory rubber fuel lines that go to the body mounted steel fuel lines that have the same ends like the fuel rail. But since my Elky was carbuerated I had to use barbed connections to adapt everything together. Hope this makes sense.
 
Last edited:

jlcustomz

G-Body Guru
Nov 22, 2011
983
1,096
93
I've had a wagon tank waiting to go in for years now, just like a lot of other stuff of mine. The b-body wagon tanks have a larger 25 gal capacity, are lighter & rust free being plastic, & have improved baffling for efi use compared to elky tanks. Much better than aftermarket replacement g-body stuff.
I got a new parts store fuel sending unit for mine, but it really needs larger wires for the fuel pump before I install. I'm relocating filler to inside bed, so I'll have to further modify for that.
 
  • Like
  • Agree
Reactions: 2 users

Art Carabio

Not-quite-so-new-guy
Dec 19, 2019
16
15
3
What's the benefit of swapping the tanks ?
For me, it was the reliability on the in-tank pump and tank baffling. I’m running a 350 TPI fuel injected motor that requires a fuel return line. Originally I removed the stock carbureted fuel sending unit and installed an additional 5/16” steel line to the sender unit for the fuel return line. I installed a fuel filter and a high pressure fuel injection pump on the frame rail just in front of the LR wheel. The problem with this is fuel starvation when the tank is low while making turns. Fuel pump life is shortened and I had replaced several pumps since 2000. An additional addition I did before I considered the tank swap was I installed a low pressure solenoid fuel pump near the gas tank fuel fittings under the Elky bed that sucked fuel out of the tank and fed the high pressure pump on the frame rail. The fuel system was getting complicated. I recently found out a Caprice or Roadmaster wagon EFI tank would fit so I decided to swap it out. The wagon tank solved these issues and was relatively inexpensive to install. I could get into the separate 2 pint reservoir i plumbed into the system that added 4 more fuel lines but it would make your head spin. This reservoir eliminated fuel starvation at low fuel levels but, as mentioned, the plumbing was very complicated with multiple failure points due to fuel connections and hose clamps. Leaks are a potential disaster with what I was running. The wagon tank eliminated a lot of issues.
 
Last edited:
  • Like
Reactions: 2 users
Status
Not open for further replies.

GBodyForum is a participant in the Amazon Services LLC Associates Program, an affiliate advertising program designed to provide a means for sites to earn advertising fees by advertising and linking to amazon.com. Amazon, the Amazon logo, AmazonSupply, and the AmazonSupply logo are trademarks of Amazon.com, Inc. or its affiliates.

Please support GBodyForum Sponsors

Classic Truck Consoles Dixie Restoration Depot UMI Performance

Contact [email protected] for info on becoming a sponsor