

Has anyone had good luck installing a full replacement floor in a 86 cutlass without removing engine and transmission? I would prefer to gut the interior and place the new pan in from the top side if possible i plan on ordering a replacement pan from opgi along with new cross members and seat mounts
Floor pan replacement
- Thread starter Rocket350olds
- Start date
You are using an out of date browser. It may not display this or other websites correctly.
You should upgrade or use an alternative browser.
You should upgrade or use an alternative browser.
- Status
- Not open for further replies.
Should have to pull the drive train to do the floors, gut the interior & if needed ad some bracing to keep the body square.

So while I haven't owned a Cutlass quite yet, I will mention on the G Body Bonneville my body man did it without doing anything to the engine or transmission.
And these were replacement floor pans that said El Camino, so I don't see why it can't be done necessarily, i'm sure someone who owns an Oldsmobile Cutlass can get specific should that be the case though honestly.
And these were replacement floor pans that said El Camino, so I don't see why it can't be done necessarily, i'm sure someone who owns an Oldsmobile Cutlass can get specific should that be the case though honestly.
Last edited by a moderator:
Don't see how you could slip a complete floor in with the transmission in place. Floor is too big to go thru the door...
If it's not split in half then that's right.Don't see how you could slip a complete floor in with the transmission in place. Floor is too big to go thru the door...
Getting to the flanges for the toe boards with the transmission still in place would be a sh*t plated cow to achieve. The pic showing those floor panels is for both sides but they don't include the tunnel. You would have to completely strip out the interior to bare metal. Then remove all the sub structural bracing that supports the seats just to get to the point where you can drop the replacement pan in place and scribe where it overlaps the old tunnel and sill ledges. You would also have to harvest the seat belt mounting sub=pads as they don;'t come with the floor Panel. All this means locating and drilling a LOT of spot welds. This is no easy job; been there done that, both sides from the toe board flange to the kickup for the rear seat. And it is a lot of work!! Particularly when/where you go to remove the toe board where it attaches to the kick panel braces. No room and no light. Not saying it is an impossible job, just be prepared to expand a lot of time and patience doing the fitting and tweaking to get the new floor to sit down properly. At a bare minimum it can be done with a .035 thick razor blade mounted to a 4.5 mini-grinder but the fine work, well anything from a sawzall to an air saw, plus hammers and chisels and panel splitters.
The only reason I did mine was that farming it out to a body shop = Muy mas $$$$$$$$$. And, of course, there was the challenge and sense of accomplishment of having done it by myself. but once, and Only Once. That was enough.
Nick
The only reason I did mine was that farming it out to a body shop = Muy mas $$$$$$$$$. And, of course, there was the challenge and sense of accomplishment of having done it by myself. but once, and Only Once. That was enough.
Nick

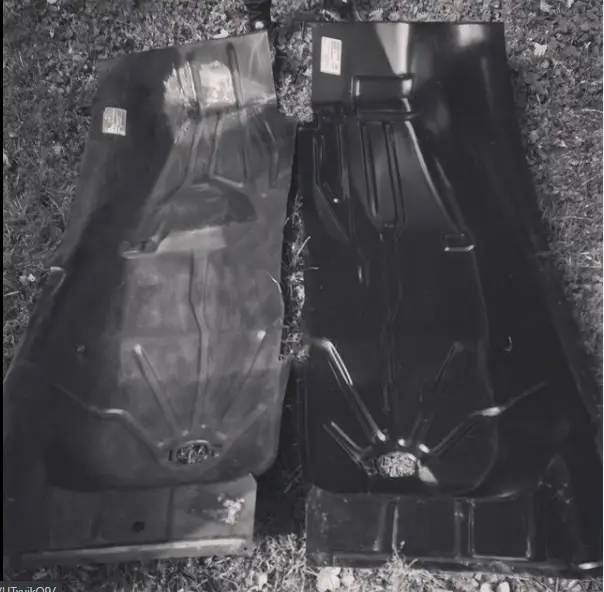
Are the pans shown reversed? The left pan is on the right and the right pan is on the left?
I think these are the imported pans.
The raised part is the tunnel portion?
USA Left side:

I think these are the imported pans.
The raised part is the tunnel portion?
USA Left side:
So while I haven't owned a Cutlass quite yet, I will mention on the G Body Bonneville my body man did it without doing anything to the engine or transmission.
And these were replacement floor pans that said El Camino, so I don't see why it can't be done necessarily, i'm sure someone who owns an Oldsmobile Cutlass can get specific should that be the case though honestly.

Yes, and they do have the tunnels as well.Are the pans shown reversed? The left pan is on the right and the right pan is on the left?
I think these are the imported pans.
The raised part is the tunnel portion?
USA Left side:
View attachment 188721
The posted picture of the USA "Left side" is the drivers side. Looking at it from the overhead perspective, You can see the holes for the seat belt mounting plates, the raised platform where the heel would sit while the toe hammers on the loud pedal, and the curve of the toe board as it swells out from the lower A pillar and back in to form the transmission tunnel mating seam.
BE aware that these stamping are somewhat universal in creation. Due to homologation of parts, and the age of the forming dies, the floor pans for G-Bodies, excepting the Camino, look pretty much alike. They are also designed to be cut to fit more precisely, meaning that they can be trimmed and tweaked to more tightly mate with existing material and produce a finer and closer seam for purposes of welding, Mig or Tig. Tig is prettier but the welds needs to be dollied post burn in in order to relax the metal; tig welded seams apparently can "shrink" slightly due to the heat of the fusion and the dolly work causes the metal to relax and expand again.
AS an example, this was the type of pan that I used when i replaced the floor on the driver's side of my 85 Monte Carlo SS. Just To do the preliminary test fit, I first had to pretty much cut away all the existing floor that had been ruined or destroyed by rust, all the way to the toe board seam in the lower fire all the back to the rear seat foot well walls, and out from the tunnel into the rocker panels.
This brings up an important point. These panels come minus one critical aspect; they do not possess the flanged extension that comes off the edge/end of the sill and which is used to mate them to the inner rocker panel. Don't assume you can just fit the new sill over what is left of the old sill; metal takes space and that affects panel alignment. For this install to work the floor panel has to go in first, then the inner panel has to be made; it is not available as a "buy it" part, and installed, tack welds, and plug welds as necessary, and then the outer rocker gets attached to that. To hang that inner panel there has to be a lip or thin flange that is actually part of the sill and it is to that lip that the inner panel gets attached. If you slither under the vehicle and look up at the inner rocker you can see in places where that flange is, or used to be, and how it interacts with adjacent panels.
How I did mine on the driver's side, at the time, was to cut away all the trashed rocker metal, while leaving the floor pan in place. Why I did that was to retain the shape and relationship of the door opening and the A and B pillars to each other as much as possible. A full up replacement would have probably required me to emplace square or round bar braces by welding them in from side to side and front to back to "Lock" the cabin walls and openings into their correct positions prior to any metal being removed. It also would have meant removing the complete dash assembly to gain access to the toe board seam. This actually is a video subject and they are worth it to watch, minus all the verbal drivel, to see how a good shop would do it.
By leaving the pan in, I was able to "cheat" the system slightly but it made attaching the sill to the inner rocker panel a lot more difficult. Gains and Losses.
I still have to visit the passenger's side and replace the inner and outer rockers for it. Them, I have; made the inner a long time ago but then had to stash it due to other issues intruding. Essentially it is a 6 foot long or so piece of flat metal that has been flanged and shaped to act as the inner face for the outer rocker. Why so long? Because the rocker in its entirely actually runs from the lower A pillar behind the kick panel all the way back into the rocket panel ahead of the rear wheel house and gets attached to the floor and various other points inside that panel. The outer rocker panel is not a cosmetic cover; it is structural and works to assist in keeping the body straight.
At the other end of things, I chose to leave the tunnel intact as much as possible, both to act as a brace and a structural member for the cabin and to give me an easier attaching point for the new panel. Like as been commented on elsewhere, the new panel gets laid over the old one, you figure out what you need to cut to have the two edged butt up to each other, take that first raw cut and then sneak up to the final seam that you will weld.
The method of attachment I will leave to the experts. My panels received a lot of Mig wire love.
A few final thoughts here, Expect surprises. Have spare new clean metal on hand to make bits with and don't try to do the work if you are less than mellow and relaxed. Stress is the enemy when you are trying to fit a panel and it is fighting back, HARD. Hide all your BFH''s, you can accomplish more with a lead core dead blow hammer or a heavy rubber one than with a 5# maul. Bring lots of clamps or vice grips to the party and expect to have to go out and get more. Make your cuts as neat and precise as possible; what you remove, you have to put back, easier to do if you don't have to piece in a whole lot of extra metal. Tag and bag the bits you disassemble as you do it. Saves the frustration of pawing through bags and boxes of ??? bits and pieces looking for that whatsit that you know you have but WhereTF is it??
This is an exercise that isn't going to be fun, BUT, You will feel a sense of pride in accomplishment if/when you wrestle it into submission.
Nick
Last edited:
- Status
- Not open for further replies.
Similar threads
- Replies
- 41
- Views
- 3K
- Replies
- 5
- Views
- 801
- Replies
- 1
- Views
- 636
GBodyForum is a participant in the Amazon Services LLC Associates Program, an affiliate advertising program designed to provide a means for sites to earn advertising fees by advertising and linking to amazon.com. Amazon, the Amazon logo, AmazonSupply, and the AmazonSupply logo are trademarks of Amazon.com, Inc. or its affiliates.