

Thank you everyone for the replies and suggestions.
I assure you I will be taking each and every one into consideration as I get closer to making it happen. There's been some excellent ideas proposed here, and they're very close along the lines of what I've already been considering.
Thank you David.
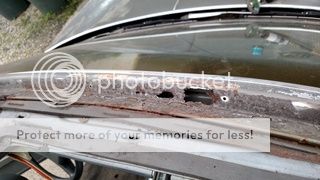
Actually as soon as I saw this additional rust in the windshield channel, I thought of you and your son's car. They seem to have suffered similar issues, with mine not being quite as extensive.
I'm glad to hear you've got a plan and have been making some headway on yours as well. I wish you both the best of luck, be sure to keep us all posted on your progress!
Thank you for the suggestion and support.
That's definitely along the lines of what I've been thinking and considering Jared. That's an excellent suggestion to flange and plug weld or panel bond the pieces. My only stumbling block at this point is exactly where to do it to ensure the distortion is going to be kept to a minimum.
I do believe there is enough room for Clecos in that area, but I'm going to do some more cleanup and grind the moulding clip mounting studs off first to see if I can keep the repair area confined to the channel area. If that's not feasible, I'll look at flanging the replacement and going further back.
Thanks very much for the suggestion, this is quite possibly the direction I'll be going.
Darin, that's awesome sir!
I'm truly humbled that I've inspired you and a few others to tackle these ugly repairs. It's looking like you're off to a great start, I'd love to continue to see your progress as you go.
Thanks very much for the encouragement and faith in my abilities, I really appreciate it.
Thanks Mike.
If you knew me in person, you'd know that I'm not the type of guy to put myself up as something or someone that I'm not. I'm human, I make mistakes and f**k up just like anyone else. To pose as someone that doesn't would be lying first and foremost to myself, never mind to others.
I think it's probably more beneficial for everyone else to see my mistakes, and how they happened. There's no shame in screwing up or admitting to it, in my eyes it's all in how you correct it.
As for as capitalizing on the exclusivity of the 442, as I mentioned earlier, all the 442 specific stuff that made it desirable was already long gone before I got to it.
The 442 badges inside and out, the rallye pac gauges, the 3 spoke steering wheel, and the aluminum 442 wheels, all gone already.
By the time I got to it, it was really only just a black and gold Cutlass with bucket seats and an Olds 350.
Thanks very much Kevin.
I'm not sure I have the current situation fully in hand just yet, but I'm sure working on it.
It was certainly a blessing that the 442 piece was in good shape, I'd shudder to think what I'd do without it...

This is what I'd love to do Quinn, thanks for the suggestion.
Only, there's a couple hitches to that plan:
1) The existing channel is rusty, even on the vertical section. Slipping the new piece in behind kinda defeats the purpose of having good clean metal to work with.
2) We have to consider the moulding mounting studs. Whether I use the old ones or the ones on the new piece, they have to be taken into consideration. I can't see how I'd be able to keep them and overlap the edges that close together. That is, unless the top 1/2" or so of the existing channel is in useable shape. (Which I don't fully know yet, I'm going to have to do some more cleanup there first).
That is, unless I'm missing something that you're thinking of and I'm not...???
Eric, I'll definitely be plug welding the overlapping flanges back together. There will be holes in the new piece from drilling out the old spot welds anyways, so I may as well reuse them as the holes to weld to the underlying flange.
The edges where it meets the "A" pillars will most definitely be welded, no question there.
TBH, I'm not really sure what the condition of that area on the 442 is, I never looked. If you're serious about having me look at it for you, let me know, but it won't be for another couple weeks. I work during regular business hours Monday to Friday, and I have previous commitments next weekend.
Again, thanks to everyone for the ideas and suggestions. It really is appreciated. I still haven't come to a final decision on how I'm going to do this, I want to work on the existing channel a bit more yet to see if it'll help make the decision for me.
Donovan.
I assure you I will be taking each and every one into consideration as I get closer to making it happen. There's been some excellent ideas proposed here, and they're very close along the lines of what I've already been considering.
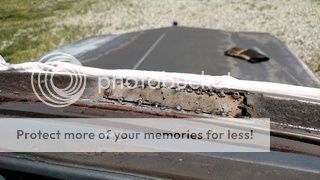
Ughhh...that looks eerily familiar to my roof rot malibu. But not nearly as bad. Good that you found the piece you needed and in great shape. Especially locally. I think you already have a good plan of attack. Removing the spot welds along the channel. Then of course the brass that's melted to the area where skin meets A pillar. On mine, the first replacement skin I had which was easier to work with not on car, I ground along the top of drip rail channel to remove those tiny spot welds and used a cutoff wheel in between the welds to seperate and peel away. In hindsight I wish I would have used my dremel to seperate instead of grinder. It took away a little more than I wanted in a couple places. Those spot welds in the drip rail area are tiny and numerous.
The new replacement whole skin I have I will do the same, a little more carefully, from the underside as if I was sitting in car with it still attached to car. So as not to damage the outer skin. The old skin still on car, well 3/4 of it, will be done from the top to leave the bottom structure intact.
I believe you already have a great plan in your head mr Donovan. You do great work. With great attention to detail. You already did one section across roof that came out great, maybe try that same or similar approach with this section. That was just my .02 cents and ramblings. I am very interested to see what you finally decide to do.
Thank you David.
Actually as soon as I saw this additional rust in the windshield channel, I thought of you and your son's car. They seem to have suffered similar issues, with mine not being quite as extensive.
I'm glad to hear you've got a plan and have been making some headway on yours as well. I wish you both the best of luck, be sure to keep us all posted on your progress!
Thank you for the suggestion and support.
Donovan, I trust your judgement more than my own but if it were me I would cut out onto the car's roof skin the bare minimum and flange the repair piece to slip under it to help minimize distortion. I wonder if you can get the clecos in that area with the roof brace right under it?
That's definitely along the lines of what I've been thinking and considering Jared. That's an excellent suggestion to flange and plug weld or panel bond the pieces. My only stumbling block at this point is exactly where to do it to ensure the distortion is going to be kept to a minimum.
I do believe there is enough room for Clecos in that area, but I'm going to do some more cleanup and grind the moulding clip mounting studs off first to see if I can keep the repair area confined to the channel area. If that's not feasible, I'll look at flanging the replacement and going further back.
Thanks very much for the suggestion, this is quite possibly the direction I'll be going.
glad to see that the windshield setback didn't dampen your determination for long! as always, I'll be looking forward to the way you approach this and how you incorporate the piece.
know that you're helping at least one person learn from this, as it gave me the courage to try this on the chief. At work, when we get a new person on the line, alot of the guys will tell the new guy that the work has to be done a certain way, but I let them know "this is how I do it, you'll find your own way of doing it in time... This is how I feel that you're doing with documenting these repairs-as a guide for us to see, and get it accomplished in our own comfort levels.
it helped me get from this:
to this:
I won't horrify you with pics of my bad welds, but that is now sealed up, and I will move to other spots to do the same...
thanks, and keep the updates and great work coming!
Darin


Darin, that's awesome sir!
I'm truly humbled that I've inspired you and a few others to tackle these ugly repairs. It's looking like you're off to a great start, I'd love to continue to see your progress as you go.
Thanks very much for the encouragement and faith in my abilities, I really appreciate it.
It is nice to see you can admit to failure and share it for the benefit of others, rather than hide it and pretend you are without fault.
Impressive work as always.
I am a bit perplexed why you didn't grab all the 442 parts and flip them (money and space limitations notwithstanding) - I highly doubt there will be repros.
Thanks Mike.
If you knew me in person, you'd know that I'm not the type of guy to put myself up as something or someone that I'm not. I'm human, I make mistakes and f**k up just like anyone else. To pose as someone that doesn't would be lying first and foremost to myself, never mind to others.
I think it's probably more beneficial for everyone else to see my mistakes, and how they happened. There's no shame in screwing up or admitting to it, in my eyes it's all in how you correct it.
As for as capitalizing on the exclusivity of the 442, as I mentioned earlier, all the 442 specific stuff that made it desirable was already long gone before I got to it.
The 442 badges inside and out, the rallye pac gauges, the 3 spoke steering wheel, and the aluminum 442 wheels, all gone already.
By the time I got to it, it was really only just a black and gold Cutlass with bucket seats and an Olds 350.
Sorry to see the set back with the front window channel Donovan...again looks like you've got the solution in hand....great that the 442 channel is a nice one. Carry on my friend!
Thanks very much Kevin.
I'm not sure I have the current situation fully in hand just yet, but I'm sure working on it.
It was certainly a blessing that the 442 piece was in good shape, I'd shudder to think what I'd do without it...
Can you cut the roof at the edge of the window channel and slip this piece in underneath, bond it away from the joint, then weld it in at the edge?
This is what I'd love to do Quinn, thanks for the suggestion.
Only, there's a couple hitches to that plan:
1) The existing channel is rusty, even on the vertical section. Slipping the new piece in behind kinda defeats the purpose of having good clean metal to work with.
2) We have to consider the moulding mounting studs. Whether I use the old ones or the ones on the new piece, they have to be taken into consideration. I can't see how I'd be able to keep them and overlap the edges that close together. That is, unless the top 1/2" or so of the existing channel is in useable shape. (Which I don't fully know yet, I'm going to have to do some more cleanup there first).
That is, unless I'm missing something that you're thinking of and I'm not...???
But I think I would plug weld the pinch weld however you could just bond it all except the ends those I would but up and weld dose that 442 have a good left quarter bottom and trunk floor extension?
Eric, I'll definitely be plug welding the overlapping flanges back together. There will be holes in the new piece from drilling out the old spot welds anyways, so I may as well reuse them as the holes to weld to the underlying flange.
The edges where it meets the "A" pillars will most definitely be welded, no question there.
TBH, I'm not really sure what the condition of that area on the 442 is, I never looked. If you're serious about having me look at it for you, let me know, but it won't be for another couple weeks. I work during regular business hours Monday to Friday, and I have previous commitments next weekend.
Again, thanks to everyone for the ideas and suggestions. It really is appreciated. I still haven't come to a final decision on how I'm going to do this, I want to work on the existing channel a bit more yet to see if it'll help make the decision for me.
Donovan.


