BUILD THREAD Project Olds Cool (Recognition!!)

Rktpwrd

Builder of Cool Shjt
Supporting Member
Feb 2, 2015
4,165
23,911
113
Calgary, Alberta, Canada
With the last bit of structural sheetmetal around the edges finally replaced, it was time to cut the last of the rust out. This is by far the largest piece, it will also be the most critical to get right and time consuming to complete.

I marked off my cut lines with masking tape...

IMG_2874.JPG


... then cut it all out in one shot using mostly the body saw. Damn that's a big hole!

IMG_2875.JPG


I usually prefer to make my patch panels symmetrical and even, but due to the location and pattern of the rust that had occurred, this one ended up looking kinda funny.

I used what was left of the old piece as a template for the new patch...

IMG_2876.JPG


...then put a slight curve in it to match the transition from the sail panel to the quarter panel.
I don't (yet) own a slip roller, so using a little redneck ingenuity, I gradually formed the curve over my largest fire extinguisher:

IMG_2877.JPG


The first test fit in the opening:

IMG_2878.JPG


IMG_2879.JPG


Looks pretty good so far!
I'll do a little more tweaking to it before I start to weld it in, I'm not really happy with the "crease" in it towards the back. It's not really a crease, it just looks like it in the pics. It could use a little more finessing tho.

Mocked back up into the opening again, after sanding off the mill scale and spraying the backside with zinc primer:

IMG_2880.JPG


IMG_2881.JPG


Tomorrow night after work, I'll get back on it, finesse the back a bit more and then start welding it in. It'll be so nice to see this completed, and have no more rust on this side!

Thanks once again for checking back everyone.
:)

Donovan
 
  • Winner
  • Like
Reactions: 10 users

Injectedcutty

G body LS mafia
Nov 24, 2014
6,057
22,808
113
Louisville, KY
Donovan, I've said it before and I'll say it again....you're metal working techniques and skills are top notch! That one piece along the window frame to the quarter has like 4 different angles/curves to replicate which is crazy!
However, you attack each piece with precision, and have a well thought out plan to execute said pieces! There is a part of me that thinks it would be cool to just clearcoat metalwork so everyone could see how repairs were made.

Well done sir, before you know it, olds cool will be finished and back cruising with windows in it again!
 
  • Agree
  • Like
Reactions: 6 users

Texas82GP

Just-a-worm
Apr 3, 2015
7,986
18,691
113
Spring, Texas
Amazing work Donovan. Before you know it, you'll never be able to tell it had the rust issues and wasn't always a hard top car.
 
  • Agree
  • Like
Reactions: 5 users

oldsofb

Royal Smart Person
Supporting Member
Dec 7, 2007
1,382
4,007
113
Maryland
The money shot. All dressed down and cleaned up:

img_2871-jpg.69265
He said "money shot" BOW CHICKA WOW WOW :rofl:

Seriously...Great work. Everything around you is a metal forming tool if you need it to be.

Hutch
 
  • Like
  • Agree
Reactions: 4 users

Rktpwrd

Builder of Cool Shjt
Supporting Member
Feb 2, 2015
4,165
23,911
113
Calgary, Alberta, Canada
Thanks for the replies and encouragement everyone.

So I haven't updated the thread in a few days, but I've still been hard at it. By now, most of you are familiar with the procedures I follow when making, welding in, and finishing out a patch so I don't think it's necessary to go into as much detail on some of this stuff.

In the last update, I had made the final outer quarter panel patch for the driver's side, and was doing the initial test fits. After a little finessing, I was comfortable with the way it was fitting, so I set about tacking it in:

IMG_2882.JPG


The back part of the patch proved to be challenging to get to conform to the required shape, I had to weld, hammer and dolly my way around until everything matched up.

Here I've already fully welded this area, and ground it flush. It turned out really well.

IMG_2883.JPG


After many hours of welding, cooling, and finally grinding, the panel is now permanent. We're now officially rust free on the driver's side!

IMG_2895.JPG


IMG_2896.JPG


Note the low area where the patch meets the sail panel. This is as a result of welding in a patch this large across a mostly flat panel. The welded seam has a tendency to "sink" in an instance like this. I fully expected this to happen, and I wasn't disappointed.

A closer view of the area:

IMG_2897.JPG


Ordinarily, I would hammer and dolly this back flat, and get rid of the sunken area that way, but in this instance, there is zero access to the backside. This is where the UniSpotter will prove invaluable.

Just before shutting things down for the night, I buzzed on a row of studs. Using the slide hammer, I should be able to pull this low area back out and finish grinding the upper welds flush. But that will be tomorrow night's task.

IMG_2898.JPG


IMG_2899.JPG


Continued >>>
 
  • Like
  • Winner
Reactions: 5 users

Rktpwrd

Builder of Cool Shjt
Supporting Member
Feb 2, 2015
4,165
23,911
113
Calgary, Alberta, Canada
In addition to this week's progress, I have further news:

At work recently, the shop was getting ready to replace the windshields in our service trucks. We were encouraged to have whatever windshields replaced in our personal vehicles as well, as the additional quantity would help lower costs. Like buying in bulk if you will.

The windshield in Olds Cool, while crack-free, was far from ideal. The trim at the top didn't sit flush with the glass because when whoever installed it prior to my owning it, had pushed the glass too far down into the urethane at the top.
This had the lovely effect of acting like a scoop, and ramming every bug within a 50 mile radius in underneath the trim.
:doh:

Also, there were a couple of strange pits in the glass in a few spots, they almost looked like spark marks, but bigger and much deeper.
The biggest reason I wanted the windshield replaced however, was because of the antenna.

While it's since been removed when I replaced the engine and transmission, the car had an antenna in the passenger's fender when I bought it.
I've never cared for fender mounted antennae (this one didn't work anyways and looked to maybe be aftermarket), so away it went.

All that left of it now is just the escutcheon:

IMG_2894.JPG


This was the perfect time to upgrade to the windshield with the antenna incorporated into the glass.

I needed to be home this morning for an unrelated reason, so I scheduled the glass guys to come out to my house and R&R the windshield at the same time. The car is tore apart and not technically street legal in its current state (to drive to their shop).
I figured I'd be clever, and have them cut out the back window while they were at it so I could repair the rust above the window.

Here's the guys in action:

IMG_2884.JPG


IMG_2885.JPG


This is where things started to go sideways. They brought out the replacement windshield, but upon holding it up to the car, discovered it was the wrong one. A phone call to their office assured them that they could have the right one here on Tuesday of next week, so they proceeded with cutting it out.

However, just as I was getting home from work tonight, I received a phone call from the glass shop informing me that there wasn't actually one available in the country, and it would have to come up from the US in another two weeks, for an additional $150!
So now my "good deal" on a new windshield is going to run me in the neighbourhood of $4-500.
:wtf:

I'm going to do what I always do tho, and make the best of a bad situation. I'll use the time and the opportunity to clean out the front frame, ensure there's no rust issues there, reseal it with epoxy, and also weld up the corners so the side trim fits a little better before the new one goes back in. If I play my cards right, this should also give me time to repair the rear window rust, and when they come back they can reinstall both at the same time.

So now the old girl is REALLY naked! The only glass in the car now is the side windows.


Some pics:

IMG_2887.JPG


The back glass out, this will make repairing the rust here MUCH easier!

IMG_2888.JPG


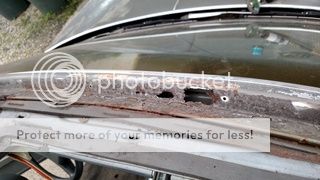
With the glass out, I got my first look at the extent of the damage at the worst spot. It's ugly, but certainly fixable:

IMG_2889.JPG


The front windshield frame doesn't look too bad, a little bit of rust, but it looks to be mainly surface:

IMG_2890.JPG


IMG_2891.JPG


They boogered up the tint job my buddy did on the back window cutting it out, it'll have to go back to him to get cleaned up and redone:

IMG_2892.JPG


It's interesting what you learn when you dig into the history behind these cars. We've already established that it had a fender mounted antenna. Yet once the stainless trim at the base of the windshield was removed, I found this!

IMG_2893.JPG


That's the factory bulkhead connector where the windshield antenna option plugs into! This car should've come with one of the other, but not both.
Score one for the good guys, I don't have to go digging in my parts stash for one!
:)

That's all for now, thanks for looking in on the progress.

Donovan
 
Last edited:
  • Like
  • Winner
Reactions: 6 users

1evilregal

Comic Book Super Hero
Apr 23, 2009
3,056
4,357
113
Greensboro, NC
that hole in the rear glass area looks eerily familiar, just in another location....


the last patch came out really good! hope mine goes half as well!
 
  • Like
  • Agree
Reactions: 1 users

Texas82GP

Just-a-worm
Apr 3, 2015
7,986
18,691
113
Spring, Texas
Awesome work Donovan, as always. Sorry to hear about the bad deal on the windshield but the car will be that much nicer for it.

That's the factory bulkhead connector where the windshield antenna option plugs into! This car should've come with one of the other, but not both.

My car, being a Brougham, came from the factory with a fender mounted power antenna (standard equipment for the Brougham trim level). My car also has the bulkhead connector for the windshield antenna. I was as surprised to find it as you. It looks to me that all of these early cars were setup for the windshield antenna and then some were fitted with the power antenna option. If I was painting my car, I would eliminate the power antenna, but I'm not.
 
  • Like
Reactions: 1 user

Opie Knievel

Rum Fueled Midnight Mechanic and Moderator
Sep 6, 2010
1,512
1,859
113
Brodhead, Kentucky
Things are definitely looking better on the driver's side of the Olds. It really sucks that your "good deal" on the windshield got out of hand like that. I'm curious about what the glass guys thought about Olds Cool and especially the Juggernaut.
 
  • Agree
  • Like
Reactions: 2 users

GBodyForum is a participant in the Amazon Services LLC Associates Program, an affiliate advertising program designed to provide a means for sites to earn advertising fees by advertising and linking to amazon.com. Amazon, the Amazon logo, AmazonSupply, and the AmazonSupply logo are trademarks of Amazon.com, Inc. or its affiliates.

Please support GBodyForum Sponsors

Classic Truck Consoles Dixie Restoration Depot UMI Performance

Contact [email protected] for info on becoming a sponsor