In March there was a discussion here that Cutlass Supremes built for export in the late '70s had rear amber turn signals, as a "see if I can" project -- and as I couldn't find a thread here on that topic -- I started looking-into what would have to be done to add them to my '86 ... and success! Here's an "after" video I finished last night, I still have to edit/post a "before" video -- so non-car-people family & friends can understand the issue -- and finish a write-up for it.
Rear Amber Turn Signals in '86 Cutlass
- Thread starter popeye1978
- Start date
You are using an out of date browser. It may not display this or other websites correctly.
You should upgrade or use an alternative browser.
You should upgrade or use an alternative browser.
- Status
- Not open for further replies.
I always thought brake lights have to be red to be legal here.
Well, it's passed inspection every year for the last 5 years -- including an Enhanced Inspection after the fire -- and this is the first time anyone has said anything about it, but now that you've pointed-it-out I see what you mean. Thank you
That's pretty cool!
I'm guessing they're white bulbs behind the red lens. Try reds.
Thank you!
What if you modified the remaining portion of the reverse light lens to house your amber turn signals so they are more visible.
they only used amber with separated turn signal lenses. Brakes lights are red everywhere.
I write software test procedures for a living so I was most comfortable writing the "how to" as a technical paper ... if you'd like all of this in PDF form -- so you can print it or just ease-of-use -- then send me a PM
Due to character-count restrictions, below is Part 1
INTRODUCTION
STOCK REAR LIGHTING
Rear of ’86 Cutlass Supreme 2-Door has been designed with three types of lights:
GOALS
PROJECT AREAS
There are three “areas” of the project:
CHOICE OF AMBER LIGHTS
I chose to use Switchback LED strips that are wired to use only the yellow LEDs (the white LEDs are not connected to a power source) and then affixed them to the top of the Reverse Lights.
TURN SIGNAL SWITCH
DISCUSSION
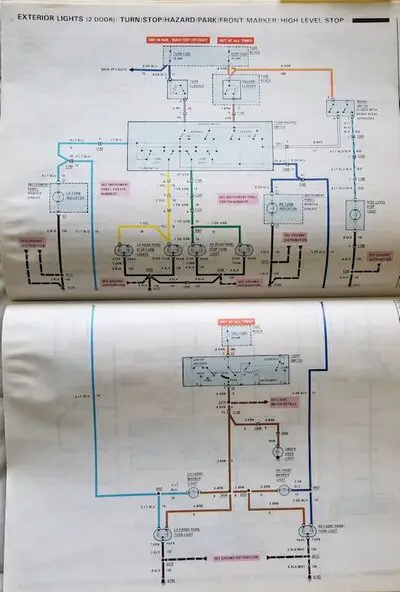
Figure 3.1-1 has the electrical schematic of the Turn Signal Switch (TSS) for the 2-door Cutlass Supreme, taken from the “1986 Oldsmobile Cutlass Supreme / Custom Cruiser Service Manual;” note:
… therefore the solution will have to:

For ideas of how to solve the problem, I had a vague memory there were GM cars in the ‘80s designed with Rear Amber Lights and after some research focused on 1986 Oldsmobile Delta 88s; these vehicles have Rear Amber Lights and as they are the same-year model as my Cutlass Supreme:
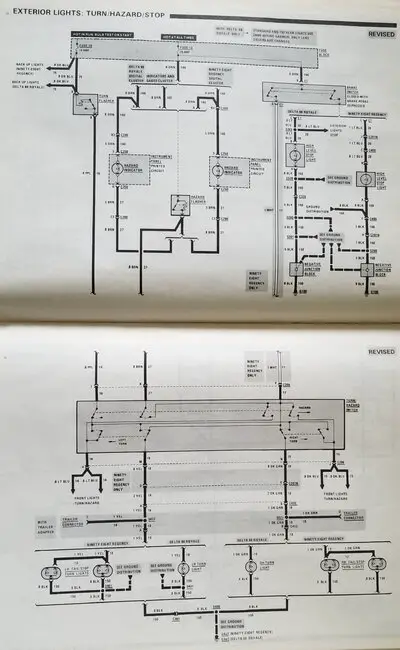
Figure 3.1-2 shows the TSS for the C/H cars, taken from the “1986 Oldsmobile Electrical Troubleshooting Supplement;” note:
… and referring to parts catalogs confirmed the ’86 Cutlass Supremes used the same model TSS as the ’86 Delta 88s.
Figure 3.1-2. C and H Turn/Hazard/Stop Lights
_____
The conceptual solution:
IMPLEMENTATION
Preparation

Figure 3.2-1. As-Bought TSS

Figure 3.2-2. Prep of Step 2.2

Figure 3.2-3. Splice Made & Terminals Mounted

Figure 3.2-4. Adapter Harness

Figure 3.2-5. Electrical Schematic
Due to character-count restrictions, below is Part 1
INTRODUCTION
STOCK REAR LIGHTING
Rear of ’86 Cutlass Supreme 2-Door has been designed with three types of lights:
- License Plate Lights: white, controlled by the headlamp switch
- Reverse Lights: white, controlled by gearshift position (lights ON if gearshift is in “Reverse”)
- Taillights: red dual-filament bulbs (1157)
Filament 1 acts as a marker light and is controlled by the headlamp switch
Filament 2 operates as both turn signal (flashing) and stop lamp (solid), TURN SIGNAL takes precedence over STOP;
EXAMPLE: if braking and signaling left, the Left Taillight will flash while Right Taillight will be solid
EXAMPLE: if braking and signaling left, the Left Taillight will flash while Right Taillight will be solid
GOALS
- Add amber turn signals to rear of the car (Rear Amber Lights)
- Make appropriate modification(s) so in each Taillight Filament 2 operates only as a stop lamp
- If necessary, restoration to Stock [Lighting] Configuration requires minimal effort
PROJECT AREAS
There are three “areas” of the project:
- Choosing Amber Lights
- Turn Signal Switch (TSS)
- Rear Turn Wiring
CHOICE OF AMBER LIGHTS
I chose to use Switchback LED strips that are wired to use only the yellow LEDs (the white LEDs are not connected to a power source) and then affixed them to the top of the Reverse Lights.
Note An idea I was pursuing was to wire the Reverse Lights with switchback LED bulbs; this would have required changing the original 1156 (single-filament) Right-Angle Reverse Light sockets to 1157(double-filament) Right-Angle sockets and wiring the sockets so:
“direction of turn” _____ I also considered somehow modifying the Reverse Light housings – as in taking them apart to do some sort of modification – but I rejected that idea as if I ever again needed to replace the Reverse Lights I would have to repeat the modification and, well, I don’t want to be breaking any during my “experiments” |
TURN SIGNAL SWITCH
DISCUSSION
Figure 3.1-1 has the electrical schematic of the Turn Signal Switch (TSS) for the 2-door Cutlass Supreme, taken from the “1986 Oldsmobile Cutlass Supreme / Custom Cruiser Service Manual;” note:
- TSS has an input from the Brake Switch (white wire)
- TSS has inputs from the Turn Signal Flasher and Hazard Flasher, position of their respective switches determines which lights flash … to include that for the Rear Taillights, “Turn Flash” overrides “[Solid] Brake” overrides “Hazard Flash”
- There is only one output to the Left Taillight (yellow wire)
- There is only one output to the Right Taillight (green wire)
… therefore the solution will have to:
- For the Taillights, “override the overrides”
- Make the Rear Amber Lights work as appropriate

Figure 3.1-1. Cutlass Supreme (2-Dr) Exterior LightsFor ideas of how to solve the problem, I had a vague memory there were GM cars in the ‘80s designed with Rear Amber Lights and after some research focused on 1986 Oldsmobile Delta 88s; these vehicles have Rear Amber Lights and as they are the same-year model as my Cutlass Supreme:
- IF the TSSs were the difference – and thus maybe part of the solution – then it was very likely the Delta 88 TSS would physically fit in my Cutlass Supreme
- High chance that documents & diagrams to be analyzed would be written/depicted in the same editorial style as manuals I already own
- If I would have had to buy additional books (which I did end-up doing) the additions would round-out / look better next to the ’86 manuals I already own
Figure 3.1-2 shows the TSS for the C/H cars, taken from the “1986 Oldsmobile Electrical Troubleshooting Supplement;” note:
- The TSS has the same “overrides” circuitry
- For Delta 88s, the Brake Switch does not connect to the TSS – it goes straight back to the taillights – therefore the overrides are not used in Delta 88s
… and referring to parts catalogs confirmed the ’86 Cutlass Supremes used the same model TSS as the ’86 Delta 88s.
Figure 3.1-2. C and H Turn/Hazard/Stop Lights
_____
The conceptual solution:
- Run two new wires – Left Rear Amber & Right Rear Amber – between the TSS and the (new) Rear Amber Lights
- Connect/splice these wires directly, without passing-through the TSS:
- Brake Switch Output (white wire)
- Left Taillight (yellow wire)
- Right Taillight (green wire)
- Connect the (new) Left Rear Amber & Right Rear Amber wires to the TSS
IMPLEMENTATION
Preparation
- Buy:
- A set of TSS connectors, including wire terminals
- 1 brand-new TSS
- Convert the new TSS into an Adapter Harness; on the new TSS:
- Cut off the assembly that is connected to the steering wheel / turn signal lever
- At the “steering wheel end” of the wires:
- Splice together the white, yellow, and green wires
- Mount a terminal at the end of each of the other wires and arrange them in a female TSS connector in same slots/order as on TSS; think of this as
Connector New Female 2 (NF2) while the other end is Connector New Male 2 (NM2)
- Ensure the new Left Rear Amber and Right Rear Amber wires have been run
- Mount a terminal at the TSS end of each of the (new) Left Rear Amber & Right Rear Amber wires
- Separate the Body Harness/TSS connection, connector designators are:
- Body Harness: Existing Female 1 (EF1)
- TSS: Existing Male 1 (EM1)
- On NF2, insert the Left Rear Amber & Right Rear Amber terminals into the appropriate “Left Rear” & “Right Rear” slots
- Connect EM1 to NF2
- Connect EF1 to NM2
NOTE Adapter Harness is the second/revised idea; original idea was to physically swap terminals in EF1 & use new TSS connectors to make the splice but test fitting found there was not enough slack in the wires to safely remove terminals from the connector |

Figure 3.2-1. As-Bought TSS

Figure 3.2-2. Prep of Step 2.2

Figure 3.2-3. Splice Made & Terminals Mounted

Figure 3.2-4. Adapter Harness

Figure 3.2-5. Electrical Schematic
- Status
- Not open for further replies.
Similar threads
- Replies
- 4
- Views
- 584
- Replies
- 26
- Views
- 2K
- Replies
- 18
- Views
- 1K
GBodyForum is a participant in the Amazon Services LLC Associates Program, an affiliate advertising program designed to provide a means for sites to earn advertising fees by advertising and linking to amazon.com. Amazon, the Amazon logo, AmazonSupply, and the AmazonSupply logo are trademarks of Amazon.com, Inc. or its affiliates.


