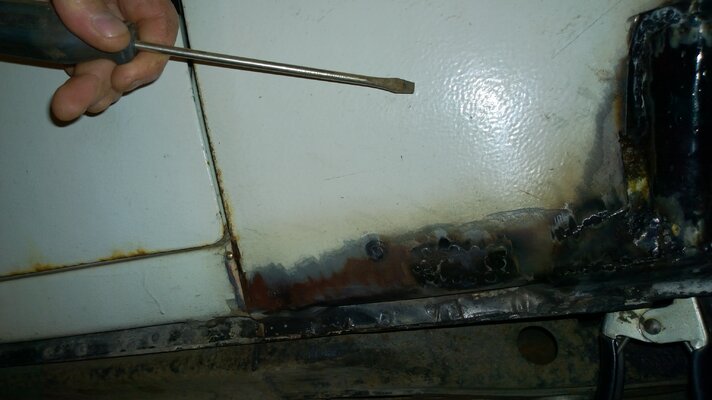
too much heat??

Status
Not open for further replies.

Catmandoo

Not-quite-so-new-guy
Feb 2, 2014
11
0
0
I welded in a small patch on the bottom of the quarter and am planning on building a patch for th area right in front of the wheel opening but I believe I may have gotten a little impatient. I did not leave an expansion gap at the top of the patch when i began welding which may have caused my issue or the fact that i burned through the areas on either end of the patch and then filled them too quickly. The metal around the patch was very thin and I probably should have made the patch larger and cut more material away to begin with but here's my dilemma... the area that the screw driver is pointing to is pulled in or has a shallow dent that I think was caused by me welding the patch in as I never noticed it there before (not that I was looking??). My question is, would it be advisable to make a cut with a 1/8" cut off wheel above the patch and then stitch it back together with the mig to hopefully shrink the area and pull the dent out or am I dreaming?
Thanks in advance
 

Attachments

  • WP_20140202_19_06_31_Pro.jpg
    WP_20140202_19_06_31_Pro.jpg
    1.3 MB · Views: 727

Catmandoo

Not-quite-so-new-guy
Feb 2, 2014
11
0
0
BTW, its an 87 Regal that I've been trying to find a donor quarter for since I bought it last June and have been waiting for the patch panels to be available but decided to build my own for the short term so I can drive it next summer without hanging my head in shame. Hopefully by next winter I can have all the pieces in hand to do a more professional repair. I've been wondering though, is the Oldsmobile patch panel that is available from gbodyparts.com close enough to use on the Buick? I can't tell if the Cutlass ones have the tiny little ridge around the wheel opening that looks like it will be so difficult to reproduce.
 

FE3X CLONE

Comic Book Super Hero
Dec 2, 2009
2,714
47
48
Ohio
I had the same thing happen to me when I shaved the door handles. While tacking the filler metal in it put a 6-8" vertical crease in the door directly below the door handle area.
On the other side I went a lot more slowly and kept an air gun on my air line to cool the weld and surrounding metal down after tacking. Still didn't help any and I ended up with the same crease.

To fix it I borrowed a dent pulling stud gun from a friend and pulled the metal back out as well as close to original as possible and then block sanded the doors probably 3-4 times. Then my neighbor block sanded them again 4-5 times.
 

Fox80

G-Body Guru
Jun 27, 2013
563
4
16
Jamestown NY
Get a shrinking tip for your mig welder, when you get the metal to hot it expands and creates a dent or a high spot, the only way to reverse it without a gallon of body man in a can is to shrink the metal back. This is however a very tedious task that can cause even more damage if you don't know what your doing. I can't stress this enough to the shade tree body guy, glue your patches on with 3-M panel adhesive. Mig welding thin metal takes years of experience, even then some "body guys" never get it
 

pontiacgp

blank
Mar 31, 2006
29,270
20,391
113
Kitchener, Ontario
we use a wet cold rag to place on the weld. It'll shrink the metal. Also we just tack it from side to side to the metal won't overheat in one spot
 

Catmandoo

Not-quite-so-new-guy
Feb 2, 2014
11
0
0
Now that is some good advice all around, especially the panel bond and shrinking tip information. I knew from past experience of the expansion issue, I just never guessed such a small patch would be an issue. So, by the way I'm thinking, the area that needs to b shrunk is just above and maybe in front of my patch. I'm going to order a shrinking tip if it'll fit my miller 211 but as an option can I make a horizontal cut above my patch extended to the left a bit and stitch it back up quenching with a wet rag after every stitch? This is a bit unfortunate but I plan on redoing this later so I may as well learn from the experience.
thanks for the responses!
 

Catmandoo

Not-quite-so-new-guy
Feb 2, 2014
11
0
0
So turns out the area was actually shrunk too much, I made a horizontal cut on top of my previous weld and the area above came right back where it needed to. Then before I realized the error of my ways, I tacked it back together in a couple of places and immediately quenched my welds and it really shrunk it. So I'm still screwing with it, its been cut and welded a few times now and it's still not perfect but it's not bad. I think I could remedy it easily if I could get a dolly on the back side of my weld and stretch it with the hammer and dolly method. I'm in strategy mode again and may modify one of my dollies to fit. Seems like best course of action at this point
 

Catmandoo

Not-quite-so-new-guy
Feb 2, 2014
11
0
0
The hammer and dolly stretch worked like it should have. And of course the patch panels became available shortly after I had paint on it. Now I'm dealing with another rusted through area at the base of my A pillar
 
Status
Not open for further replies.

GBodyForum is a participant in the Amazon Services LLC Associates Program, an affiliate advertising program designed to provide a means for sites to earn advertising fees by advertising and linking to amazon.com. Amazon, the Amazon logo, AmazonSupply, and the AmazonSupply logo are trademarks of Amazon.com, Inc. or its affiliates.

Please support GBodyForum Sponsors

Classic Truck Consoles Dixie Restoration Depot UMI Performance

Contact [email protected] for info on becoming a sponsor