

What Did You Do To Your G-Body Today? [2022]
- Thread starter bruisedbanana79
- Start date
You are using an out of date browser. It may not display this or other websites correctly.
You should upgrade or use an alternative browser.
You should upgrade or use an alternative browser.
- Status
- Not open for further replies.
Finished the last amount of dolly over to get the door skin located as well as the rose tacks for the front seam. Went back and cleaned up some of the higher/nastier examples to get them down to the height of the skin metal.
Took a peak at the hinges yesterday and discovered a few issues with the pins and bushings. Pulled them both apart and replaced the bushings in the upper or spring loaded unit and both the bushings and pin in the lower. Did not have to over bore or up-bush either hinge which was useful. Somewhere I have a tote box full of cores to work with, just not sure where it is right now. When I had issues with the S-10 and had to do its door pins, I picked up a spring clamping tool from Napa, sort of looks like the valve installation tool for a flathead, that reaches in and grabs the spring using a pair of two fingered forks and then uses a screw jack nut that is driven by a wrench to close up. A few turns and the pressure is off the spring and it can be slipped out and set gently aside. Do the repairs, reset the pin, and gently ease the spring back in a slowly releast the clamp. Beats trying it with a large screwdriver and offering copious prayers that the spring does not slip and try to take your teeth out!
Slid under the frame yesterday and applied a coat of the Rust Check Rust encapsulator over the coat of Sem Rust Mort that I laid on during the Thursday work day. Decided to let it all harden and cure so today was a non foo-foo day. Think my lungs appreciated the break.
Nick

Be Kind to your Lungs Day got an extra day of kindness as a fast check of my paint inventory revealed that at some point I had used up all the frame paint and had not gotten around to restocking it. Made a fast run this morning about lunch time and found the top coat but had no luck with the intermediate product. Both stores that might carry it were closed today, so go figure.
Did take a few minutes to dig into the exhaust bits box and retrieve a new set of pipe hangers, plus two pieces of perf strip. Disassembled the old hangers, harvested the upper tabs, and replaced the intermediate extensions with new longer ones as the new hangers were shorter in overall length. Decided on a whim to make the new extensions as pairs and sandwiched the upper tab and the new hanger between them. Looks a little more professional than just a couple of straps rube-goldberged together and hung from the upper spring pocket.
Lack of inventory in the paint department may have been a blessing of sorts as it is too cold to shoot the next coat; rained all morning and there was localized flooding in some areas of the city. My nearby river is up to the point where the water actually touches the caution strips on the bridge abutments.
Nick
Hung the new mufflers.
Still need my hangers to arrive so I can mount them properly. So much better.
These Amazon Super 10 knockoffs were great to get it together on the cheap. Just not for something you actually want to drive over 2000 RPM.

I tired to take some video with my GoPro Hero 2 relic, but the Audio at Idle is too blown out on my old Mic. so not worth editing or posting.
Still need my hangers to arrive so I can mount them properly. So much better.
These Amazon Super 10 knockoffs were great to get it together on the cheap. Just not for something you actually want to drive over 2000 RPM.
I tired to take some video with my GoPro Hero 2 relic, but the Audio at Idle is too blown out on my old Mic. so not worth editing or posting.
idk if I've mentioned it before, but in 2000 my car was hit pretty hard. hard enough to crush the driver's rear outer wheelhouse and necessitate an entire new driver rear 1/4. I guess that also damaged the trunk latch, because it was selftapped in. It ended up pulling the screws through the thin metal, so I welded it back to the body, with one new self tapper for insurance against my terrible flux core welds on that very thin metal. I can pull the car up and down by the latch, so it's good enough for me.
I also messed with the cruise control more and hooked it to the carb, and I guess the ecm does have some play in how it works in the 84-88 cars. I still have to figure out how to make all that play nice without an ECM, or cobble something together with an aftermarket kit using the factory stalk controls.


Also washed the gravel dust off and removed the vinyl top trim. I may put a half top back on, i may not.
I added flaps in my 4th gen camaro fan shroud to aid in the overheating problem above 65mph, it has gone from 220-230 at 75+mph (goes back down under 65mph) to a steady 200-205 at 3500rpm at 75mph highway speed. I used push clips from a harbor freight clip kit and some foam drawer liner. Eventually I'll get 1/16th rubber for it when those inevitably disintegrate. I may make them bigger soon and see if that helps more. If i can get it to stay under 200 on even a 100f iowa day on the highway once it's good and heat soaked, that will be a win.

Lastly, I drilled a hole and ziptied the goddamnmotherf*cking hood latch cable to it because it kept popping out of the thing requiring me to take the grille out to access the 13mm latch bolts.

I also messed with the cruise control more and hooked it to the carb, and I guess the ecm does have some play in how it works in the 84-88 cars. I still have to figure out how to make all that play nice without an ECM, or cobble something together with an aftermarket kit using the factory stalk controls.
Also washed the gravel dust off and removed the vinyl top trim. I may put a half top back on, i may not.
I added flaps in my 4th gen camaro fan shroud to aid in the overheating problem above 65mph, it has gone from 220-230 at 75+mph (goes back down under 65mph) to a steady 200-205 at 3500rpm at 75mph highway speed. I used push clips from a harbor freight clip kit and some foam drawer liner. Eventually I'll get 1/16th rubber for it when those inevitably disintegrate. I may make them bigger soon and see if that helps more. If i can get it to stay under 200 on even a 100f iowa day on the highway once it's good and heat soaked, that will be a win.
Lastly, I drilled a hole and ziptied the goddamnmotherf*cking hood latch cable to it because it kept popping out of the thing requiring me to take the grille out to access the 13mm latch bolts.
A thought on the cruise control might be to locate and sub in an older version that does not take its cues from the EEE/CCC/ECm/? "it's not a computer" module. Thinking from around 79-80 or in there as a possibility.
So spent this AM running errands and using the run time to apply more tweaking to the Fi Tech control module. The IAC is still way too high in count and takes forever to drop to where the motor can be shut off without it wanting to diesel. Got it down to a better place but still need to pull some more out of it.
With the humidex added in, this PM was over a 100 degrees, which made it a perfect time to slide back under the Monte and apply the last coat of paint, this time the Duplicolor semi-flat top coat. Pulled the shot in about a 1/2 hour and got out just in time to watch the condensation form on my concrete floor from the air being so humid and the floor being just cold enough. Did not matter to the paint as it flashed about as fast as I could shoot it.
It also worked great for the minor amount of skin filler that I elected to apply to the inner door skin. This was probably vanity on my part as most of that section of sheet metal is not likely to get visited; still it give me a better finished look and that appeals to me. Used a metal to metal aluminum powder based filler by Evercoat and had it harden inside of an hour even with me being stingy on the catalyser/hardener. Got it to the point where I could sand on it without the material tearing and from there it was just a lot of block sanding until my fingers told me to be happy. After that it was another application of primer and let the whole thing dry. In this case it will be overnight. Once the shop gets hot in the late afternoon it is time to quit for the day. The concrete will pull coolness from the ground and act as a poor man's A/C.
Tomorrow, if I like what i see, then it will be time to jamb the door ends with the final color along with touching up the paint on the inner door skin, and then I can hang the door.
At this point, Thursday and Friday are write offs as I received a call in warning for this week over a week ago. I'm in for the balance of the month so at least i can bank a few bucks after the (insert choice of appropriate epithet describing the miscreants from the IRS here) abscond with their unfair share.
Nick
With some good advice from Gbody folks, I got my seats and console installed and operating. I only have to get the cable hooked up to the transmission and it is completely done. While I am under I will give it a once over. So all in all it took 4 fullish days to get the bench seat and carpet out and remove the insulation, then reinstall new insulation and measure for the console and shifter holes, and modify the brackets so the seats fit, and wire the drivers seat for power. If I were a welder it may have been a day shorter. Here are the pics. When I bought this El Camino it was dull weathered white with the saddle brown interior. I hope soon to get it out of the garage and into the muffler shop for some custom work and then it is back on the swapmeet circuits.
Attachments
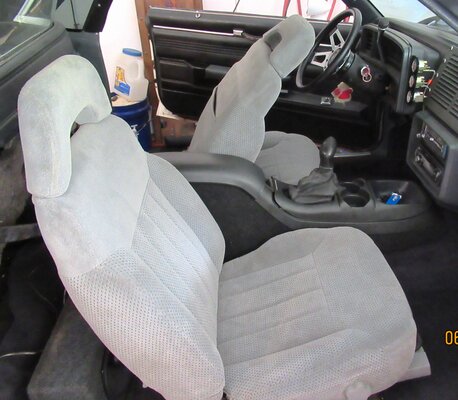
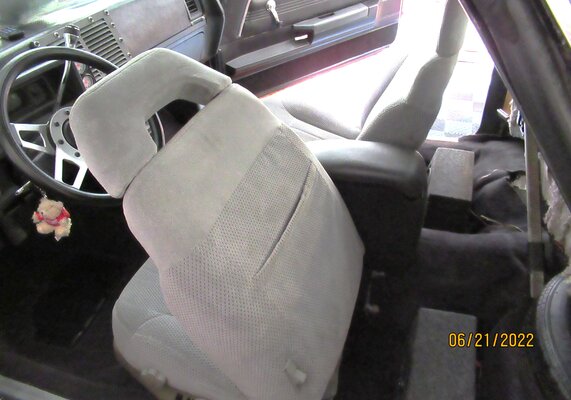
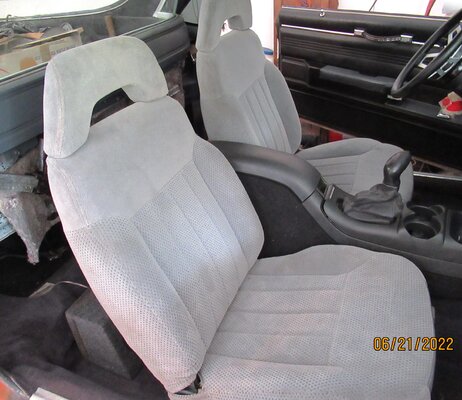
Nice job! I can't wait to start mine.With some good advice from Gbody folks, I got my seats and console installed and operating. I only have to get the cable hooked up to the transmission and it is completely done. While I am under I will give it a once over. So all in all it took 4 fullish days to get the bench seat and carpet out and remove the insulation, then reinstall new insulation and measure for the console and shifter holes, and modify the brackets so the seats fit, and wire the drivers seat for power. If I were a welder it may have been a day shorter. Here are the pics. When I bought this El Camino it was dull weathered white with the saddle brown interior. I hope soon to get it out of the garage and into the muffler shop for some custom work and then it is back on the swapmeet circuits.
To hook your power, did you only need to run a power wire to the seat and ground it?
I ran a 12 gauge wire to the fuse box, an Ignition plug-in with a 30A fuse inline, then grounded it to the mount where there was already a ground...cleaned it and got to bare metal. I amunsure whether the inline fuse is necessary, but seemed like a hot wire should be fused. I don't know whether a circuit breaker would have been better but if so, it is extremely easy to get toNice job! I can't wait to start mine.
To hook your power, did you only need to run a power wire to the seat and ground it?
I ran a 12 gauge wire to the fuse box, an Ignition plug-in with a 30A fuse inline, then grounded it to the mount where there was already a ground...cleaned it and got to bare metal. I am unsure whether the inline fuse is necessary, but seemed like a hot wire should be fused. I don't know whether a circuit breaker would have been better but if so, it is extremely easy to get to
- Status
- Not open for further replies.
Similar threads
- Replies
- 54
- Views
- 4K
- Replies
- 64
- Views
- 5K
- Replies
- 7
- Views
- 2K
GBodyForum is a participant in the Amazon Services LLC Associates Program, an affiliate advertising program designed to provide a means for sites to earn advertising fees by advertising and linking to amazon.com. Amazon, the Amazon logo, AmazonSupply, and the AmazonSupply logo are trademarks of Amazon.com, Inc. or its affiliates.