the engine wants to run after shutting key off...

Thanks. I'm still relatively new at this.
Well... allow me to help and get you started in the right direction.

Regardless if you bought the carb new or used... to set it back to basic, you will have pull the carburetor off the engine, but before you do, make sure the float bowls are adjusted correctly, and be sure to cover the carb/intake opening afterwards so nothing drops in by accident.

Hang the carb upside down to drain the fuel through the vents, save it for later to resuse pouring the fuel back in through the front vent, now loosen the electric choke cover with its three screws and turn it clockwise so the choke flap is open 100% on its own, then tighten the screws to hold it in place, theres a line scribed on the cap so you can line it back up where it was factory set with the center line on the choke cover housing for later.

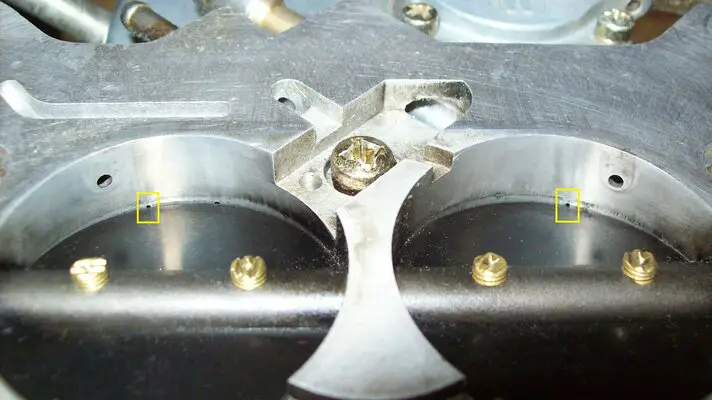
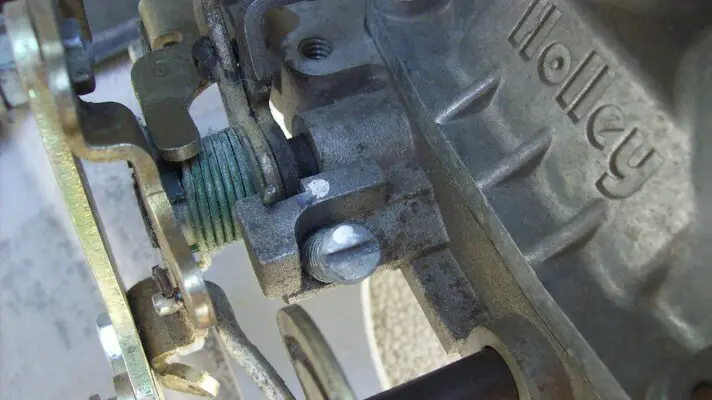
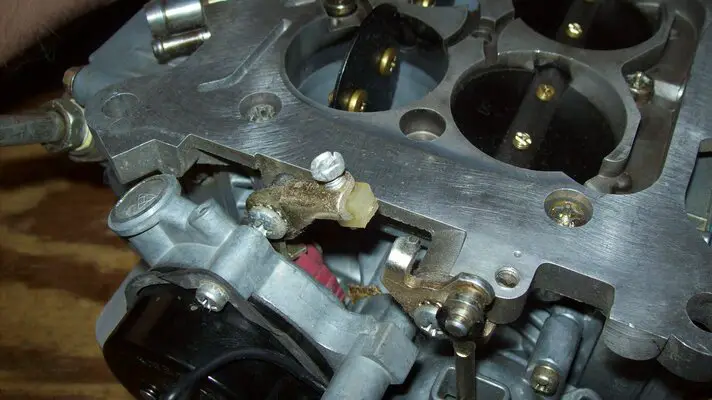
Back off the idle screw enough so that the primary throttle blades are closed completely, flip the carburetor upside down and slowly turn the idle screw in so that the transfer slots are showing and shaped like a small square(pic1). That should be roughly .020 in size, use a feeler guage to check, thats the starting point, one thing i like to do is mark the throttle screw and the small pad(pic2), i used a paint pen to indicate my starting point when adjusting the RPM when the engine is running.

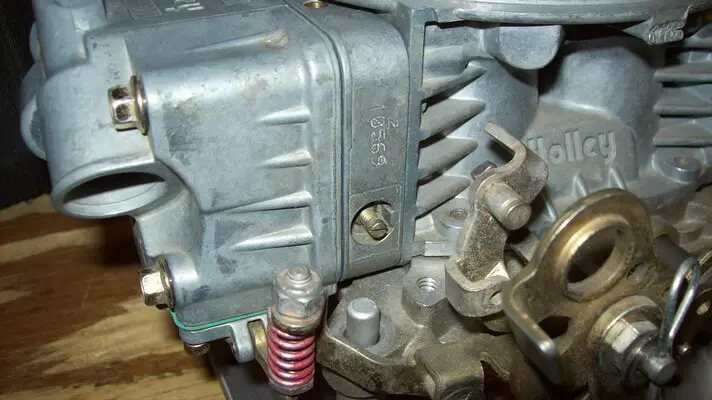
Now its time to adjust the idle mixture screws(pic3), since you have the newer and fancier version of the holley 670 avenger, you have four of them, two for the primary side and two for the secoday side, turn them all in, gently till they bottom out, now turn them all out 1 1/2 turns as a starting point, just remember when adjusting them with the engine running, use a vacuum guage to acheive the highest/steady idle, all four will need to be adjusted with the same amount of turns to equalize the front and rear fuel feed.

Every 1/4 turn of the idle screw seems to be roughly .010 in adjustment, i've used a feeler guage to confirm this myself, and from what i've read online, .060 would be max, that would be equal to one full turn of the idle screw from the .020 starting point, but for mild engines like yours and mine, we shouldnt be go anywhere near that point, my ZZ4 roller cam is 208/221 with good idle vacuum characteristics for power brakes, i get a solid 17"(park) and 14"(drive) @ 800rpm. Since you have vacuum secondaries, theres no need to mess with that part, leaving it factory set.

Now, with no other changes, put the carburetor back on the engine, making sure all vacuum lines are pluged, be sure to reconnect the PCV and power break booster lines to the carb, or however you had them connected before, and leave the distributor vacuum advance can disconnected. Put gas back in the carburetor, start the engine up, see where it idles right off the bat, raise the idle some if you have to, but i strongly recommend marking the idle screw location relative to the carb body before adjusting so you can keep that minimum .020 transfer slot opening set. Let the engine warm up and get to operating temp(160-180), hopefully you have working watertemp/oilpressure and rpm guages to help you, a seperate hand held vacuum guage connected to a full vacuum port on the carb or a port on the intake will be needed.

With the engine is running, loosen the distributor hold down clamp a tiny bit at a time till you can barely turn the distributor by its cap, just enough to keep things safe. Chevrloet distributors run clockwise, so you will have to turn it counter cloclwise to advance it, clockwise to retard the timing. Make sure your balancer is marked and timing tab are both easily read with the timing light, start off with 12degress, keep in mind that anytime you advanvce the timing, the engine idle rpm will rise a little, but no worries, thats what the carb idle screw is for. Adjust the timing to 12degrees to start with and see where your idle rpm is at, your shooting for 800, if the rpm is lower, adjust the carb idle screw and raise it, keeping in mind how far you have moved it, now bump the timing to 14degress, again, adjust the carb idle screw to shoot for 800rpm.

When you have finally acheived your goal with 12-14 degree initial timing @ 800rpm and everything sounds good, now its time to tighten down the distributor hold down clamp, the transfer slots should still be within spec(.020-.060) due to prior idle rpm adjustments, so your idle mixture screws should still be functional. With the engine still running, now its time to use that hand held vacuum guage hooked up to a full time vacuum port to adjust the idle mixture screws, be sure to adjust one at a time, and remember, you are already at 1 1/2 turns out and the engine should be running well at this point. With a small blade screw driver, adjust the primary side screws first, while watching the vacuum gauge, turn the screw in 1/8th of a turn inward and wait a few seconds, the engine idle will either go up or down along with the vacuum. Your looking for the highest vacuum reading at idle, if the vacuum reading stays the same after turning it 1/8th of a turn inwards and no changes, go the opposite direction 1/8th turn outwards and see if there is any change, if there is any changes, go back in the opposite direction 1/8th of turn at a time till the vacuum improves, do the same to the other three idle mixture screws. One thing i will note, whatever idle mixture screw gave you the best vacuum reading, make the other three are exactly the same amount of turns and you should be set.

Now that the initial timing is set, the idle mixtures screws are set, hopefully to your satisfaction, is the idle of the engine at 800rpm, if not, adjust it and again, make sure your float bowl levels are set correctly, the fuel level should be halfway up the sight glass front and rear, but i would advise setting that first before anything else. and that should be it, now reconect your distributor vacuum advance can to ported vacuum on the carb.

Keep in mind, all that i have written here is not set in carbonite, this is has been my way of working with engines using carburetors, and it has worked well for me from past experience over the years. I know others here have their own ways of doing things, so please, if i had missed anything or something need correcting, feel free, we all make mistakes from time to time or forget things, ie, getting old, as if any of us can escape that dreadful fact.

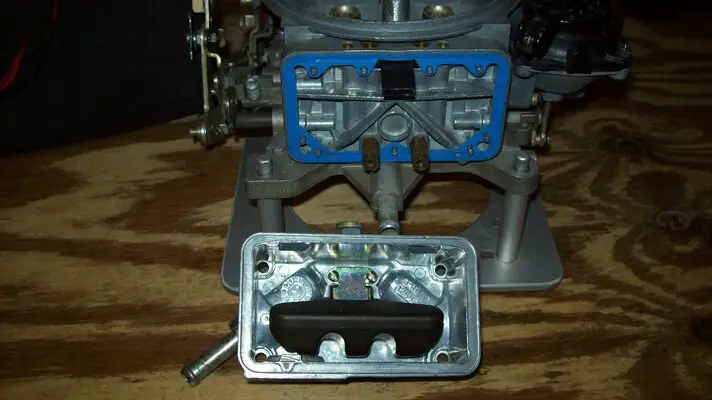
In additing to your brawler 670, i'd like to make a suggestion or two.... 1. Jet extentions/notched float(pic4), for those WOT moments so you dont starve for fuel on the secondary side, 2. adjusting the fast idle cam screw(pic5), its factory set to 1500rpm when the choke is in use, better for flat tappet when cold, i dont see the need to be that high IMO for roller cam, turn it out 1/4 turn at a time to lower the rpm your comfortable with.

Pictures courtesy of my very ow Holley 770 Street Avenger.
 

Attachments

  • setting 1.JPG
    setting 1.JPG
    359.2 KB · Views: 9
  • setting 2.JPG
    setting 2.JPG
    330.5 KB · Views: 8
  • setting 3.JPG
    setting 3.JPG
    398.2 KB · Views: 10
  • advice 1.JPG
    advice 1.JPG
    277.1 KB · Views: 9
  • advice 2.JPG
    advice 2.JPG
    389.7 KB · Views: 9
Well... allow me to help and get you started in the right direction.

Regardless if you bought the carb new or used... to set it back to basic, you will have pull the carburetor off the engine, but before you do, make sure the float bowls are adjusted correctly, and be sure to cover the carb/intake opening afterwards so nothing drops in by accident.

Hang the carb upside down to drain the fuel through the vents, save it for later to resuse pouring the fuel back in through the front vent, now loosen the electric choke cover with its three screws and turn it clockwise so the choke flap is open 100% on its own, then tighten the screws to hold it in place, theres a line scribed on the cap so you can line it back up where it was factory set with the center line on the choke cover housing for later.

Back off the idle screw enough so that the primary throttle blades are closed completely, flip the carburetor upside down and slowly turn the idle screw in so that the transfer slots are showing and shaped like a small square(pic1). That should be roughly .020 in size, use a feeler guage to check, thats the starting point, one thing i like to do is mark the throttle screw and the small pad(pic2), i used a paint pen to indicate my starting point when adjusting the RPM when the engine is running.

Now its time to adjust the idle mixture screws(pic3), since you have the newer and fancier version of the holley 670 avenger, you have four of them, two for the primary side and two for the secoday side, turn them all in, gently till they bottom out, now turn them all out 1 1/2 turns as a starting point, just remember when adjusting them with the engine running, use a vacuum guage to acheive the highest/steady idle, all four will need to be adjusted with the same amount of turns to equalize the front and rear fuel feed.

Every 1/4 turn of the idle screw seems to be roughly .010 in adjustment, i've used a feeler guage to confirm this myself, and from what i've read online, .060 would be max, that would be equal to one full turn of the idle screw from the .020 starting point, but for mild engines like yours and mine, we shouldnt be go anywhere near that point, my ZZ4 roller cam is 208/221 with good idle vacuum characteristics for power brakes, i get a solid 17"(park) and 14"(drive) @ 800rpm. Since you have vacuum secondaries, theres no need to mess with that part, leaving it factory set.

Now, with no other changes, put the carburetor back on the engine, making sure all vacuum lines are pluged, be sure to reconnect the PCV and power break booster lines to the carb, or however you had them connected before, and leave the distributor vacuum advance can disconnected. Put gas back in the carburetor, start the engine up, see where it idles right off the bat, raise the idle some if you have to, but i strongly recommend marking the idle screw location relative to the carb body before adjusting so you can keep that minimum .020 transfer slot opening set. Let the engine warm up and get to operating temp(160-180), hopefully you have working watertemp/oilpressure and rpm guages to help you, a seperate hand held vacuum guage connected to a full vacuum port on the carb or a port on the intake will be needed.

With the engine is running, loosen the distributor hold down clamp a tiny bit at a time till you can barely turn the distributor by its cap, just enough to keep things safe. Chevrloet distributors run clockwise, so you will have to turn it counter cloclwise to advance it, clockwise to retard the timing. Make sure your balancer is marked and timing tab are both easily read with the timing light, start off with 12degress, keep in mind that anytime you advanvce the timing, the engine idle rpm will rise a little, but no worries, thats what the carb idle screw is for. Adjust the timing to 12degrees to start with and see where your idle rpm is at, your shooting for 800, if the rpm is lower, adjust the carb idle screw and raise it, keeping in mind how far you have moved it, now bump the timing to 14degress, again, adjust the carb idle screw to shoot for 800rpm.

When you have finally acheived your goal with 12-14 degree initial timing @ 800rpm and everything sounds good, now its time to tighten down the distributor hold down clamp, the transfer slots should still be within spec(.020-.060) due to prior idle rpm adjustments, so your idle mixture screws should still be functional. With the engine still running, now its time to use that hand held vacuum guage hooked up to a full time vacuum port to adjust the idle mixture screws, be sure to adjust one at a time, and remember, you are already at 1 1/2 turns out and the engine should be running well at this point. With a small blade screw driver, adjust the primary side screws first, while watching the vacuum gauge, turn the screw in 1/8th of a turn inward and wait a few seconds, the engine idle will either go up or down along with the vacuum. Your looking for the highest vacuum reading at idle, if the vacuum reading stays the same after turning it 1/8th of a turn inwards and no changes, go the opposite direction 1/8th turn outwards and see if there is any change, if there is any changes, go back in the opposite direction 1/8th of turn at a time till the vacuum improves, do the same to the other three idle mixture screws. One thing i will note, whatever idle mixture screw gave you the best vacuum reading, make the other three are exactly the same amount of turns and you should be set.

Now that the initial timing is set, the idle mixtures screws are set, hopefully to your satisfaction, is the idle of the engine at 800rpm, if not, adjust it and again, make sure your float bowl levels are set correctly, the fuel level should be halfway up the sight glass front and rear, but i would advise setting that first before anything else. and that should be it, now reconect your distributor vacuum advance can to ported vacuum on the carb.

Keep in mind, all that i have written here is not set in carbonite, this is has been my way of working with engines using carburetors, and it has worked well for me from past experience over the years. I know others here have their own ways of doing things, so please, if i had missed anything or something need correcting, feel free, we all make mistakes from time to time or forget things, ie, getting old, as if any of us can escape that dreadful fact.

In additing to your brawler 670, i'd like to make a suggestion or two.... 1. Jet extentions/notched float(pic4), for those WOT moments so you dont starve for fuel on the secondary side, 2. adjusting the fast idle cam screw(pic5), its factory set to 1500rpm when the choke is in use, better for flat tappet when cold, i dont see the need to be that high IMO for roller cam, turn it out 1/4 turn at a time to lower the rpm your comfortable with.

Pictures courtesy of my very ow Holley 770 Street Avenger.
Wow! Thanks for taking the time. That's a lot of info.
 
I think we discussed in previous posts a few months back... What's your static CR? What's your base timing? If your are using the vacuum advance, is it plugged into timed vacuum or manifold vacuum?

Big question is; when the key was rotated to "OFF", did it "run-on", "flutter" and die after a few seconds, or did it just keep running exactly as if the key was still turned to "ON".
 
Wow! Thanks for taking the time. That's a lot of info.
No problem, glad to help..... hopefully it works out for you.

Keep in mind that the carburetor you have is no ordinary peice.... it has adjustable idle and high speed air bleeds at the top of the main body that are replaceable, which allows you to tune your fuel curve for the engine, a four corner idle adjustment system, meaning you have idle mixture screws on both front and rear metering blocks, and i do beleive those metering blocks are adjustable as well, they have replaceable idle feed resrictors(IFR) and powervalve channel restrictors(PVCR), but dont quote me on that untill you remove the metering blocks to see for yourself. Seen a guy on YT take apart his brawler carburetor similar to yours and for sure saw the adjustable IFRs and i think also the PVCRs, but he still had a powervalve still installed, the standard holley carburetors are none adjustable, but they can be made adjustable with a few simple hand tools, your carb is way out of my league, if you would like to get into more details, either google for it or perhaps others here can help you, im just used to the regular holley carbs.

One other suggestion i forgot to mention in my last post.... according to the holley website specs, you should have "70" jets in the primary side and "74" jets in the secondary side, thats a bit lean if you decide to go WOT after setting everything things up correctly, i would go with "76" to "78" for the secondary side, its better to be on the rich side than be lean when floggin that pedal, and also get yourself an AFR wideband meter, it will help imensely when tuning that carburetor to your particular engine, its 99% effective, but its better than 100% guessing without one.

Ps - Of course if you decide to go EFI one day, all the forementioned help given prior is null and void, the ECM and the asscoiated sensors takes all the guess work out regardless of elevation, and weather conditions, carburetors can be tuned absolutely perfect one day, then be somewhat of a nightmare the next.
 
  • Like
Reactions: rogus

GBodyForum is a participant in the Amazon Services LLC Associates Program, an affiliate advertising program designed to provide a means for sites to earn advertising fees by advertising and linking to amazon.com. Amazon, the Amazon logo, AmazonSupply, and the AmazonSupply logo are trademarks of Amazon.com, Inc. or its affiliates.

Please support GBodyForum Sponsors

Classic Truck Consoles Dixie Restoration Depot UMI Performance

Contact [email protected] for info on becoming a sponsor