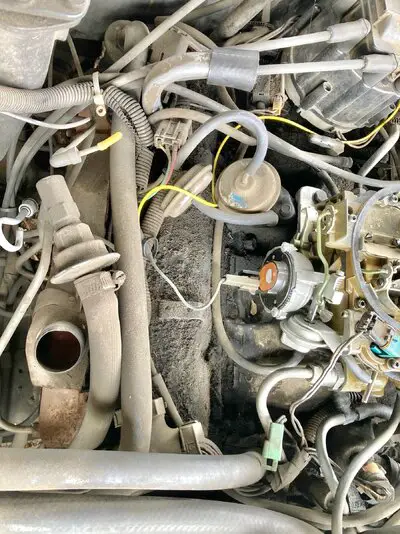
Valve Cover -- Left (passenger) side...yikes!

DWCaprice2017

Apprentice
Oct 25, 2019
55
25
18
58
Hi, All!
Daniel here with the '84 Caprice, 305.
It looks like there were three things causing smoke/burning smells in the engine:
A ground wire attached to the rear of the engine--the insulation was burning; the leaking
heater control valve, and finally the seeping oil from Valve Cover Gasket onto the exhaust
manifold.
Some years ago I "easily" replaced the right side...knowing that the left side had to be
done eventually.
The time has come!
As you can see in the photo, it's a mess in there!
I know I'll have to remove some or all of the air pump hoses that's over the Cover, pull off the
distributor ends of the spark plug wires--labeling their positions, and I'll also have to CAREFULLY
separate several wiring harness connectors. It's that part that I'm the most afraid about doing,
with the connectors being 40-years old!
Prior to doing this, I will be taking extensive photos for reference to know how it all goes
together.
Here's the question:
Does anyone have advice on what I'll need to look out for and anything I can do to reduce
the chance of breaking those connectors?
 

Attachments

  • Caprice Left Side of Engine.jpeg
    Caprice Left Side of Engine.jpeg
    644.2 KB · Views: 7
Sounds like you've got all the bases covered with taking lots of well lit pics as thing's will look different after they've been handled some & moved around. thing's get brittle after year's of heat cycles underhood so there's not much you can do about that,I have no doubt you're gonna take your time to minimize any breakage.
 
I think you've got a solid plan, know what you're in for, and I wish you luck and have faith that you'll accomplish this goal without too much trouble. Brittle plastic has no solution but perhaps a bit of spray lube would help break the bond between the clips. You can clean it afterwards.
 
Take your time, take lots of pictures and label where you remove wires from. I've done valve cover gaskets on my 88 Super Sport and an 86 El Camino years ago. Removing the alternator, heater hoses going to the front of the engine as well as the EGR from the intake made access to the valve cover much simpler. Most of the wires will come apart with a little persuasion and a small flat blade screw driver, some may have enough slack to move out of the way once the holding clips are released. Plastic vacuum lines may be brittle so plan to replace them with rubber line.
Just my suggestions.
This is an excellent tip sheet I will add to it in a couple ways ! Ok use some cord to tie wires or removed hoses to one side. You may wrap sheet plastic under the loom as it will decidedly make crumbs it will not stop the tie up suggestion at all .I'm going to say the neoprene ( black rubber) gaskets last longer seal better and need less tightening then the cork/ Vinton gaskets do , fel pro being the better gaskets brand .Having not the fel pro type ? then possibly smear a thin layer of grey untra gasket silicon ( ultra) on the gasket surface it helps to keep it stuck ti the cover pan surface while you shimmy twist the pan over the rockers and past wires . Clean the surface well with gas or even acetone or carb cleaner get te head surface squeaky dry .if you gasket has 4 holes on one side and 2 on the opposite I put the 4 hole side up towards the intake. Snug the 4 bolts down and be prepared to re-tighten"them after say 50 miles as they will settle onto the head .Failng to retighten them or too over tightening them prior to the settle in time" is probly going to result in a gasket that bleeds / wicks oil ....it being a chevy with only 4 tiny bolts engineeering wise has resulted in millions of gallons of oil dripping onto the roads and driveways of our great nation...oil much like water may find its own level ...lol give some attention to the drain back holes clean them and put a small rag there wile you scrape any old gasket or oil detriment ( dried oil) dont forget them (drain hole rags)straighten the holes in the pan flange ok its early and your going to be fine use a shop vac with a crevice tool to get ( vacuum)crumbs you might see .And thanks goes to the gbody guys for the site
 
  • Like
Reactions: Sweet_Johnny
This is an excellent tip sheet I will add to it in a couple ways ! Ok use some cord to tie wires or removed hoses to one side. You may wrap sheet plastic under the loom as it will decidedly make crumbs it will not stop the tie up suggestion at all .I'm going to say the neoprene ( black rubber) gaskets last longer seal better and need less tightening then the cork/ Vinton gaskets do , fel pro being the better gaskets brand .Having not the fel pro type ? then possibly smear a thin layer of grey untra gasket silicon ( ultra) on the gasket surface it helps to keep it stuck ti the cover pan surface while you shimmy twist the pan over the rockers and past wires . Clean the surface well with gas or even acetone or carb cleaner get te head surface squeaky dry .if you gasket has 4 holes on one side and 2 on the opposite I put the 4 hole side up towards the intake. Snug the 4 bolts down and be prepared to re-tighten"them after say 50 miles as they will settle onto the head .Failng to retighten them or too over tightening them prior to the settle in time" is probly going to result in a gasket that bleeds / wicks oil ....it being a chevy with only 4 tiny bolts engineeering wise has resulted in millions of gallons of oil dripping onto the roads and driveways of our great nation...oil much like water may find its own level ...lol give some attention to the drain back holes clean them and put a small rag there wile you scrape any old gasket or oil detriment ( dried oil) dont forget them (drain hole rags)straighten the holes in the pan flange ok its early and your going to be fine use a shop vac with a crevice tool to get ( vacuum)crumbs you might see .And thanks goes to the gbody guys for the site
THANK YOU!
Yours and everyone’s tips/advice is giving me more confidence in doing this!
 
  • Winner
Reactions: Sweet_Johnny

GBodyForum is a participant in the Amazon Services LLC Associates Program, an affiliate advertising program designed to provide a means for sites to earn advertising fees by advertising and linking to amazon.com. Amazon, the Amazon logo, AmazonSupply, and the AmazonSupply logo are trademarks of Amazon.com, Inc. or its affiliates.

Please support GBodyForum Sponsors

Classic Truck Consoles Dixie Restoration Depot UMI Performance

Contact [email protected] for info on becoming a sponsor