Anyone Ever Done Vinyl Plank Flooring? In a Crooked House?

Supercharged111

Comic Book Super Hero
Oct 25, 2019
4,943
7,740
113
Colorado Springs, CO
So here I was feeling all confident after watching a bunch of YouTube videos on tackling my layout. I decided to measure the center of my living room, then measure that distance out in the kitchen off of the sill plate on the back wall as it's the longest dimension we have on the main level. I snapped a line and it's within 1/32" end to end, but it looks off relative to the subflooring.
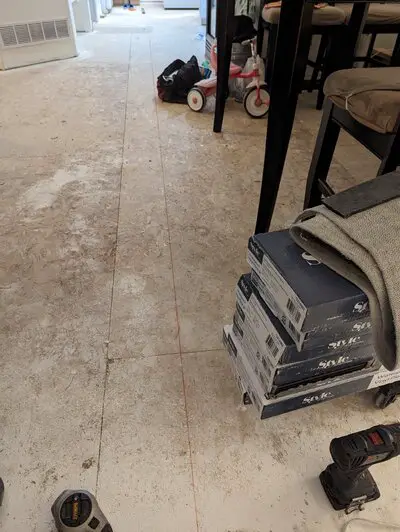
PXL_20231226_011656541.MP.jpg

I then measured in between those points and it's all over the place. I then measured to the walls in the opposite direction (left in the pic) and there was a consistent theme there: it's decidedly narrower on the end where the pic starts by me than it is out in the kitchen. I'm debating staying true to the long wall vs splitting the middle as the more highly visible stuff is actually the bit that's skewed, but those are short sections. So I'm torn. What's been you guys' experiences? Obviously if this was just one small room there'd be fewer variables.
 

86LK

Royal Smart Person
Jul 23, 2018
1,991
2,053
113
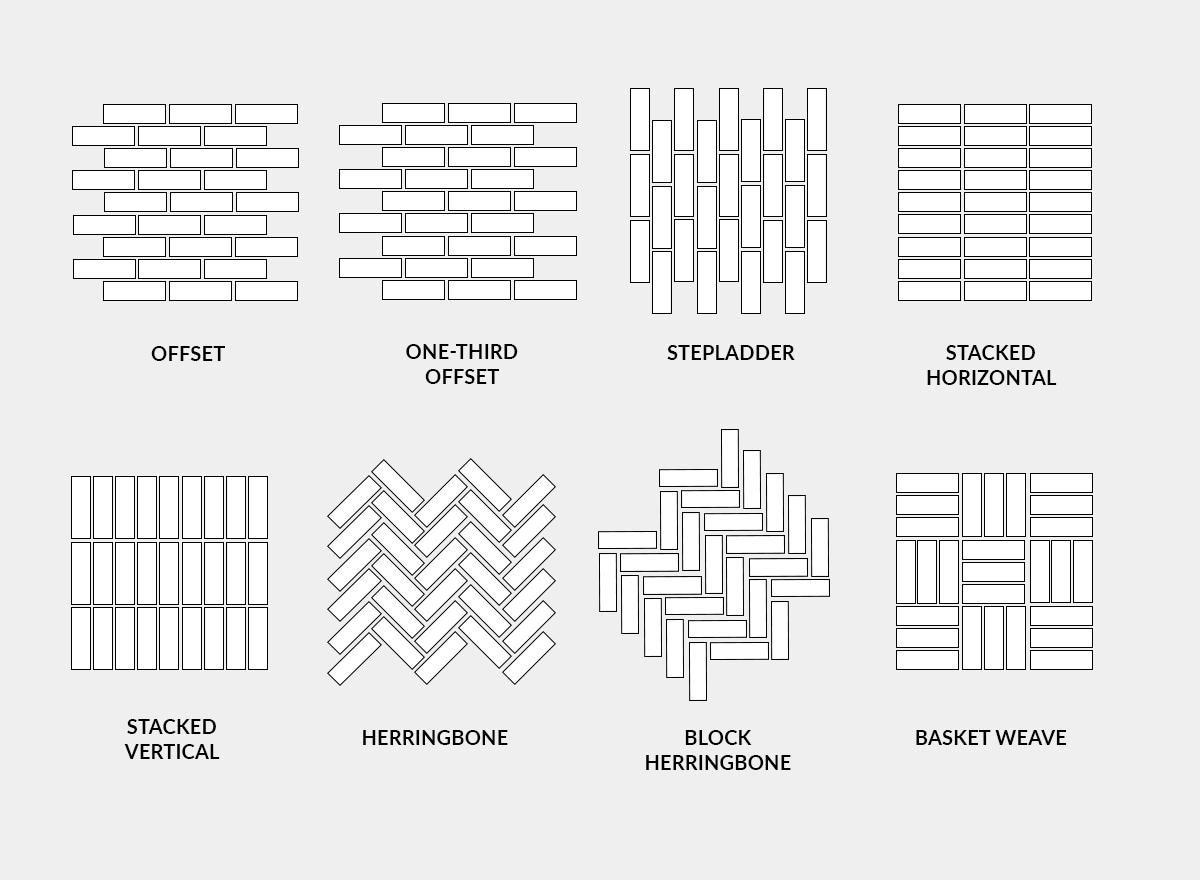
who says the pattern has to be longboard? try doing herringbone or something else that will draw the eye away from the issue

Rectangular-tile-layout-patterns.jpg
 
  • Like
Reactions: 1 users

Supercharged111

Comic Book Super Hero
Oct 25, 2019
4,943
7,740
113
Colorado Springs, CO
who says the pattern has to be longboard? try doing herringbone or something else that will draw the eye away from the issue

Rectangular-tile-layout-patterns.jpg

I'm lining up the long edges with the long axis, that's supposed to be your best chance for success. And you can't pattern them like above as the all snap together in 1 way.

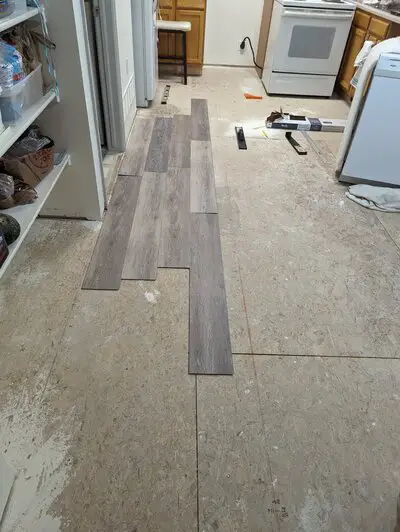
PXL_20231226_032344896.MP.jpg


I decided to snap a few together to sanity check things. If that section of line is to be trusted, this is how the layout would look here. I'd spaced this 3.5" off of the line to get a decent visual. Next I decided to math out the total width of 4 positions and I found all were within 1/8". So either my chalk line is making an S or both walls of the house are. The former seems more likely, but I didn't know a chalk line could do that? Maybe I had some side preload when I let it go? I've never snapped a line this long before.

My next thought is to snap together 2 rows that run the length, line them up with the 2 far apart measurements that agree with one another, and see if the chalk line dances underneath them. If so, I can use those 2 rows for reference and just trace a line with a carpenter's pencil to the subfloor to be gospel and build to that.

Edit: the chalk line I snapped was a touch over 34 feet and per the Google I should not expect a straight line at that length. So I'll procure a couple of helpers, grab a blue chalk line, and resnap to see what that gets me.
 
Last edited:

78Delta88

Royal Smart Person
Supporting Member
May 23, 2022
1,303
1
1,096
113
SW Arizona
Double check your line with a laser. Not very expensive any more. After coming out of Afghanistan, one of the Captains I worked with had several rental houses. That we did several floors then also did mine. The one house we did the actual oak hard wood, the others were the snap together ones.

All his houses were built 1905 to 1960's so yeah, not very square. Mine built 1988 so a little better. It was just a set of large rectangles with the exception a tree went through my back window while overseas and came home to replacing the floor down to joists so in the hall had an issue with change over from OSB (original) to one inch ply wood (new), so hid this with "mud room" carpet in a short area. Never noticed when done.

How level is the floor? Up to 1/4 off at the wall you hide with base board trim, thick with 1/4 round on top if you want. You also don't want to go wall to wall snug, needs some edge space under the baseboard so floor can expand and contract with the house. There also used to be an underlayment closed foam pad about 3/16 to 1/4 inch thick that the snap down goes on top of. Pad comes in rolls. Many skip this step and go right to the hard floor. Over time this will show in the floor. Especially if OSB is used, it can swell with moisture.

Main thing is flat level floor that is not moving as you walk on it. Some areas might need screwed down, nails loosen up over the years and need to tighten it back up first.
 
Last edited:

78Delta88

Royal Smart Person
Supporting Member
May 23, 2022
1,303
1
1,096
113
SW Arizona
Most new construction is glue to the 2 x 12 joist and then floor set down and air nailed down which are smooth nails not ring shanked like the older techniques, when used to be hand nailed down. Wood is hydroscopic which means it grabs moisture and swells, worse at some times of the year. Thing to remember is it is a floating floor.

In my house I found in parts crew used 2 x 8 in some spots and 2 x 4 in one spot, all of that got ripped out and replaced. But I had Pinks All Out on the TV, so good times!
 
Last edited:

Supercharged111

Comic Book Super Hero
Oct 25, 2019
4,943
7,740
113
Colorado Springs, CO
This is a 99 build, but none of the closet or pantry door frames are plumb so I'm not impressed with the build quality. The floor has a couple of dips and I bought some underlayment compound to mix up and fill in those spots. The crap I got in a little tub from Lowes was impossible to spread but did set up hard as a rock. I'll schmear some of this on top and screed it off to finish what the little quart tub couldn't and address the other areas that I know of. The chalk line did miss a low spot that I previously didn't know existed. I think I'll start with buying a laser, you're the second person to mention that and now that I think I have a couple of good marks to work off of that will tell me how screwy my line actually is. That and I'll need it for the day I finally get off my dead *ss and put a bump steer kit on the Camaro.
 
  • Like
Reactions: 1 user

Supercharged111

Comic Book Super Hero
Oct 25, 2019
4,943
7,740
113
Colorado Springs, CO
Well I finally figured out the problem. First I bought a laser and my long line was plenty straight. So I drew one perpendicular and it was off over an inch in. 12' span, so something was definitely amiss. Next I measured off of the subfloor seam to the drywall and was landing within 1/8", now we're talking! Next I measured from my line to the seam and observed a precise 2" difference end to end. Next I measured the window casings in the kitchen and living room and I'll be damned! Living room has a 2x6 wall and the kitchen a 2x4 wall!

33db66c7-ac72-480a-9412-297a3b1a7959_text.gif

So now I'm off to get the correct floor patching product and to finally decide on the layout like I wanted to do last night.
 
  • Like
Reactions: 1 user

GBodyForum is a participant in the Amazon Services LLC Associates Program, an affiliate advertising program designed to provide a means for sites to earn advertising fees by advertising and linking to amazon.com. Amazon, the Amazon logo, AmazonSupply, and the AmazonSupply logo are trademarks of Amazon.com, Inc. or its affiliates.

Please support GBodyForum Sponsors

Classic Truck Consoles Dixie Restoration Depot UMI Performance

Contact [email protected] for info on becoming a sponsor