(Installed Easter 2013. This product is made of fiberglass and can be modified/altered. As I have no experience with that, these were treated as bolt-on as possible.)
Back in 2012, as part of my paint job, I bought some fiberglass rear fillers. These were made by Danko Reproductions and I got them through Gbodyparts.com. They were a lot cheaper than other fillers and being made of fiberglass I figured they'd last longer as long as they don't get hit. I didn't really have the money for the nice ones anyway.
I didn't manage to get any out-of-the-box photos, but I wasn't really impressed with them. Along the top edge (under the taillights) of each filler were a couple stepped "dips" that seemed to have been a flaw in production. Although they were a big turn-off, they weren't an issue since they were hidden under the lower taillight trim. As for mounting, you are given small dimples to drill through. Some of them are hard to see and others (along the top) were nearly cut through due to some not-so-precise trimming by the manufacturer.
Now for some pictures. It should be noted that these were painted by me with a primer "sealer," build primer, and metallic paint after being cleaned and sanded. They accepted the paint well and the difference in shade between the car and fillers is my bad. (They were painted separately and I ran out of color.)
Now it did say in the instructions that the holes may need to be reamed "due to every car being different" (or something like that) and that washers may even need to be used. I started by drilling through the provided dimples in the fiberglass and seeing where that left me. I got lucky with the top row. The holes basically lined up and there was still enough fiberglass around them despite the poor trimming. I didn't get so lucky with the side holes. It wasn't so much "reaming" as it was "drilling another hole next door to where they told you to."

As you can tell by this next picture, the natural shape of these particular fillers aren't quite right and you do have to flex them a bit to get them to fit. Although there was noticeable tension, I don't think they were about to break. I wouldn't want to pull them much farther though.

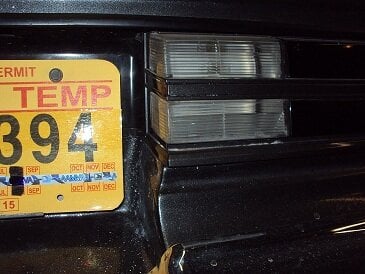
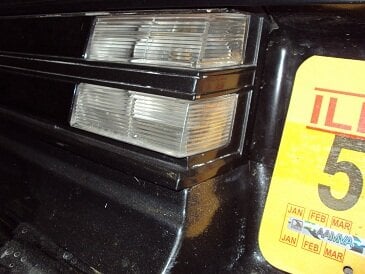
On the other end of the filler there was some trimming to do in order to get the license plate on. Nothing a pneumatic grinder can't handle in a couple seconds. As this isn't a show car, I just eyeballed these cuts.

Before -^-
After -v-

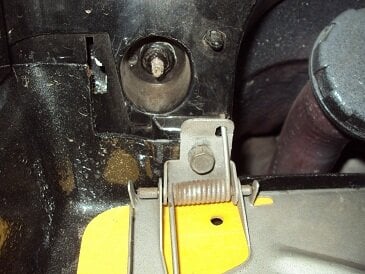
The tab for the side holes hit the body at an angle, kinda like so from a bird's eye side-view: (top of car)_|/_(top of filler)
This caused the stamped nut to make awkward contact, only allowing part of it to apply pressure. Whether or not this matters is totally up to you.

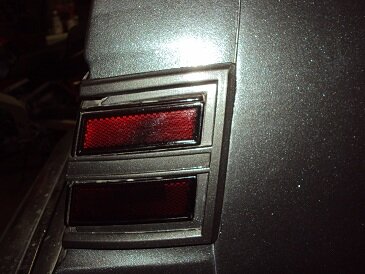
Upon sliding in the taillight assembly, I noticed that the fillers didn't let it touch the body. Here's the initial gap which you can see daylight through:

Here's the final gap after tightening down all of the rubber wing nuts as tight as possible without breaking any plastic taillight trim:

From this next angle you can see how the outer corner stops the taillight from touching the body of the car in a flush manner. You can also see how the filler gradually moves away, causing some mismatch at the inner corner. Lastly, you can sorta see (from a bad angle) one of the dips on the top edge of the filler that I referred to in the middle of the first section of this entry.

Here's the corner mismatch I was talking about:


The other side of the car was more of the same, although the "pilot dimples" for drilling weren't quite as good as the other side. This caused just a little bit of a "sagged" look which just barely exposed another one of those dips in the fiberglass. You can also see that additional trimming could have been done where the two pieces meet for a more perfect fit, but the license plate does a decent job of hiding this.

On a positive note, the side body lines do match up pretty well.

When it's all said and done, while not perfect they do get the job done pretty cheap. I wouldn't recommend them for a show car or something you want to look super clean. But if you can't afford the cool new rubber ones from gbodyparts.com or the sweet looking one-piece filler by spoolfool and just need a hunk of fiberglass to make the rear bumper look less like an afterthought sticking out of the back of your cruiser, I'd tell you this:
Be open minded to sanding, filling, modifying, and waiting. My results could have been a tad better had I taken time to rework these to fit better. Mostly, take your own measurements before drilling. As far as the "waiting" is concerned, it can take a long time to get these pieces. Gbodyparts was good enough to keep me posted as to when Danko could be able to get them shipped out. I'd have to dig through some e-mails to find out exactly how long it took, but I remember it taking weeks. Anyway, hopefully some of you find this helpful while researching your next set of rear fillers.
Thanks for reading and have a good one! 🙂

Back in 2012, as part of my paint job, I bought some fiberglass rear fillers. These were made by Danko Reproductions and I got them through Gbodyparts.com. They were a lot cheaper than other fillers and being made of fiberglass I figured they'd last longer as long as they don't get hit. I didn't really have the money for the nice ones anyway.
I didn't manage to get any out-of-the-box photos, but I wasn't really impressed with them. Along the top edge (under the taillights) of each filler were a couple stepped "dips" that seemed to have been a flaw in production. Although they were a big turn-off, they weren't an issue since they were hidden under the lower taillight trim. As for mounting, you are given small dimples to drill through. Some of them are hard to see and others (along the top) were nearly cut through due to some not-so-precise trimming by the manufacturer.
Now for some pictures. It should be noted that these were painted by me with a primer "sealer," build primer, and metallic paint after being cleaned and sanded. They accepted the paint well and the difference in shade between the car and fillers is my bad. (They were painted separately and I ran out of color.)
Now it did say in the instructions that the holes may need to be reamed "due to every car being different" (or something like that) and that washers may even need to be used. I started by drilling through the provided dimples in the fiberglass and seeing where that left me. I got lucky with the top row. The holes basically lined up and there was still enough fiberglass around them despite the poor trimming. I didn't get so lucky with the side holes. It wasn't so much "reaming" as it was "drilling another hole next door to where they told you to."

As you can tell by this next picture, the natural shape of these particular fillers aren't quite right and you do have to flex them a bit to get them to fit. Although there was noticeable tension, I don't think they were about to break. I wouldn't want to pull them much farther though.

On the other end of the filler there was some trimming to do in order to get the license plate on. Nothing a pneumatic grinder can't handle in a couple seconds. As this isn't a show car, I just eyeballed these cuts.

Before -^-
After -v-

The tab for the side holes hit the body at an angle, kinda like so from a bird's eye side-view: (top of car)_|/_(top of filler)
This caused the stamped nut to make awkward contact, only allowing part of it to apply pressure. Whether or not this matters is totally up to you.

Upon sliding in the taillight assembly, I noticed that the fillers didn't let it touch the body. Here's the initial gap which you can see daylight through:

Here's the final gap after tightening down all of the rubber wing nuts as tight as possible without breaking any plastic taillight trim:

From this next angle you can see how the outer corner stops the taillight from touching the body of the car in a flush manner. You can also see how the filler gradually moves away, causing some mismatch at the inner corner. Lastly, you can sorta see (from a bad angle) one of the dips on the top edge of the filler that I referred to in the middle of the first section of this entry.

Here's the corner mismatch I was talking about:


The other side of the car was more of the same, although the "pilot dimples" for drilling weren't quite as good as the other side. This caused just a little bit of a "sagged" look which just barely exposed another one of those dips in the fiberglass. You can also see that additional trimming could have been done where the two pieces meet for a more perfect fit, but the license plate does a decent job of hiding this.

On a positive note, the side body lines do match up pretty well.

When it's all said and done, while not perfect they do get the job done pretty cheap. I wouldn't recommend them for a show car or something you want to look super clean. But if you can't afford the cool new rubber ones from gbodyparts.com or the sweet looking one-piece filler by spoolfool and just need a hunk of fiberglass to make the rear bumper look less like an afterthought sticking out of the back of your cruiser, I'd tell you this:
Be open minded to sanding, filling, modifying, and waiting. My results could have been a tad better had I taken time to rework these to fit better. Mostly, take your own measurements before drilling. As far as the "waiting" is concerned, it can take a long time to get these pieces. Gbodyparts was good enough to keep me posted as to when Danko could be able to get them shipped out. I'd have to dig through some e-mails to find out exactly how long it took, but I remember it taking weeks. Anyway, hopefully some of you find this helpful while researching your next set of rear fillers.
Thanks for reading and have a good one! 🙂


 Hopefully it doesn't cause an issue down the road with sagging but maybe I can reinforce them to prevent that. Yours seem to fit a bit better, looking from the side of the car at the taillight. When were yours purchased? I'm curious as to weather or not whatever Danko is using to produce these is wearing out causing the product to be out of spec with what they originally produced. :?: