gages

Status
Not open for further replies.

justdandy

Not-quite-so-new-guy
Jan 20, 2022
28
10
3
78
From all I can find it looks like a set of small Monte Carlo (S/S?) instrument gages will sub for the idiot lights in the dash of my '87 Elky. I looked at the printed circuit boards they seem to be the same part. I'll need an oil pres. sndg. unit. My big concern is will they just bolt in. This is my driver so I don't want it down for weeks. My speedo, Tach and gas gage all work fine now. I just need water temp and oil press. with indicators not numbers. Like an aircraft that line up the gages so when all is right the indicators all point straight up. In the car with fixed gage mount, I'll use a iridescent dot at the normal operating point.
Does anyone have an idea if the gages will work??? or a better solution. not looking for a $900 digital marvel. this thing is old school and low budget
thanks.
 
I apologize, but it is "gauges".
Not knowing what your current set up looks like, I made a trio gauge set up for under the dash and used aftermarket mechanical gauges. Just throwing this out there as an option.
After my initial install with 60/40 seats, I later added a center console and changed to Cerullo buckets and still have the trio set up in place.
IMG_2042.JPG
20170115_204037_resized.jpg
20220601_154825.jpg
 
Last edited:
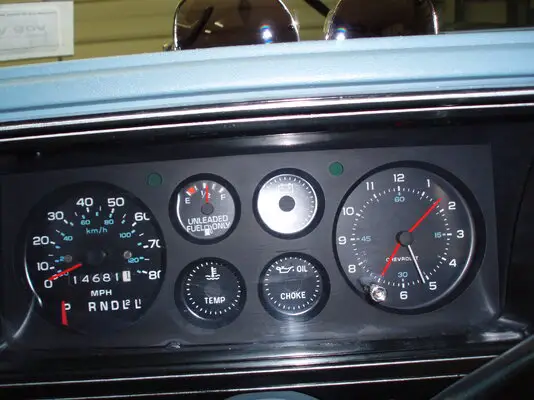
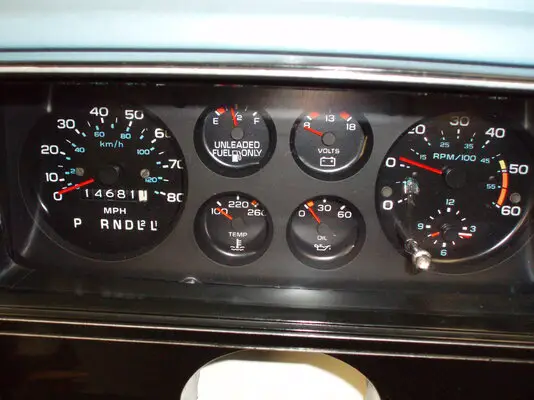
that's a nice interior mine is the same but what I can see of the dash cluster isn't enough. On the Elky there are 4 small (I think 1.5 inch) round "gages". A light for "choke" and water, a water light, a charge light, oil light and fuel gage. I just want to change the "water/choke" light to a temp gage with a needle and the "oil" light to a pressure gage with a needle. That's why I thought I'd get a pair of Monte gages that would fit.
 
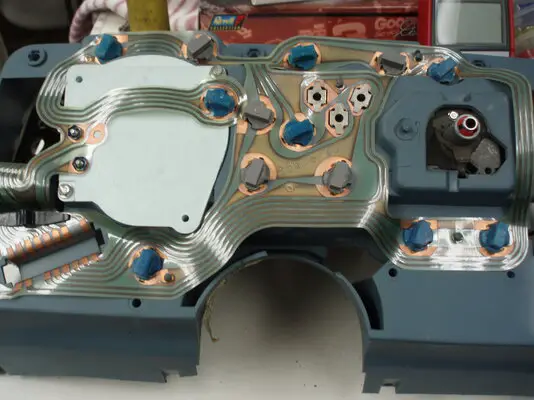
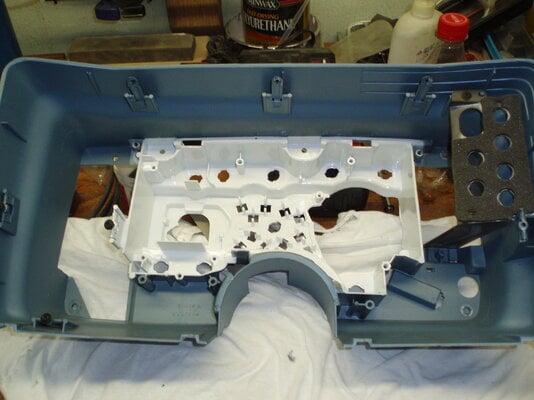
As pagrunt mentioned you need the dash housing with the printed circuit.
I have changed over my 79 Monte Carlo's and they took about 1-2 days from start to finish on the install including the sending units..
Below is the physical difference between the warning light dash and the gauge dash.

P1012148.JPG P1012093.JPG
I've been told it is not necessary but on both my changeovers I also added the 10 ohm alternator exciter wire between the ignition switch block to the main panel behind the fuse block.
Below is the before and after.

P1012087.JPG P1012105.JPG
 
I have a round gauge cluster that I pulled out of my '79 Malibu when I swapped to AutoMeter gauges. It has a clock instead of a tach. PM me if you are interested and I'll send you pictures. It's in my attic.
 
  • Like
Reactions: Rktpwrd
79 USA 1, do you have a video, or know of a video that shows the steps to this change. I need to do the same on my MC. IF it is too big of pain i plan on just adding a cluster under the ashtray.
 
79 USA 1, do you have a video, or know of a video that shows the steps to this change. I need to do the same on my MC. IF it is too big of pain i plan on just adding a cluster under the ashtray.

That I do not, Sorry.
When I did the first conversion I worked off the factory wiring diagram for the 79 Monte Carlo. Ironically the pin out on the harmonic clip that plugs into the back of the gauge pod and subsequently the printed circuit is the same between the warning light dash and the gauge dash. The printed circuit and the housing are different between the two. I had to add the tach lead into the clip and as mentioned above the alternator brown wire is excited through the warning light on the idiot light dash, GM had a 10 ohm wire that ran from the #3 ignition post at the ignition switch to the main bulkhead replacing the warning light circuit. There is also a grounding circuit on the temp warning light circuit which lights the temp light in start mode. Unless it is disconnected at the ignition switch the temp gauge grounds out while in start mode.
Depending on which you would prefer, the gauge trio under the ash tray would be easiest. Locating parts and the time to do a factory changeover is quite involved but, rewarding when ( strictly in my opinion ) it looks like GM put them there.
 
Going to agree with 79USA1 here, it is a doable project but you have to have all the correct fiddley bits or it will drive you nuts. The big thing to be aware of is that the guts of the dash are metric. To work with the various nuts and bolts you need metric sockets or nut drivers. The easiest way to do the swap is do the complete cluster housing as a unit. That way you don't have to mess with that wiring strip because it is fragile and can be damaged very easily.


Nick
 
I agree with getting the entire pod, but then most people would pull the entire pod as unit and not as separate parts anyway. My only problem was re-pinning the connector as I needed two wiring diagrams, gauges and non-gauges, to compare. Oh, and running a tach wire as at that time I did not know it is usually tucked up inside somewhere.
 
Status
Not open for further replies.

GBodyForum is a participant in the Amazon Services LLC Associates Program, an affiliate advertising program designed to provide a means for sites to earn advertising fees by advertising and linking to amazon.com. Amazon, the Amazon logo, AmazonSupply, and the AmazonSupply logo are trademarks of Amazon.com, Inc. or its affiliates.

Please support GBodyForum Sponsors

Classic Truck Consoles Dixie Restoration Depot UMI Performance

Contact [email protected] for info on becoming a sponsor