EL CAMINO 1983 El Camino 5.3 Swap / Build Thread

JohnIL

Greasemonkey
Sep 9, 2020
131
310
63
Central Illinois
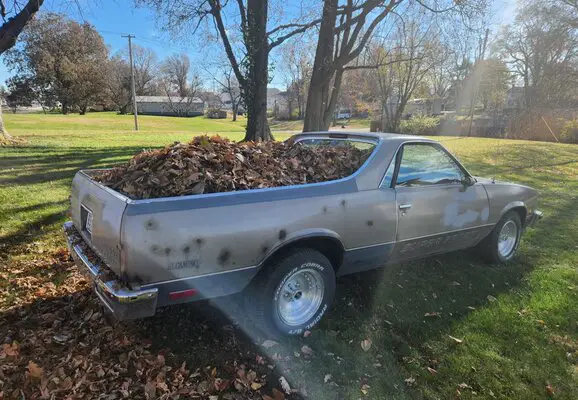
Sorry for the lack of updates. Progress on the El Camino has been slow, but there is indeed progress. Life got in the way this summer, some of it good, some of it bad. On the bad side, my family and I lost a few weeks to yet another round of COVID-19 infections. This is our third infection. Nothing life threatening, but I'm sick of getting sick! On the good side, we've spent some time this summer vacationing. While on one of those vacations, I found a new toy that has slowed down progress on the El Camino. I bought a 1965 Chevy C10. Because, more projects are always better. ;)

Post-Purchase01.jpg


The plan for the C10 is a modernized resto-mod, similar to the path we're taking with the El Camino. Major work on the truck will have to wait until the El Camino is closer to "finished". For now, I'm just enjoying having a new toy to play with.

Now then, back to the El Camino...

Rear and "Opera" Window Seals
A while back, we ordered new outer seals for the door glass and the triangular opera windows behind the doors. The original seals where cracked and leaking. The door glass seals were easy. We had the doors opened up anyway to do maintenance on the door latches and the electric windows, so we replaced the seals at the same time. They're held in by a few small screws that are easily accessible once the interior door panel is out of the way. The opera window seals were another animal entirely. In order to replace the outer seals, the opera windows need to be removed and reinstalled. The opera windows are glued in place. That's outside my skillset, so I went to the professionals.

I took the new seals and the car to an auto glass company that I've worked with in the past. While they were resealing windows, I asked them to take a look at the back glass. We had a water leak at the back of the cab and we couldn't figure out where it was coming from. The glass shop found that the glue holding the back glass had dried out and let go. In fact, the rear glass was loose enough to rattle in the frame. We knew we had a rattle, but we had no idea it was coming from the window. So, the glass shop reglued the rear window and driver side opera window. They had to hold off on resealing the passenger opera window because they found a rust hole underneath the old seal. I took the car back home and spent an afternoon cutting out the rust and welding in new steel. A second short visit to the glass shop took care of resealing the passenger opera window. The glass shop was great to work with. I would highly recommend Auto Glass Systems to anyone in or near Springfield, IL. Good people and good service. The car is sealed up now and window rattles are gone.

Quarter Panel Patching Begins
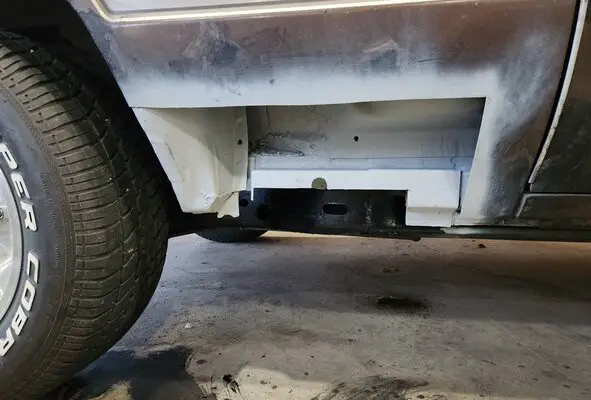
I've been putting off the exterior rust repair because it's going to take a LOT of work. I couldn't put it off any longer, so I devoted a free weekend to tearing into the worst rust hole (at least I hope it's the worst). The passenger side rear quarter panel, between the passenger door and the right rear wheel well had a rust hole through the outer skin all the way through the inner rocker panel. By the time I got done cutting out all of the rust, I could see the frame rail! (see pictures below).

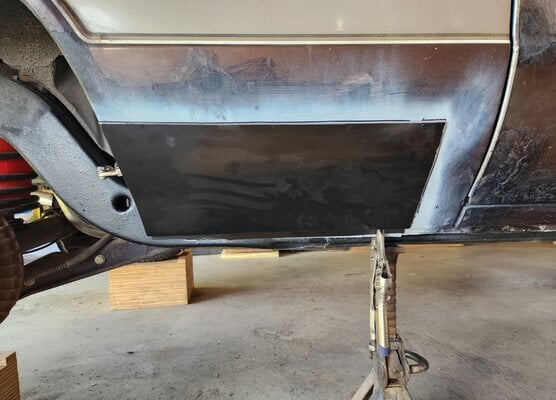
Once the rot was out of the way, I treated the whole area with rust converter and weld-through primer, then began welding in new steel. The inner rocker was a mess. I sure am glad my repairs are hidden by the outer skin. It's all solid, but it isn't pretty. Before starting on the outer skin, I drenched everything with more rust converter, weld-through primer, and rust encapsulating paint.

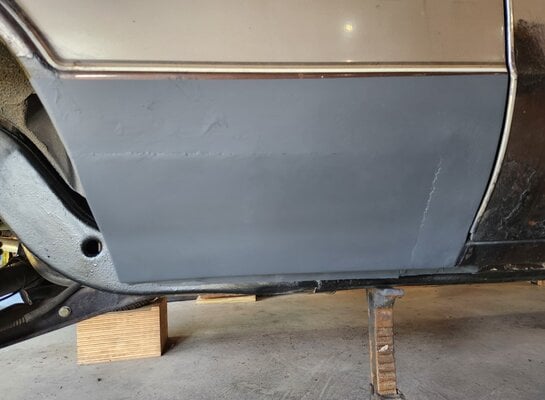
The outer skin was actually the easiest part of the repair. I started with a replacement partial quarter panel patch. Of course, the fit of the replacement panel wasn't exact. But, after some cutting and massaging, I came up with something usable. This was my first attempt at fitting a patch panel in almost 25 years. So, as you can see in the pictures, it isn't perfect. But, it's good enough that it can be smoothed out during the filler stage without any deep puddles of mud. All-in-all, I'm happy with the repair. That's one hole down and several more to go.
 

Attachments

  • QuarterPanelRepair01.jpg
    QuarterPanelRepair01.jpg
    172.9 KB · Views: 100
  • QuarterPanelRepair02.jpg
    QuarterPanelRepair02.jpg
    189.2 KB · Views: 111
  • QuarterPanelRepair03.jpg
    QuarterPanelRepair03.jpg
    134.8 KB · Views: 102
Last edited:
  • Like
Reactions: 3 users

JohnIL

Greasemonkey
Sep 9, 2020
131
310
63
Central Illinois
It's hard to believe that it's been almost a year since my last update. I'm sorry for being an absentee forum member. It certainly wasn't intentional. We've been busy working on the '83 El Camino, the '65 C10, and all of our other hobbies. The metalwork on the El Camino has continued slowly, but surely. Last week, we buttoned up the last of the main body patch panels. We've replaced/patched the quarter panels on both sides of the car, both in front of and behind the wheel wells. I don't have any new pictures because they all pretty much look the same. Cut out the rust, treat the inner panels to slow down future rust, weld in new metal, and primer the heck out of the panel. Lather, rinse, repeat...

My son drives the El Camino daily and it's been very reliable (knock on wood). He's put a couple thousand miles on the car this year. Along the way, we've addressed a few nagging issues.

A few months ago, my son replaced all four shock absorbers with new KYB units. That all went pretty well, except that one of the rear shocks blew a seal, almost immediately. A replacement shock easily solved the problem. The new shocks ride great. They are a bit harsher than the old worn out shocks, but they have a much better road "feel".

While my son was replacing shock absorbers, I was exorcising the electrical demons out of his taillights. The passenger side brake/turn signal was significantly dimmer than the driver side. To fix the problem, I had to replace the light socket, twice. The first replacement socket was an inexpensive Dorman unit from our local auto part store. That one had the same problem as the original, a lousy ground. So, I ordered a Delco replacement online. It was only a couple of dollars more expensive, but the quality difference was HUGE. The socket is significantly heavier and the ground wire attachment is much more substantial. This one works great. Now, the brake lights and turn signals are nice and bright.

The biggest headache (maybe even more tedious than the rust repair) has been the electric windows. The El Camino doesn't have air conditioning, so the windows get a workout. As you would expect from 1980's wiring, the windows are temperamental. When my son first started driving the car, we replaced the windows switches in both doors and lubricated the heck out of the window tracks and regulators. The windows worked, but they were still slower than molasses. And, occasionally, both windows would stop working completely. That told me the problem wasn't mechanical, it was electrical. And, it told me the problem was in the driver side door, which controls both windows. I started by adding dielectric grease to the connector on the driver side window switch. That sped up both windows significantly. However, the windows still occasionally stopped working. Each time, we were able to revive the windows by nudging the driver side switch. Eventually, I got sick of messing with the switch connection. The factory switch "socket" was worn and loose. No amount of grease was going to make it reliable. So, I lopped off the factory switch socket and soldered pigtail wires directly to the pins on the switch. I connected the pigtails to the factory door wiring using shiny new bullet connectors. That worked great, for a while. Now, the driver side window is reliable, but passenger side window still stops occasionally. Again, it can usually be revived by nudging the driver side switch. That leads me to think the problem is probably the bullet connector on the wire that runs from the driver side switch over to the passenger side switch. So, I'll pull the door apart for the millionth time and see what I can do to make that connection more reliable. My son has been lobbying for about a year to "downgrade" to manual windows. It would be a lot of work, but at this point, I'm almost ready to agree with him. Wish me luck and patience.

John
 
  • Like
Reactions: 5 users

JohnIL

Greasemonkey
Sep 9, 2020
131
310
63
Central Illinois
I spent some time over the weekend addressing a nagging problem related to the rust repair. As I mentioned in my last update, we've buttoned up the last of the major holes in the body. We still have to contend with the rotten door bottoms, but the main shell of the car is solid again. The problem is, even with a liberal coating of primer, the fresh repairs are starting to show surface rust, especially along the bottom edge of the quarter panels. I have no intention of repairing these areas again, so I'm taking drastic measures to prevent new rust. I've developed a multi-pronged process to seal up the bottom edges of the car and the insides of the body panels. Only time will tell how successful this process is, but I'm hopeful.

Step 1: I used rust converter to treat the surface rust along the bottom edge of the quarter panels and around the inside lip of the rear wheel wells. While I was at it, I treated the bottoms of the rocker panels and the front fenders too.

Step 2: While the rust converter was reacting and drying, I made my way round the car opening up the weep holes along the bottom edges of all of the panels. Most of them were clogged with dirt, which tells me that they really didn't "weep" all that well. I opened them all up to 3/8". This will become important later on in the process. Now that I had better access to the inside of the panels, I used a shop vac to suck out any/all dirt possible. I very much doubt that I got it all, but it's definitely better than it was.

Step 3: I used painters tape to tape a line along the bottom edge of the car. Then, I coated the bottom edge of the panels liberally with the same rust encapsulator paint that we used on the floorboards and the frame. I paid special attention to the back sides of the panels, wherever I could reach. I also make sure to seal up the raw edges of the newly expanded weep holes.

Step 4: I resealed the bottom edge of the panels with brushable seam sealer, staying away from the weep holes. While I had the seam sealer out, I sealed up the last of the floorboard repairs from the under side. There were a couple of spots that I failed to seal up before.

Step 5: Another coat of rust encapsulator paint over the seam sealer.

Step 6: Wait... The seam sealer and rust encapsulator paint needs to cure before I can move on to the last step. I'll give it a couple of weeks to cure.

Step 7: I plan to use those newly expanded weep holes for access to soak the insides of the panels with cavity coater. It's similar to cavity wax, only better. At least that's how it's advertised. I'm using a product called KBS Cavity Coater. The hope/expectation is that this stuff will soak into all of the cracks and crevices inside the panels and protect them from future rust from the inside.

Once all of this is done, we'll paint over the bottom edges of the panels with body color, along with the rest of the car. I'm not sure what else we can do to stop the rust from coming back. I just hope that it works. Wish us luck!
 
Last edited:
  • Like
Reactions: 2 users

JohnIL

Greasemonkey
Sep 9, 2020
131
310
63
Central Illinois
Very minor update, mostly for the sake of documentation.

I spent one evening this week replacing the output seal for the 4L60E transmission. It's been weeping AFT ever since we installed the drivetrain. So far, the new seal is holding fluid. My only fear is that the tail shaft bushing is worn enough (130K miles) to allow the driveshaft yoke to "wobble" causing the leak to return. If it leaks again, I'll either have to invest in a bushing removal tool or I'll have to pull the tail housing off and take it to a transmission shop to get the bushing replaced by a pro.
 

JohnIL

Greasemonkey
Sep 9, 2020
131
310
63
Central Illinois
Cavity Coater

As I mentioned earlier this month, I set out on a quest to rust "proof" the body repairs along the bottom edge of the El Camino. The last step of that quest, after giving all of the rust encapsulator paint and seam sealer a couple of weeks of drying time, was to spray the insides of the panels with cavity coater.

The product I chose is KBS Coatings 75101. It works very much like a traditional cavity wax, except that it is more like a penetrating oil. It seeps into seams and welds and coats everything in a thin film. I sprayed the cavity coater inside the quarter panels and the rockers. The product seams to apply as advertised. It comes in a large aerosol can and comes with a 3ft long spray tube that lets you spray the inside of the panels through various access holes. I could tell that I had sprayed enough inside each panel when it started running out all of the drain holes.

I have a few observations for anyone looking at using this product.
  • It's messy. As I mentioned, it has the thin consistency of a penetrating oil (think PB Blaster). It's oily and runs all over the place. Please don't think that this is a complaint. I'm confident that it got into all of the nooks and crannies. It was just messier than I expected.
  • It's stinky. Again, I'm not complaining, but you might want to use it outside, if possible. I used it inside the garage and you could smell it for a few days afterward.
  • The smell permeates into the vehicle cabin. The "oily" smell was pretty intense in the car's interior for about a week. The smell dissipated as the cavity coater dried out.
  • It seems pretty efficient. It only took about 15 minutes to treat the both rear quarters and both rockers. And, I have about half of the can leftover for future use. Once the door skins are repaired, I may use it inside the doors too.
Time will tell how well the cavity coater works to prevent new rust. But, it was easy to apply and I'm confident that I got it everywhere I wanted it to go.

More Seam Sealer

While we were sealing things up, it seamed like a good time to reseal the seams inside the bed at the rear of the cab. We used small picks to remove as much of the dried out factory sealer as possible. We could actually see through the seams into the cab in a couple of places. No wonder rain water was leaking into the cab! With the seams cleaned out, we treated everything with rust converter, just in case. Then, we taped along both sides of the seams to keep the sealer from getting all over the place. We used Eastwood's "brushable" seam sealer, pressing it into the seams with a popsicle stick. Then, we pealed off the tape.

We learned a valuable lesson about working quickly. We didn't pull the tape off until the whole job was done. By then, the some of the seam sealer had started to setup. Pulling the tap spoiled the surface of the sealer. In hindsight, we should have remove the tape as we went along, while the sealer was still wet. That would have left a cleaner "strip" of sealer along the seams. Instead, we had to re-smooth the seams with a fingertip afterward. This was messy and the seams aren't as flat and tidy as they could have been. We'll know better next time.
 
  • Like
Reactions: 5 users

JohnIL

Greasemonkey
Sep 9, 2020
131
310
63
Central Illinois
Steering Linkage Rebuild

The last time I drove my son's El Camino, I noticed that the front end was doing a bit of wandering and the steering felt loose. Further investigation revealed some minor wear in the steering rod joints. That is to be expected with 130K+ on the chassis. So, I ordered a complete steering rebuild kit from Speedway Motors. You could buy the components individually from a local parts store, but the kit makes it easy. It comes with new tie rods, adjuster sleeves, drag link, idler arm, and all of the castle nuts, cotter pins, seals, and grease fittings.

Replacing all of this was pretty straight forward. It just took some time. I was careful to assemble the new tie rods to the same length as the old ones. It may be necessary to get the car realigned eventually, but it's pretty darned close.

Steering Box Adjustment

Once the steering linkage was replaced, the steering was definitely better, but it was still pretty loose. There was very little "feedback" through the steering wheel. To address this, I tightened the pinion preload screw on the top of steering box. It only took about 1/4 turn to tighten up the steering and provide much better steering feedback. It's about as good as a slushy old Saginaw-style steering box will ever be. It's not rack and pinion, but it's not bad.
 
Last edited:
  • Like
Reactions: 4 users

JohnIL

Greasemonkey
Sep 9, 2020
131
310
63
Central Illinois
Heater/HVAC Box Reseal

This weekend, I knocked out another malingering project on the El Camino. The seals on, in, and around the HVAC box were just plain shot. When we brought the car home, the HVAC box was full of dirt, leaves, and pine needles (LOTS OF PINE NEEDLES). We did our best to clean it out without completely removing and disassembling the box. The first time my son drove the car in the rain, he confirmed that the carpeting on the passenger side was wet. So, I ordered an HVAC box seal kit. That was two years ago and the seal kit has been sitting on the workbench ever since. In hindsight, we should have removed the HVAC box and resealed everything BEFORE we dropped in the new engine. Ideally, this job should be done with no engine and no passenger side fender. The engine blocks one side of the box and the fender blocks the other side. Since we have no intention of removing either the engine or the fender, I did the best I could do with them still in place.

The garbage on the firewall of a G-Body is installed in layers, like a cake. A really nasty, filthy cake filled with bugs, dirt, and road debris. The first layer consists of the windshield wiper arms, the stainless steel lower windshield trim, the windshield squirters, the rear hood seal, and the HVAC cowl screen. The next layer consists of the HVAC wiring, heater fan motor, fan motor resistor, and heater hoses. The AC lines where already disconnected. With all of that out of the way, I could finally get to the HVAC box itself. When I pulled the lid off the box, it was pretty obvious that someone had replaced the heater core at some point. The foam gasket between the lid and the firewall was torn in three pieces and the putty seal between the lid and the box was pretty much gone. With the lid out of the way, I removed the heater core and the AC evaporator core. That's as far as I could go with the disassembly with the engine and fender in place.

With the box completely open, I now had access to all of the trash and crumbling seals inside the box. I spent the better part of three hours scraping and chipping away the old seals between the various parts of the box's interior. After some quality time with the shopvac and a cleaning rag, the inside of the box was finally free of dirt, seal debris, and all those lousy pine needles!

With the box cleaned up, I resealed all the interior seams using 1/8" x 3/4" butyl tape. I've used the same tape to reseal windows and doors on our various campers over the years. It's easy to press the tape over/into the seams. It's not a difficult job, but it's fussy. My goal was to cover all of the interior seams so that any water that makes it's way into the box drains out the bottom instead of through the seams into the car interior. I sure hope I got it all sealed.

Now that the inside of the box was resealed, it was time to start relayering the cake.

I installed a new heater core. The old one was fine, but it was at least 25 years old. A new one was cheap insurance. I put the old AC evaporator back in. If we every get around to recommissioning the AC system, we will probably need to replace the evaporator. But, it's more likely that the car will eventually get a Vintage Air kit instead. Anyway, back the the reassembly. I replaced the foam seals around the heater core and the condenser with new seals from the kit. Then, I applied the new putty seal around the underside of the box lid. This seal is really nothing more than a thinner version of the same butyl tape I used inside the box. I also replaced the foam gasket between the rear of the lid and firewall. This gasket is intended to be a one piece seal around the entire HVAC box. Since the box itself was still attached to the firewall, I just cut out the part of the gasket that seals the back of the lid. I used more of the butyl tape to seal the ends of the foam gasket. Then, the lid went back on the box. This step is a thorough pain in the neck. It's a challenge to get the lid lined up without displacing the butyl seal and all of the foam seals around the heater core and the condenser. I didn't get it perfect, but I'm reasonably sure that it's sealed.

With the lid back on, I sealed the seam between the lid and the firewall with a layer of butyl tape. I think they must have used something like seam sealer at the factory. The butyl tape should serve to the same purpose. Then, it was time for the rest of the layers to go back on. Heater hoses, fan motor, wiring, HVAC cowl screen, hood seal, windshield squirters, windshield trim, and finally, the windshield wiper arms.

It was absolutely NOT necessary to list all of those steps, but after doing all of that, I wanted to have something to show for it. If we ever have a reason to tear the front of the car apart, we'll remove the HVAC box and properly reseal all of the components. For now, I hope that I've done enough to keep the water out of the interior when it rains.
 
Last edited:
  • Like
Reactions: 3 users

JohnIL

Greasemonkey
Sep 9, 2020
131
310
63
Central Illinois
El Camino Earning Its Keep

This weekend was our annual fall yard cleanup. We have a bunch of old growth maple trees on our property and they drop a ridiculous amount of leaves in the fall. Historically, I've used my daily driver GMC Sierra to haul the leaves out to the street where we can burn them off. Last year, on a lark, my son asked if we could use his El Camino instead. It worked so well, that we used it again this year. It has been officially decided that the standard unit of measure for the volume of dried leaves is the "El Camino". This year's pile of leaves was over 20 "El Caminos". That's a LOT of leaves!
 

Attachments

  • FallCleanup2023.jpg
    FallCleanup2023.jpg
    324.1 KB · Views: 31
  • Like
Reactions: 1 users

GBodyForum is a participant in the Amazon Services LLC Associates Program, an affiliate advertising program designed to provide a means for sites to earn advertising fees by advertising and linking to amazon.com. Amazon, the Amazon logo, AmazonSupply, and the AmazonSupply logo are trademarks of Amazon.com, Inc. or its affiliates.

Please support GBodyForum Sponsors

Classic Truck Consoles Dixie Restoration Depot UMI Performance

Contact [email protected] for info on becoming a sponsor