It might be time to rename the car from Projekt Fahrfromcruzin to The Smilemaker. No idea where the red stuff came from, but I pressure tested the entire cooling system for 3 days and nothing is going where it shouldn't be. Which means, after also finding the cause of the surging at idle, we got a runner! Got the 16 year old tires replaced and have been able to cruise around town a couple of times. It's currently almost impossible to not spin the tires (I have a progressive linkage to install to maybe help), but it's hard to not giggle and laugh every time the rear end breaks loose. An alignment is the next step and then we are on to body mounts and maybe into the interior.
The Volkswagen's journey
- Thread starter Podagrower
- Start date
You are using an out of date browser. It may not display this or other websites correctly.
You should upgrade or use an alternative browser.
You should upgrade or use an alternative browser.
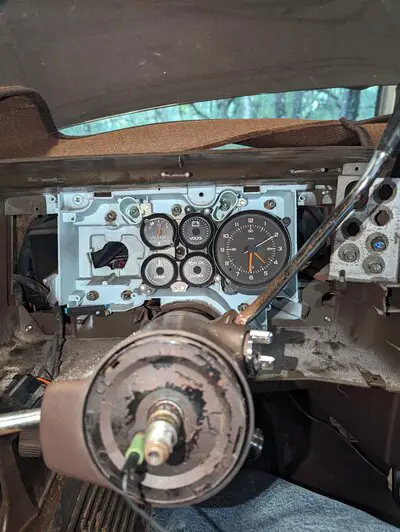
Project creep? What project creep. I stuck to the game plan completely. I certainly didn't decide that while I was working on the alignment and getting the steering wheel centered it would be a good idea to dive into the dash.
In unrelated news, both front turn signal holders were worn out and the ground strap broke so they have been replaced. I've sourced a set of gauges and a tach to replace the factory idiot lights. I broke the speedometer needle. I replaced the speedometer cable. And I got all the bolts for the body bushings broken loose.

In unrelated news, both front turn signal holders were worn out and the ground strap broke so they have been replaced. I've sourced a set of gauges and a tach to replace the factory idiot lights. I broke the speedometer needle. I replaced the speedometer cable. And I got all the bolts for the body bushings broken loose.

Gauges are done. The factory needle was broken on the volt meter, but I pulled the needle off our factory gas gauge and replaced the volt meter one. But somehow I also managed to break the needle on the gear indicator (superglue). And when I was replacing the last burnt out dash light I broke the needle off the volt meter again, fortunately(?) the gauge set I bought had a bad temp gauge so I had to replace it, giving me another spare needle to put on the volt meter. I also managed to rip out the computer that was from one of the vehicles previous engines.
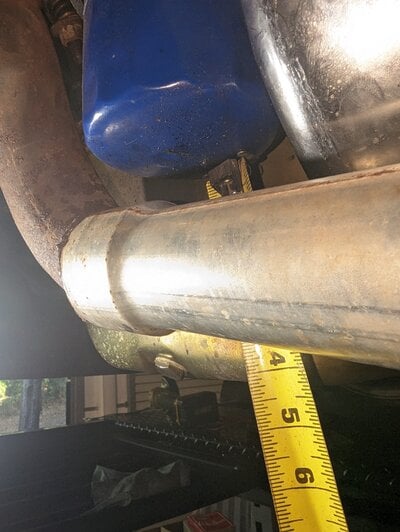
And on yesterday's game of "F$$$ the next guy" it was time to change the starter. I had been ignoring how much it sounded like the starter was dying and hoping it was just corrosion or lack of use that would come back around with some time. It did actually sound a lot better for a couple of days, but last weekend there were a couple of times that it was really questionable, and when I went looking online and found it was the ebay $25 starter I went looking for a new one. In my quest to do things as good as I can, I needed to pull the inspection cover to check the gear mesh and pinion clearance. Turns out all 4 bolts holding the inspection cover on are different size heads, lengths, and number of washers. And then, the inspection cover doesn't come off anyway because of how somebody installed the exhaust.
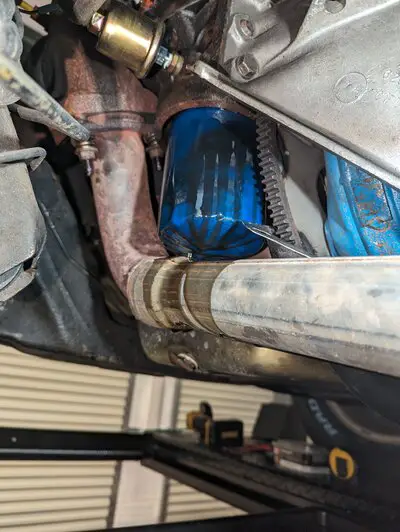
Well, the fu$$ery continues. I've been putting off changing the oil ever since I saw how much clearance they left between the filter and exhaust.

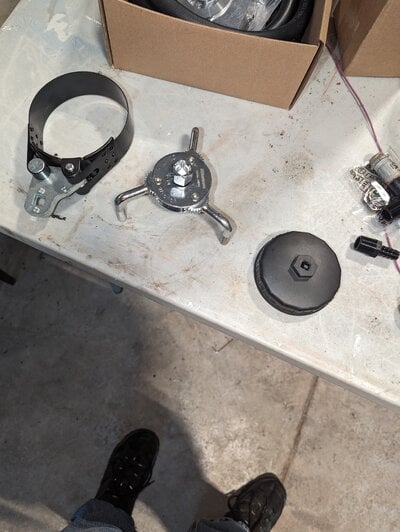
So I finally girded my loins and assembled the warriors to tackle the job.

None of those filter wrenches fit, but I was able to get the filter off by hand.

And to my astonishment, once I unbolted the inspection cover with all of it's different size bolts I was able to get the filter out. So I just put another filter the same size back in place and put all the mismatched bolts back in the inspection cover. Kidding. I installed a remote oil filter setup to move the filter up to the driver's side fender and changed the inspection cover bolts to a matching set. I did take an oil sample to send to Blackstone to get a baseline of engine health since I don't know anything about it. Oil capacity is now 7.5 quarts.

So I finally girded my loins and assembled the warriors to tackle the job.

None of those filter wrenches fit, but I was able to get the filter off by hand.

And to my astonishment, once I unbolted the inspection cover with all of it's different size bolts I was able to get the filter out. So I just put another filter the same size back in place and put all the mismatched bolts back in the inspection cover. Kidding. I installed a remote oil filter setup to move the filter up to the driver's side fender and changed the inspection cover bolts to a matching set. I did take an oil sample to send to Blackstone to get a baseline of engine health since I don't know anything about it. Oil capacity is now 7.5 quarts.
When we left off, we had a reasonable driving car, we've taken it to a couple of cars and coffees, but it's not a daily driver without AC in the summer. Then project creep poked it's head out again.
Since the first time I looked under the car, I wanted to fix the exhaust system. From the axle back is pretty good with decent bends and decent welds. But in-between the axle and engine was a different story. The glass packs (because of course it's got glass packs) are clamped on to the tail pipes but welded on the front side and the clamps leak a ton. Forward of the glass packs is a mix of welded pipes of varying sizes 2.5", 2", even some 1 7/8". Some of it was meh, but some of it looked like ray charles was calling out dimensions to stevie wonder to bend up while ronnie wilsap welded it up.
I'm not a welder. The last time I did exhaust work I found that soup cans were a much better patch material than beer cans. But it snowballed on me when I bought the double hump transmission crossmember in preparation of fixing the exhaust and somebody gave me a cheap welder. I bought some exhaust tubing and pre bent pieces and proceeded to ruin a weekend.
Problem the first. I needed flanges to fit the manifolds as the existing flanges are not suitable to reuse. Turns out, some of the ancient steel galvanized irrigation pipe I've ripped up had the perfect reducer to force into the exhaust pipe to make it flared. After that, it went pretty well. My welds suck, fortunately most of the joints are lap joints so they are more forgiving than the butt joints. I was able to weld most of it together on a table so I wasn't doing a bunch of overhead awkward welding under the car. It's not perfect, it looks like it was done by somebody who had never replaced an entire exhaust system before, but it looks at least as good as what the last guy was paid to do.
Got finished up last night and it was too late to take a test drive, but at least I could start it up on the lift. And there's a massive exhaust leak at both donuts......I think my flares are actually too deep and the exhaust pipe is bottoming out on the manifold before the donut seals. That's a problem for future me.
Can you slip in a second donut on top of the first one on each side?? Do a double donut with maybe a smear of exhaust cement between the two for a little more sealing?? This is a total shade tree make-shift repair possibility but if it works, it works.
And dont't be too hard on yourself about welding. Flux core is miserable to work with at the best of times. The metal has to be clean beyond Mother-in-Law level and even new material has to be sanded to remove the outer oxide. Trying to flux core body metal is an invitation to throw wrenches in frustration. The best thing to do post weld is to take a cheap H-F 4.5 mini-grinder and a 60 gr flap wheel and knock the high spots down. That gets you a smoother looking product and allows you to find places where you missed or went light on the penetration.
Nick
Last edited:
That is real close to the solution for the driver's side. The driver's side has a smog manifold and there is a taper to the outlet on the manifold. The existing donut was tapered top and bottom and I originally tried a donut that is tapered on one side with the other side slip fitting into the manifold (which is the donut style the passenger non smog manifold had). I thought just having one style donut on both sides would be easier. But whatever. I slipped the new donut that is tapered on both side in on the drivers side and I think it sealed.Can you slip in a second donut on top of the first one on each side?? Do a double donut with maybe a smear of exhaust cement between the two for a little more sealing?? This is a total shade tree make-shift repair possibility but if it works, it works.
Nick
The passenger side did not seal after taking the pipe down and cutting 1/2" off the flange. I can see the pipe was bottomed out before and no longer is.
For those of you in the back who were shouting "buy new hardware, dumbass. it won't take any longer to change the hardware out than to reuse the old hardware", you were right. Of course, that one guy yelling it was me and I ignored that guy. The exhaust manifold flange studs on the passenger side were rusty and crusty where the bolts were tightened originally. I tried running the nuts all the way up the studs and they just bottomed out on the rust, so I ran a tap up the threads and cleaned them up. Bingo Bango Bob's yer auntie no more exhaust leak there.
That, of course doesn't mean there weren't still leaks, but I was getting somewhere. A few pinholes and cracks in my non expert welds required grinding down and reworking but eventually I got it down to 2 leaky joints on the backside of the glasspacks and 1 pinhole that kicked my butt. But it was close enough to justify a test drive to see if the exhaust hit anything new, if it rattled loose anywhere, or if it just fell off at the first bump. The exhaust tick from the loose passenger side manifold is gone, the leak isn't noticeable so it's an improvement.
One thing I didn't mention was that I bought into the X pipe hype. The existing pipes were pretty close together and I thought I could fit it in together easily. It did make a pretty good fit, and here's what I didn't really expect-it really took the drone out of the exhaust inside the car. All the shouty barky rumble is still there outside the car, but I think my wife and I may actually be able to talk to each other in the car now (so take that as a warning if you are using the drone of the exhaust for reasons).
GBodyForum is a participant in the Amazon Services LLC Associates Program, an affiliate advertising program designed to provide a means for sites to earn advertising fees by advertising and linking to amazon.com. Amazon, the Amazon logo, AmazonSupply, and the AmazonSupply logo are trademarks of Amazon.com, Inc. or its affiliates.

