Hey folks,
got and installed this shifter a few months ago, but never posted pics. I got out today, took it appart and took some pics so you guys could see how it went in.
It's a QuickSilver, hooked up to my 700r4. I bought the "universal" so it can pretty much be addapted to fit any Auto trans up to 4spds. The instruction sheet is fairly explanitory, but the pictures are tough to read. It does a good job explaining how to install the parts supplied. But it's tricky if you are using your own custom setup.
First trick was mounting the shifter to the floor. I did not want to drop the trans to drill holes for a bracket, and unlike most setups, I wanted to keep my factory consoul and shift plate. So, I simply used the bracket that the factory shifter is attached to. I had to cut the rivets and grind down the extra bracket arms. Here's what it looked like:


I would not recommend trying to do this in one night when you're outside the city at a friends :lol: cuz if the new shifter doesn't work, then you can't use the old one you just cut up :wink:
When bolted to the bracket, the shifter was in the same location as the factory shifter. Almost all the holes were already there, few had to be enlarged, and just one new hole drilled.


When the consoul went on, there was interference with the metal frame of the consoul and the front body of the shifter mechanism. The metal frame of the consoul has a front and back face that covers the factory shifter assembly. I had to do some trimming on the front face, seen here:


Once the consoul frame is trimmed and installed, it looks like this:


This bracket also puts the shifter at the perfect height.


The B&M logo looks a little low, but the shifter is in [Park]… When shifting, the B&M logo is high enough to see.
Here is a picture of the two bolt locations that hold the consoul to the dash. If you have these bolted up and the shifter still hits the consoul frame, you need to do some more trimming.

Next came the shift plate. I did not want to use the chrome one supplied with the shifter, and wanted to keep my factory look. But since the new shifter has a longer travel thru [P] to [D1], the stick would hit when downshifting. I had to trim the back inside face to allow full travel of the shifter.

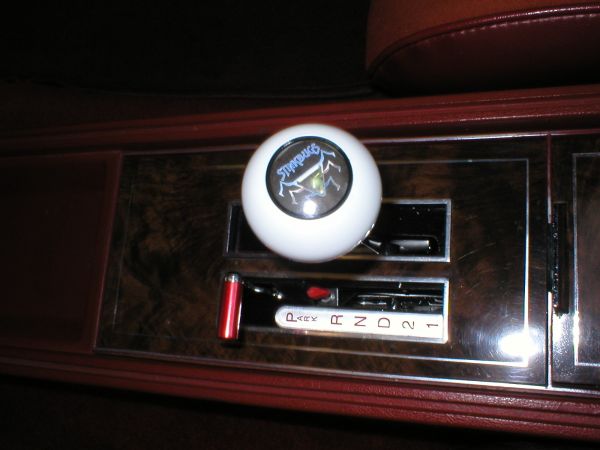
Here’s the finished product:


I think over all it turned out well. The install was not as smooth as I had hoped, but since when are costum setups simple? I did have to spend time later to level the bracket. I used shims and washers to get it just right.
Unfortunately, my shift marks do not line up, because of the rachet indicator… But I might sort that out later on too.
I did not talk about the shifter cable… But I will say that you MUST use the one they provide. Your stock cable will not work with the rachet shift points. You may also need to enlarge the floor hole the cable comes out of, as the supplied one is stiffer and does not flex much.
Hope you guys like my setup,
Feel free to comment!
got and installed this shifter a few months ago, but never posted pics. I got out today, took it appart and took some pics so you guys could see how it went in.
It's a QuickSilver, hooked up to my 700r4. I bought the "universal" so it can pretty much be addapted to fit any Auto trans up to 4spds. The instruction sheet is fairly explanitory, but the pictures are tough to read. It does a good job explaining how to install the parts supplied. But it's tricky if you are using your own custom setup.
First trick was mounting the shifter to the floor. I did not want to drop the trans to drill holes for a bracket, and unlike most setups, I wanted to keep my factory consoul and shift plate. So, I simply used the bracket that the factory shifter is attached to. I had to cut the rivets and grind down the extra bracket arms. Here's what it looked like:


I would not recommend trying to do this in one night when you're outside the city at a friends :lol: cuz if the new shifter doesn't work, then you can't use the old one you just cut up :wink:
When bolted to the bracket, the shifter was in the same location as the factory shifter. Almost all the holes were already there, few had to be enlarged, and just one new hole drilled.


When the consoul went on, there was interference with the metal frame of the consoul and the front body of the shifter mechanism. The metal frame of the consoul has a front and back face that covers the factory shifter assembly. I had to do some trimming on the front face, seen here:


Once the consoul frame is trimmed and installed, it looks like this:


This bracket also puts the shifter at the perfect height.


The B&M logo looks a little low, but the shifter is in [Park]… When shifting, the B&M logo is high enough to see.
Here is a picture of the two bolt locations that hold the consoul to the dash. If you have these bolted up and the shifter still hits the consoul frame, you need to do some more trimming.

Next came the shift plate. I did not want to use the chrome one supplied with the shifter, and wanted to keep my factory look. But since the new shifter has a longer travel thru [P] to [D1], the stick would hit when downshifting. I had to trim the back inside face to allow full travel of the shifter.

Here’s the finished product:


I think over all it turned out well. The install was not as smooth as I had hoped, but since when are costum setups simple? I did have to spend time later to level the bracket. I used shims and washers to get it just right.
Unfortunately, my shift marks do not line up, because of the rachet indicator… But I might sort that out later on too.
I did not talk about the shifter cable… But I will say that you MUST use the one they provide. Your stock cable will not work with the rachet shift points. You may also need to enlarge the floor hole the cable comes out of, as the supplied one is stiffer and does not flex much.
Hope you guys like my setup,
Feel free to comment!


