

Engine cover is looking good, coming along nicely! Straight flat sheetmetal is hard to MiG weld without warping. Nice progress overall, keep up the good work!
EL CAMINO 1983 El Camino 5.3 Swap / Build Thread
- Thread starter JohnIL
- Start date
You are using an out of date browser. It may not display this or other websites correctly.
You should upgrade or use an alternative browser.
You should upgrade or use an alternative browser.
- Status
- Not open for further replies.
Thanks D! That's high praise coming from you. I hemmed and hawed between 20ga and 18ga steel. I went with 20ga to keep the weight down and I'm happy with that. But, 18ga definitely would have been easier to weld. I braced the under side at two points along the long corners and across the back edge to help keep the warping to a minimum. It's not warp free, but it will pass the naked eye test. It was a fun diversion, but I'm not about to go into production.Engine cover is looking good, coming along nicely! Straight flat sheetmetal is hard to MiG weld without warping. Nice progress overall, keep up the good work!
John
Why eliminate the stock FPR?
That’s a nice job on the cover - ya got me thinking lol. I’d say take a step back from it for a day and then look at it again. Did you weld the underside? If no, then that might give you some more to grind into what you want rather than use filler.
BTW - great work!!!
That’s a nice job on the cover - ya got me thinking lol. I’d say take a step back from it for a day and then look at it again. Did you weld the underside? If no, then that might give you some more to grind into what you want rather than use filler.
BTW - great work!!!
NailHead,Why eliminate the stock FPR?
That’s a nice job on the cover - ya got me thinking lol. I’d say take a step back from it for a day and then look at it again. Did you weld the underside? If no, then that might give you some more to grind into what you want rather than use filler.
BTW - great work!!!
I eliminated the FPR almost by accident. Or, more accurately, by ignorance. I've done lots of engine swaps, but this was my first experience with an LS. I honestly didn't know there was a regulator built into the fuel rail. So, when we were first planning this project, I ordered a complete fuel system kit from MuscleRods. It came with the all-in-one filter/regulator/return. I fitted the Aeromotive fuel pump in the tank and regulator on the frame rail long before the LS arrived in the garage. It wasn't until after the first start up that I learned what that little gizmo on the fuel rail was. By that time, we had already capped off the return port on the rear of the fuel rail. Without the return line, the regulator just sits there. That seemed like an unnecessary leak risk. Thus, the plug. If I had it to do all over again, I probably wouldn't have purchased the fuel system kit. It's a good kit, but if I had known that there was already a perfectly good regulator on the engine, I could have built the fuel system less expensively with off-the-shelf AN line and fittings. In practical terms, the only thing the fuel system accomplished was to eliminate one fuel line (the return line) running through the engine bay. I hope others can learn from my experience. I'll certainly know better when I do my next LS swap.
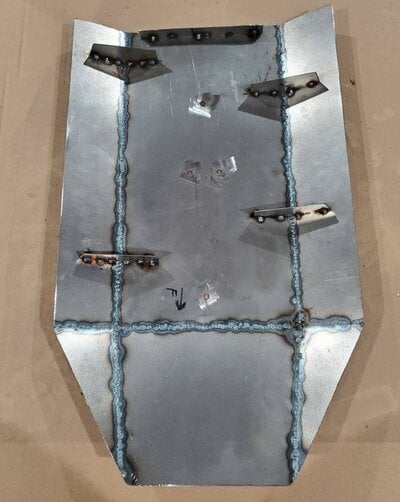
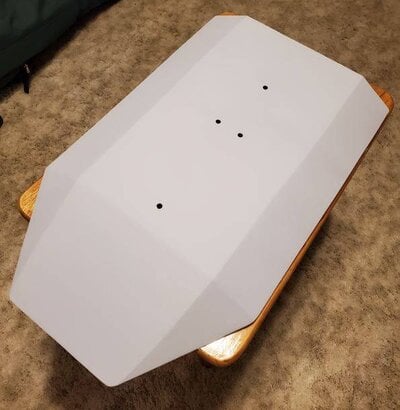
Thanks for the compliments and suggestions on the intake cover. I didn't weld up the inside, except in a couple of spots where I blew holes. I'm attaching a picture of the under side to show the bracing. The bracing did a lot to help to keep everything straight and avoid warping. Really, the top surface turned out pretty well. The filler is just to fill the grinding scratches. But, I get your point. If I wanted to avoid filler entirely, I could add some weld material to the back side, then dress the front side with a DA and finer grit paper. It kind of depends on how annoyed I get when it's time to fill all those scratches. 😛
Thanks.
John
Attachments
More progress. Sorry, no pictures this time.
Everything inside the doors
Now that the weather is a little warmer, we dug into a chore that I knew would be time consuming. The El Camino has manual locks, but power windows. Over the years, my uncle, father, and brother have all done various maintenance work inside the doors with varying degrees of effectiveness. Then, the car was parked for 20 years. After sitting for so long, everything inside the doors was dry, stiff, and in some cases, not operable. So, my son got a crash course on field stripping a G Body door.
Once we were inside the doors, we cleaned and lubricated everything:
Next we turned our attention the windows electrics. Even after the new switches, the driver window worked, but the passenger window didn't. After a little exploring, we discovered a broken wire on the connector behind the passenger side window switch. That connector doesn't appear to be available on the aftermarket and the driver side connector runs over $100. So, the only option was to fix the connector myself. I pulled the connector apart and soldered the wire back on. The connector isn't intended to be serviceable, so it didn't go back together neatly. But, it all works now. Time will tell how long that connector lasts. The electric windows are as slow as you would expect, but they do work pretty smoothly. Depending on how annoyed we get with the slow windows, we may invest in one of those snazzy "Window Racer" units. I would love to hear from anyone who has installed one. Thoughts?
 www.dixierestorationdepot.com
As we reassembled the doors, we corrected a few more family sins. Neither of the pull straps were installed correctly and the driver side pull handle (the little pocket thingy in the door arm rest) wasn't screwed down. We hunted up the correct screws and tightened everything down. Everything works the way it should now. You can open (and close) both doors without fear of destroying the interior panels. The only thing left to concur on the doors is the passenger side outside mirror. The mirror glass and the mirror pedestal were both broken by a vandal. I found new glass at O'Reilly and a forum member is helping us out with a replacement pedestal. That will all get installed when we do the body work on the doors.
Windshield Washer fluid pump replacement
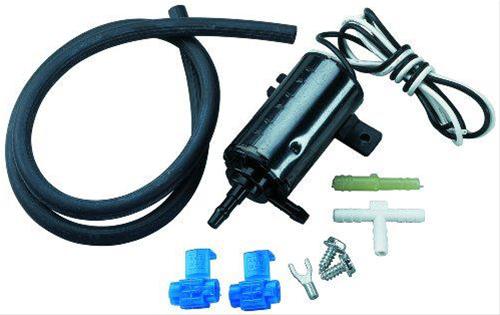
The factory pump (integrated with the wiper motor) gave up the ghost at least 25 years ago, but the wiper motor works just fine. So, rather than sourcing a replacement for the anemic squirt-squirt-squirt pump, we stuck to our modernization theme and opted for an aftermarket electric pump.
 www.summitracing.com
This is easily one of my top 5 favorite upgrades to the El Camino so far. The new pump provides a steady high pressure stream of washer fluid, like our modern daily drivers. MUCH better than the weak spirting factory design. The pump is so small that it virtually disappears in the shadow of the washer fluid tank on the inner wheel well. And, the wiring was simple. With a little help from the wiring experts here on the forum, I identified the correct wires on the factory pump.
White wire = 12v positive
Pink wire = switched negative.
Now, when you hit the washer fluid switch, the windshield is clean, RIGHT NOW! I can't recommend this upgrade enough for anyone who plans to drive their G-body in inclement weather.
What's Next?
If the weather cooperates, I'm hoping to spend some time finishing up the intake cover. I'm eager to see it finished. It should dress up the engine bay nicely.
Everything inside the doors
Now that the weather is a little warmer, we dug into a chore that I knew would be time consuming. The El Camino has manual locks, but power windows. Over the years, my uncle, father, and brother have all done various maintenance work inside the doors with varying degrees of effectiveness. Then, the car was parked for 20 years. After sitting for so long, everything inside the doors was dry, stiff, and in some cases, not operable. So, my son got a crash course on field stripping a G Body door.
Once we were inside the doors, we cleaned and lubricated everything:
- Door strikes and latches
- Latch release levers and linkages (interior and exterior)
- Door locks & linkages
- Window tracks, pivots, and gears
Next we turned our attention the windows electrics. Even after the new switches, the driver window worked, but the passenger window didn't. After a little exploring, we discovered a broken wire on the connector behind the passenger side window switch. That connector doesn't appear to be available on the aftermarket and the driver side connector runs over $100. So, the only option was to fix the connector myself. I pulled the connector apart and soldered the wire back on. The connector isn't intended to be serviceable, so it didn't go back together neatly. But, it all works now. Time will tell how long that connector lasts. The electric windows are as slow as you would expect, but they do work pretty smoothly. Depending on how annoyed we get with the slow windows, we may invest in one of those snazzy "Window Racer" units. I would love to hear from anyone who has installed one. Thoughts?
Dixie Restoration Depot
www.dixierestorationdepot.com
As we reassembled the doors, we corrected a few more family sins. Neither of the pull straps were installed correctly and the driver side pull handle (the little pocket thingy in the door arm rest) wasn't screwed down. We hunted up the correct screws and tightened everything down. Everything works the way it should now. You can open (and close) both doors without fear of destroying the interior panels. The only thing left to concur on the doors is the passenger side outside mirror. The mirror glass and the mirror pedestal were both broken by a vandal. I found new glass at O'Reilly and a forum member is helping us out with a replacement pedestal. That will all get installed when we do the body work on the doors.
Windshield Washer fluid pump replacement
The factory pump (integrated with the wiper motor) gave up the ghost at least 25 years ago, but the wiper motor works just fine. So, rather than sourcing a replacement for the anemic squirt-squirt-squirt pump, we stuck to our modernization theme and opted for an aftermarket electric pump.
Trico Wiper Blades 11-100 TRICO Windshield Washer Pumps | Summit Racing
Free Shipping - TRICO Windshield Washer Pumps with qualifying orders of $99. Shop Windshield Washer Pumps at Summit Racing.
www.summitracing.com
This is easily one of my top 5 favorite upgrades to the El Camino so far. The new pump provides a steady high pressure stream of washer fluid, like our modern daily drivers. MUCH better than the weak spirting factory design. The pump is so small that it virtually disappears in the shadow of the washer fluid tank on the inner wheel well. And, the wiring was simple. With a little help from the wiring experts here on the forum, I identified the correct wires on the factory pump.
White wire = 12v positive
Pink wire = switched negative.
Now, when you hit the washer fluid switch, the windshield is clean, RIGHT NOW! I can't recommend this upgrade enough for anyone who plans to drive their G-body in inclement weather.
What's Next?
If the weather cooperates, I'm hoping to spend some time finishing up the intake cover. I'm eager to see it finished. It should dress up the engine bay nicely.
Last edited:
I bought and installed a window racer for Olds Cool, it made a significant difference IMO. I covered it in the Olds Cool build thread, you’ll just have to try and find it if you want. I believe I even posted links to videos on Instagram after the install. It sped up both windows as well as the AstroRoof.
Thanks for the reply. I'll definitely check out your review. I think the window racer would help, but I wanted to make sure it wasn't just a gimmick. Much appreciated.I bought and installed a window racer for Olds Cool, it made a significant difference IMO. I covered it in the Olds Cool build thread, you’ll just have to try and find it if you want. I believe I even posted links to videos on Instagram after the install. It sped up both windows as well as the AstroRoof.
I will second that on the window racers install. Improved the electric window speed on my monte carlo.
Progress has been SLOW...
The weather absolutely refuses to cooperate. We occasionally get a warm day, but it rarely lasts more than one day. That makes it really difficult to spend any quality time in the garage. I can't wait for summer. In the meantime, we try to get out there whenever we can.
Engine Intake Cover
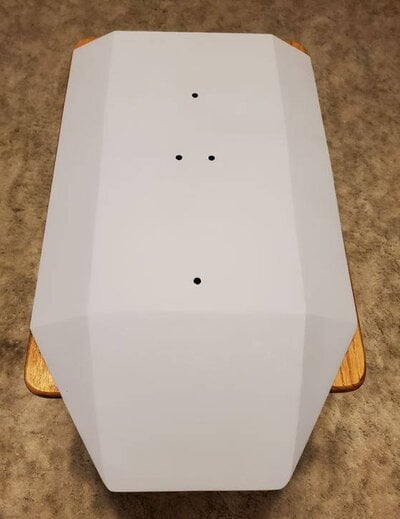
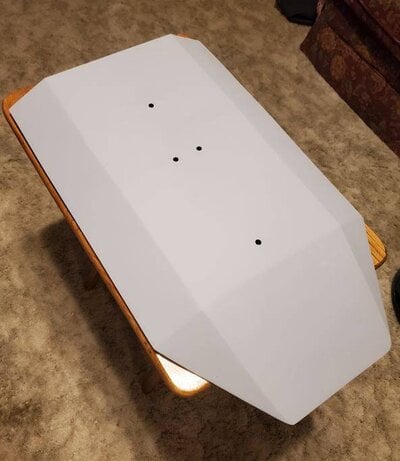
One thing that is almost impossible to do in cold weather is bodywork. Putty and paint don't like cold temperatures and moist air. I've only had two days in the past three weeks that were warm enough for body filler to set and primer to dry. The good news is that was enough time to get the ripples smoothed and get the surface prepped for paint. You can see how it turned out in the pictures below. Along the way, I realized (and remembered) a few things.
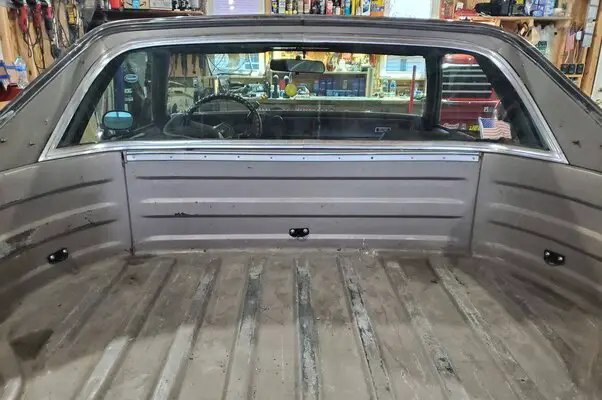
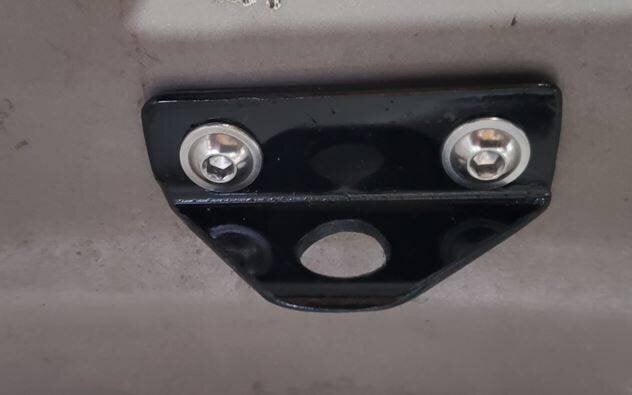
Cargo Tie Downs
When the El Camino was new, it came with just about every dealer option available. Bed rails, tonneau cover, tie downs, it had it all. Over the years, all of those items were removed. What was left behind were all the holes in the sheet metal. We plan to weld up and smooth out the bed rail and tonneau cover holes, but the tie down nutserts are still there and they're still usable. We just needed a set of tie downs to bolt on. Have you looked at the price of a set of factory tie downs? Those silly little chunks of bent wire must have a solid gold core. Needless to say, I wasn't interested in paying for originality. So, we made our own tie downs out of angle steel that we already had on hand. The only cost was the stainless steel mounting screws. On the bright side, they turned out well and I think they're probably stronger than the original wire tie downs anyway. Pictures below.
3rd Brake Light
This one was my son's idea and it's a good one. The location of the taillights is one of the worst parts about the G-body El Camino design. They're too far below the line of sight of other vehicles. As pickup trucks and SUV's (we have one of each) become more popular, the problem gets worse. We've all been conditioned to look for brake lights high up in the air, in our natural field of vison. One day, my son asked me two questions. 1) Why the heck doesn't this thing have a 3rd brake light up on the back of the cab, like our modern vehicles? 2) Could we add one?
I decided right then and there that my son was brilliant and we set about looking for an aftermarket solution. We found an inexpensive (less than $20 on Amazon) LED strip brake light that should do the trick nicely. The wiring is simple because we've haven't replaced the headliner yet and the brake light wiring passes through the cab under the driver side door sill. We've already tapped into the light blue wire that powers the brake lights and run a wire up the driver side B pillar to the roof. The next time we get a warm day in the garage, we'll drill some mounting holes over the rear window and mount the light.
Here's the light we're using:
It won't exactly look like it came from the factory, but it will definitely be visible. The added safety is well worth the styling compromise. More to come on this one...
John
The weather absolutely refuses to cooperate. We occasionally get a warm day, but it rarely lasts more than one day. That makes it really difficult to spend any quality time in the garage. I can't wait for summer. In the meantime, we try to get out there whenever we can.
Engine Intake Cover
One thing that is almost impossible to do in cold weather is bodywork. Putty and paint don't like cold temperatures and moist air. I've only had two days in the past three weeks that were warm enough for body filler to set and primer to dry. The good news is that was enough time to get the ripples smoothed and get the surface prepped for paint. You can see how it turned out in the pictures below. Along the way, I realized (and remembered) a few things.
- I really suck at body work! I haven't spread and sanded body filler in over twenty years. I was lousy at it then, and I'm lousy at it now.
- Flat panels aren't really flat. No matter how nice my metalwork looked, the facets of the intake cover still had some minor warping. The deepest part of the filler was less than 1/8", but it took me four thin coats to get it flat enough for the eye-ball test.
- long sanding blocks are your friend. Back when I was in high school, squishy sanding blocks and rolls of cheap adhesive sandpaper weren't common. Now, blocks and rolls of sandpaper are cheap and easy to get. Cutting down the filler with a 12" block made it much easier to flatten the surface. I still suck at bodywork, but I think it will pass inspection.
- High build primer is amazing stuff! After the fourth coat of filler, I was getting frustrated. No matter how much I filled and sanded, the surface still looked like dog food. I decided it was as good as it was going to get. Then, after two fat coats of high build primer, it looks a whole lot better. After sanding the primer, I gave it two more coats of high build and it almost looks like I know what I'm doing.
Cargo Tie Downs
When the El Camino was new, it came with just about every dealer option available. Bed rails, tonneau cover, tie downs, it had it all. Over the years, all of those items were removed. What was left behind were all the holes in the sheet metal. We plan to weld up and smooth out the bed rail and tonneau cover holes, but the tie down nutserts are still there and they're still usable. We just needed a set of tie downs to bolt on. Have you looked at the price of a set of factory tie downs? Those silly little chunks of bent wire must have a solid gold core. Needless to say, I wasn't interested in paying for originality. So, we made our own tie downs out of angle steel that we already had on hand. The only cost was the stainless steel mounting screws. On the bright side, they turned out well and I think they're probably stronger than the original wire tie downs anyway. Pictures below.
3rd Brake Light
This one was my son's idea and it's a good one. The location of the taillights is one of the worst parts about the G-body El Camino design. They're too far below the line of sight of other vehicles. As pickup trucks and SUV's (we have one of each) become more popular, the problem gets worse. We've all been conditioned to look for brake lights high up in the air, in our natural field of vison. One day, my son asked me two questions. 1) Why the heck doesn't this thing have a 3rd brake light up on the back of the cab, like our modern vehicles? 2) Could we add one?
I decided right then and there that my son was brilliant and we set about looking for an aftermarket solution. We found an inexpensive (less than $20 on Amazon) LED strip brake light that should do the trick nicely. The wiring is simple because we've haven't replaced the headliner yet and the brake light wiring passes through the cab under the driver side door sill. We've already tapped into the light blue wire that powers the brake lights and run a wire up the driver side B pillar to the roof. The next time we get a warm day in the garage, we'll drill some mounting holes over the rear window and mount the light.
Here's the light we're using:
It won't exactly look like it came from the factory, but it will definitely be visible. The added safety is well worth the styling compromise. More to come on this one...
John
Attachments
Last edited:
I was always interested in seeing how hard it would be to put an LED strip into the upper bed moulding. Thought about doing something in the rear window channel, but figured if there was ever a problem the adhesive would suck. Others have junkyard swapped brake lights on the inside of the glass. Reflection into the cab becomes a concern. Think the wagon guys found something that works. Not sure, maybe someone else will chime in.
- Status
- Not open for further replies.
Similar threads
- Replies
- 0
- Views
- 323
- Replies
- 8
- Views
- 554
- Replies
- 2
- Views
- 264
GBodyForum is a participant in the Amazon Services LLC Associates Program, an affiliate advertising program designed to provide a means for sites to earn advertising fees by advertising and linking to amazon.com. Amazon, the Amazon logo, AmazonSupply, and the AmazonSupply logo are trademarks of Amazon.com, Inc. or its affiliates.