4 Wheel Disc Brake Conversion

Status
Not open for further replies.

Redguy1

Not-quite-so-new-guy
Nov 21, 2012
11
0
1
61
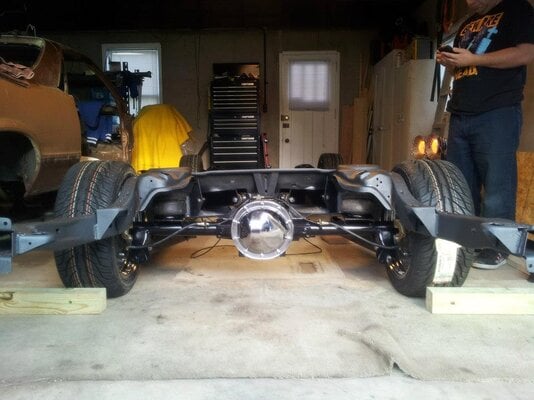
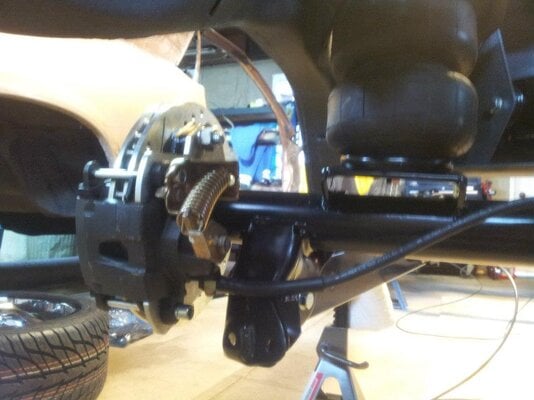
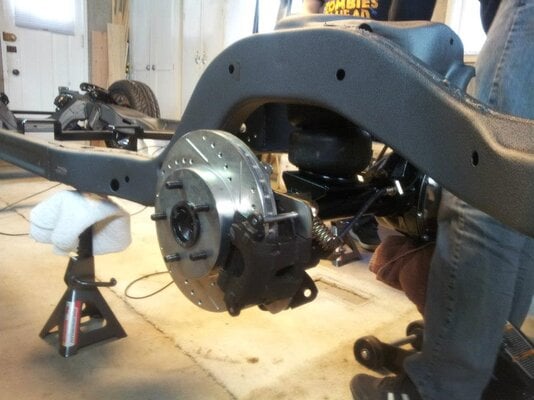
I have been working on my 1987 El Camino for about 4 years now. It is a complete frame up restomod project that has had its fair share of set backs. One of the many set backs has been the rear disc brake conversion. We are currently using a Stainless Steel (thats the company) conversion kit from Summit racing. However, due to the fact that we are also air bagging the suspension, and lowering the car, we are running into some serious clearance issues with the emegency brake mechanism when the kit is installed (per the instructions) with the calipers to the front of the rotor. The e-brake mechanism overlaps the rubber bump stop on the stock axle and subsequently the frame when the car is lowered. When we place the rotor to the rear of the caliper, the mechanism hits the bottom half of the shock in the stock location.
As this is my first disc brake conversion, im not sure if these clearance issues are normal and I just have to modify parts in order to lower the car, or is this a major manufacturing issue with the conversion kit. Does anyone know of a conversion kit that does not have these issues? I have never seen an El Camino with 4 wheel disc and this may the very reason why.
 

Attachments

  • 554062_4860858685815_1869187058_n[1].jpg
    554062_4860858685815_1869187058_n[1].jpg
    87.6 KB · Views: 1,419
For the shocks you can use some relocation brackets. Its basically an "L" to move the shock mounting slightly inward. The only way to create more clearance on a gbody is to notch & re-inforce the frame. This will give you clearance for larger brakes and larger wheels.
 
A few fellas on here have used flynbye.com for there conversion. I myself went with there backing plate and fourth gen camaro lt1 calipers. These calipers end up being placed to the rear of the rotor. Leaving the ebrake mechanism running into the stock shock mount. Like axis g mentioned a simple "L" shaped bracket mounted on the inner of the LCA bolt fixes the clearance issues. Look up LScustoms posts his have real good detail. I have pics also, links in the signature.

:worthless:
 
Thanks Guys. It seems that you are giving us the exact answer that we have come up with on our own. We will follow through using the Stainless Steel (company name) conversion but we are going to contact the other aftermarket suppliers you mentioned for the shock relocation brackets. We will also contact Stainless Steel directly and notify them of thier design oversights and hopefully others will not have to go through the issues we have in order to make thier systems work. We will post pics along the way. thanks for your help.
 
I wold love to add some photos of this project but instructions for doing this seem to be lacking on my album page. Can anyone give plain simple instructions on how to accomplish this?
 
Ok. So I figured out how to post some pics of the ongoing project. New ones coming as soon as we make more progress
 

Attachments

  • 376441_4750636570331_1590862789_n[1].jpg
    376441_4750636570331_1590862789_n[1].jpg
    89.8 KB · Views: 1,376
  • 39805_1570606151558_4323029_n[1].jpg
    39805_1570606151558_4323029_n[1].jpg
    45.8 KB · Views: 1,353
  • 62571_4750637890364_798953806_n[1].jpg
    62571_4750637890364_798953806_n[1].jpg
    112 KB · Views: 1,362
  • 554062_4860858685815_1869187058_n[1].jpg
    554062_4860858685815_1869187058_n[1].jpg
    87.6 KB · Views: 1,378
Motors gorgeous. Motor mods? What direction are you going with the build. Keep the pics coming buddy.
 
update on 1987 Restomod

The motor is a stroked out 383 with 12.5/1 compression ratio, eagle crank and rods. That is backed up with a set of AFR heads and a quick fuel carb. The Moroso valve covers are carbon fiber print and will match the bright red & dark red two tone paint. A seriously beafed up 200R4 trani will be installed leading back to the Grand National rear axle with the 4 wheel disc brake conversion. Body will be shaved completely clean with the exception of the chrome front facia and have modern pop doors. Interior will be light cream colored leather with a custom center counsol and thumping sound system. Modern gauges, swithes and a computerized automatic ride height adjuster will be installed at the end of the build. No projected completion date as I have a full time job and a family who would love to see me once in a while. Yes. More pics will follow as progression occurs.
 
nice looking start for having 365k on it! great start, and I love the red on that engine! looking foward to the progress!
 
attached you guys will find pics of the finshed rear disc brake conversion and the rear air ride system. We ended up using the Stainless Steel system but had to make adjustments to both the mounting plates and the shock locations. All and all not a bad conversion. However, I would have expected the designers to notate the fact that this system WILL NOT work in a lowered car.
 

Attachments

  • finished rear axle.jpg
    finished rear axle.jpg
    90.9 KB · Views: 1,106
  • modified brakes & rear air ride.jpg
    modified brakes & rear air ride.jpg
    74.8 KB · Views: 1,181
  • rear disc brake conversion.jpg
    rear disc brake conversion.jpg
    82.3 KB · Views: 1,608
Status
Not open for further replies.

GBodyForum is a participant in the Amazon Services LLC Associates Program, an affiliate advertising program designed to provide a means for sites to earn advertising fees by advertising and linking to amazon.com. Amazon, the Amazon logo, AmazonSupply, and the AmazonSupply logo are trademarks of Amazon.com, Inc. or its affiliates.

Please support GBodyForum Sponsors

Classic Truck Consoles Dixie Restoration Depot UMI Performance

Contact [email protected] for info on becoming a sponsor