BUILD THREAD 81 Buick/Olds Turbo Wagon 02/15/2024 More Parts!

How's everyone been? As you guys know, I've been extended on my desert vacation. This have given me a bunch of time to kill.

So, I've decided to update and start adding some content to my YouTube channel. Nowadays the first place everyone goes for information is YouTube, so along with the message boards I'm apart of, I'm going to be adding videos also.
I've got a ton of projects I have my hands in. 1932 Ford, the wagon, 69 coda, 50 Plymouth, 51 studebaker, 83 D150, chevy trucks, HHR, 56 chevy belair, 64 chevelle, 70 monte. That's besides the quads, go karts and rc trucks.
So if your like me, and watch YouTube to kill time. Check out my channel. I'll be adding alot of videos this year.
 
Thanks for the update. Try to stay healthy while protecting us from ourselves.
 
Last edited:
I'm in - subscribed to your channel.
 
  • Like
Reactions: liquidh8
Thanks for the update. Try to stay healthy while protecting us from ourselves.

Right now, we are protecting ourselves from ourselves, haha. I can assure you I'd much rather be home working on some projects. I've got so many projects, it's about time I get some in the the youtube world for all to see.

I'm in - subscribed to your channel.
Thank you! I'll be home in a few weeks, and I can start getting some real videos up. But in the meantime, I'm just pulling some pics of projects and getting vids together of popular things and I'll posting it.
 
Using my tax free deployment cash, I've picked a few things up for the wagon.

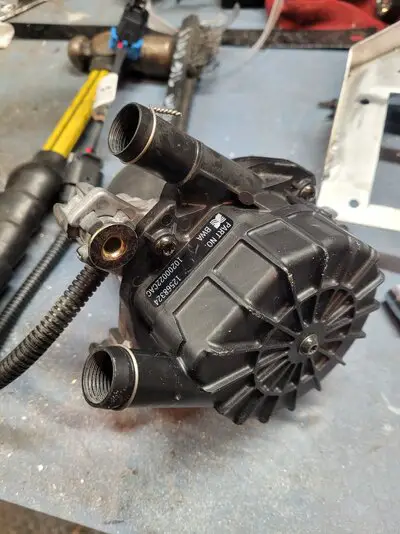
I have the 5 disc 0 pump Vigilante converter for it. I also picked up two mishimoto knock off catch cans, one 2 port and one 3 port. I also got a gm smog pump to use as a crankcase evap pump, along with a harness and hobbs switch from racetronix. And finally, a new coolant reservoir and washer fluid reservoir, the ones I have are dingy.

I'll update the thread, and my YouTube channel with video, once I'm home and do the work.
 
Re: 81 Century/GN Wagon build-up 56K beware!!

I welded the bottom of the door skin patches on, got some warpage, ever though I had a bucket of water, a sponge, and jumped around 🙁 oh well, I hammered and dollied it pretty strait, the used the metal to metal on the seam. I got both doors and the passenger side front in this stage.

I media blasted all four doors' skins, there was filler and questionable adhesion of the red paint. So I just went to bare metal to start anew.

I bought a gallon of slick sand, a gallon of rage gold and my epoxy primer. I also got a replacement tube of panel adhesive that is 3 moths old. I'll be trying it once more on the license plate hole in the tailgate, I want to smooth it over.

I took for door handles, and ground the ridges of the face of them, to smooth them out. I like the look. I'll be doing 8 outside door handles this way. Ill paint 4 black, and 4 body color, so I can decided on what looks best. I also filled the pits in the headlight buckets and the hatch glass handle, the sprayed them with 2K high build. That was tonight.

I have to go out and buy a primer gun, or a real big tip for one of the guns my brother and I have. 1.8mm or bigger, to spray the slicksand.

I welded the DS door mirror holes shut, and a patch in the hinge area. Then grinded all the welds down, and apply metal to metal on the lower skin seam and the mirror holes.

Ok, now for some of the pics. I started laying the Rage gold on the rear doors. There were so many cherry dents, I hammered them out, and skimmed almost the whole door. ](*,) But the filler is super thin. After the rage is worked, then a few coats of slick sand and lots of blocking, it'll be mirror flat :mrgreen: Oh, I also just blasted the whole outer skin to get all the old shabby paint and bondo off.

Lower skin tacked, all the doors looked the same so I slacked on the pics a bit. 🙁
31493864329_large.jpg


After welding
31493864322_large.jpg


Drivers side door mirror holes welded up. I'll be using the 88 Monte SS mirrors, but I am pushing them way forward, right at the beginning of the window frame.
31493864321_large.jpg


This rear door, is the same as all four. All those dark spot are low spots, cherry dings. The is a crap load of them! :? The lower doors are flattened out with the metal to metal, again, it's thin but needed.
31493864324_large.jpg


The drivers side front door, I welded a patch in here.
31493864323_large.jpg


Some rage gold
31493864320_large.jpg


More rage gold
31493864319_large.jpg


Sanding
31493864318_large.jpg


I have to do another pass with the rage gold, then they'll be ready for epoxy/sealer, then Slick Sand.


Here are the headlight bezels. They are loaded with pits. I primed hem and the have some filler on them now. Need to get some more pics, but this is after blasting and some etching primer. These are metal.
31493864328_large.jpg


31493864327_large.jpg


Door handles with the rib ground flat, I think they will look great. I am undecided on black or body color, so i did 8 exterior handles like this.
31493864326_large.jpg


31493864325_large.jpg


I will say this, if the adhesive would have worked, the lower doors would have less work in them. And, if there were replacement skins available, I would have done that instead.
I did this with my door handles, too, but I still think they are kind of ugly. Has anyone done anything else?
 
  • Like
Reactions: liquidh8
I've been MIA on the site for a while, I know, I know.... With the forums not using Tapatalk I don't get the notifications like I'm used to.
I've been busy with every other project other than the wagon. I have put 1800 miles on it this season, a few car shows also.

Boost is still at 22/20, but I have been working the tune, and it was really fat, so as I've been leaning it out, its been getting faster. The Vigilante Converter is awesome! A different animal with some stall. The coolant and washer tanks are in and look great! I also replaced the TPS, the original 87 one was flaking out. STILL no harness from racetronix, I've called Full Throttle so many times, and I keep getting "we'll call you back". Mind you I've ordered this harness in May. We'll see how this plays out.

So since I have no evac pump harness, I haven't installed it yet, the evac system and catch cans are gonna be a winter project. If you have Instagram, look for #mehls_mountain_garage, I post on there all the time. I'm behind on YouTube videos, I need to take some time and edit it all together.

I also just put a brand new engine in my daily, an 07 HHR with a 2.2 and 5 speed.
 
Small update:
I finally received the harness for the evac pump. I'll be modifying it to clean it up a bit, too many unneeded connectors for my application. In the new year I'll start the catch can and evac install. I need to replace the newish rear u-joint, it has a ton a play for some reason. Those are my prime winter projects on the wagon.

I've been doing other piddly things on my other rides and my brothers cars.

My cousins husband is also building a metric (g-body) dirt track car, so I'll have my hands all in that crew chiefing it.
 
Good morning! I have been so wrapped up worth adding things to my Instagram, and shooting video for my YouTube, I forget to take pictures of things. In any case, here is an update on the wagon.

I had always planned on running a PCV catch can, and a crankcase evac pump to help with crankcase pressure. I'm not trying to pull a huge vacuum and make more power, just trying to keep the crankcase from pressurizing and pushing the oil mist out of my breathers and all over the engine, which it is doing. Here are a few things I bought:

I picked up a pair of catch cans from FleaBay, a 2 port and a 3 port, both are knockoffs of a mishimoto. They are compact, and have 3/8" NPT threaded holes, and also came with some barb fittings which I will not be using.
I also picked up a new Secondary Air injection Pump, to be used as a crankcase evacuation pump, 2 valve cover 10an adapter fittings, a Hobbs switch, and a harness from Racetronix.
I bought some 10an, and 6an, fittings and hose from Fleabay to plump it all in. This hose an fittings are all black. The PTFE hose I have is stainless with stainless fittings, and i overkill for this application.
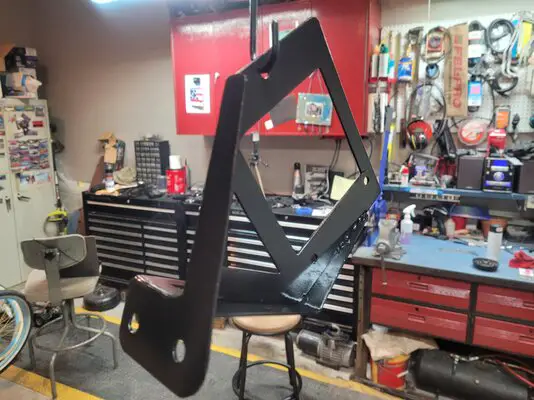
I bought some aluminum to fabricate a bracket to mount the pump behind the bumper on the PS under the battery.

So, with all that being said, I fabricated a mount out of aluminum, welded it up, painted, and mounted the pump to it using some stainless steel hardware. I ran the wire harness from racetronix along with all the other wiring, putting the relay behind the PS headlight close to the pump location. I could have built a harness, but to be honest, it would have cost the same, plus all my time. I will modify a few things once it's complete though. I mounted the Hobbs switch with a simple bracket I made out of some steel. Its just an angle, with a hole tapped to 1/8" npt, and mounted to the intercooler. I used some vacuum line an tee'd into the BOV. Now, I was going to take the intake off and drill and tap the hole, but them I would have had to un another harness from the Hobbs to the relay, and honestly, this looks cleaner and functions fine.

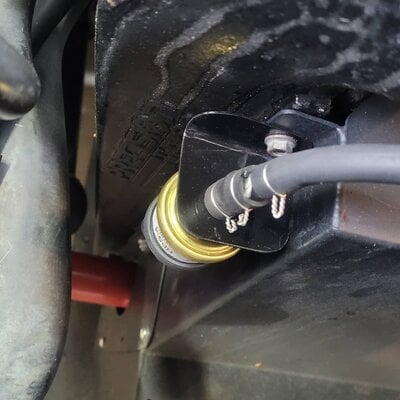
Here is the hobbs. I use safety wire on all the vacuum hose connections to keep them from blowing off under boost.

IMG_20210221_170044_719.jpg

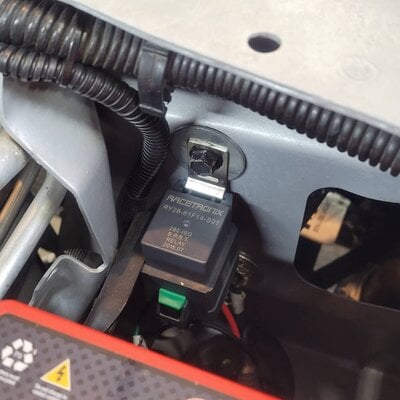
Here you can see the relay mounted to a bolt holding the header panel brace to the radiator support. This is behind the battery.

IMG_20210221_170044_682.jpg

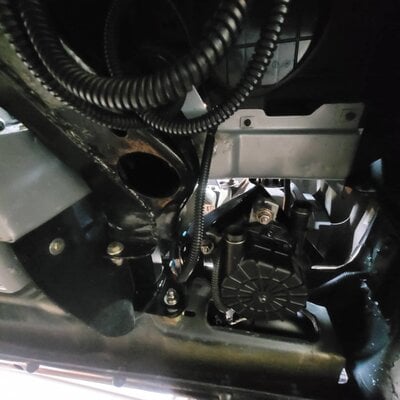
Not the best pic, but the best I could get from the floor. This is of the pump mounted to the aluminum bracket mounted to 2 bolts holding the bumper bracket on. I tapped the outlet ports of the pump for npt to 10an fittings.

IMG_20210221_170044_775.jpg

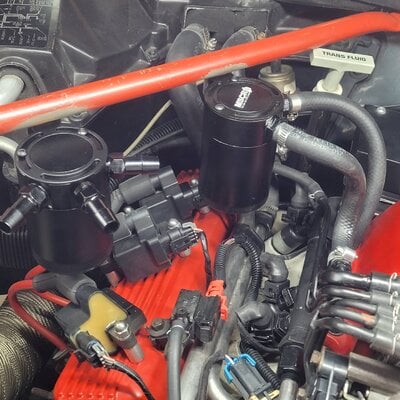
Here are the catch cans mounted to the monte carlo bar, or fender support. I made and welded some tabs to the underside to hold the catchcans. I will repaint the bars when the weather is warmer. I used to home temporarily for the PCV can, the 6an hose and fittings are in transit.

IMG_20210221_170044_652.jpg

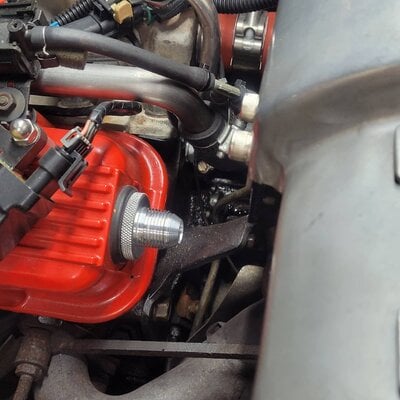
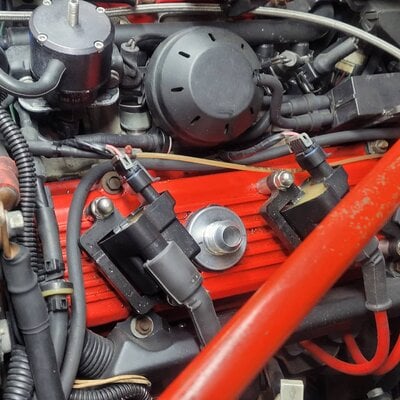
Here are the 2 10an valve cover adapter fittings. These are Metco pieces and will get 10an hose run from them to the 3 port catch can.

IMG_20210221_170044_627.jpg
IMG_20210221_170044_581.jpg

Next post has more...
 
Last edited:
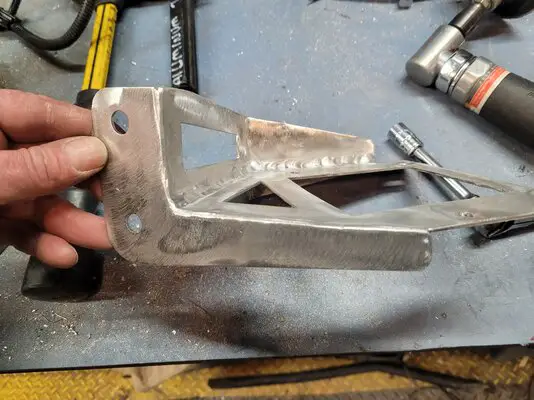
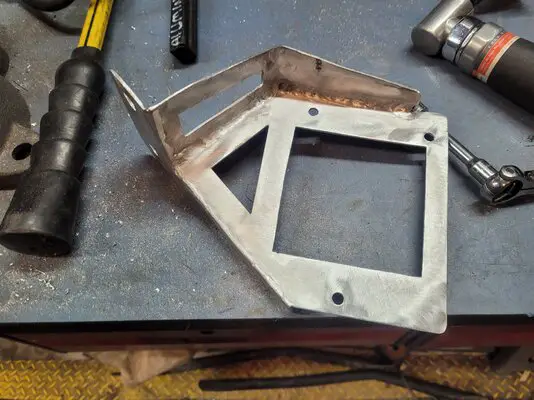
Here are a few of the aluminum bracket I made. My aluminum TIG is rusty, but it looks fine. I painted it with some underhood black.
20210219_191714.jpg

20210219_191711.jpg

20210219_194123.jpg

20210219_191706.jpg

I'll update this weekend or next week when the hose and fittings arrive. Check out my IG if you have it @mehls_mountain_garage. I'll be making a video also to put on YouTube.
 
Last edited:

GBodyForum is a participant in the Amazon Services LLC Associates Program, an affiliate advertising program designed to provide a means for sites to earn advertising fees by advertising and linking to amazon.com. Amazon, the Amazon logo, AmazonSupply, and the AmazonSupply logo are trademarks of Amazon.com, Inc. or its affiliates.

Please support GBodyForum Sponsors

Classic Truck Consoles Dixie Restoration Depot UMI Performance

Contact [email protected] for info on becoming a sponsor