

82 El Camino, 6OHELCO
- Thread starter cdunson79
- Start date
You are using an out of date browser. It may not display this or other websites correctly.
You should upgrade or use an alternative browser.
You should upgrade or use an alternative browser.
- Status
- Not open for further replies.
Interesting. I hope it works OK for you. The jury is still out on the Autometer sender I used. i need to run a tank or 2 through it to know for sure. It was slow to come up to full on my initial fill up. I did find out my tank holds 24 1/2 gallons filling it up from clear empty. And that was the first click off on the gas stations nozzle so the domed area was not filled.Good point on the expansion. I'll do an extension. Float seems to work ok at this point. Was ok floating and just a tad slow falling back down, kind of the opposite of yours.
Btw, keep in mind you will have to undo your zip tie on the vent line when you install the tank. The hose has to run above the rail that the top of the tank mates to.
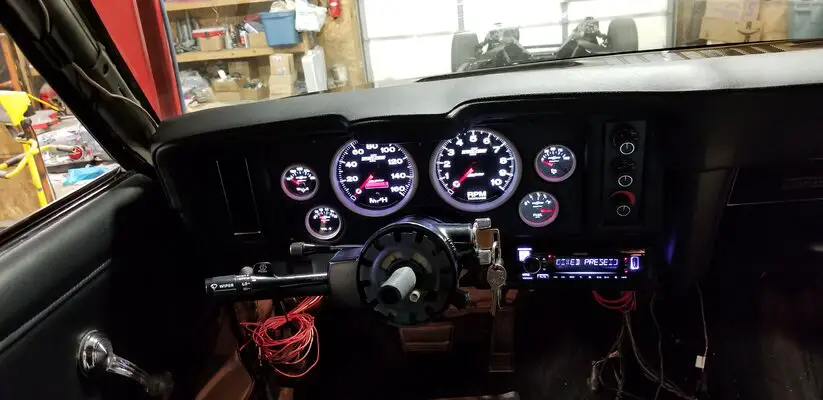
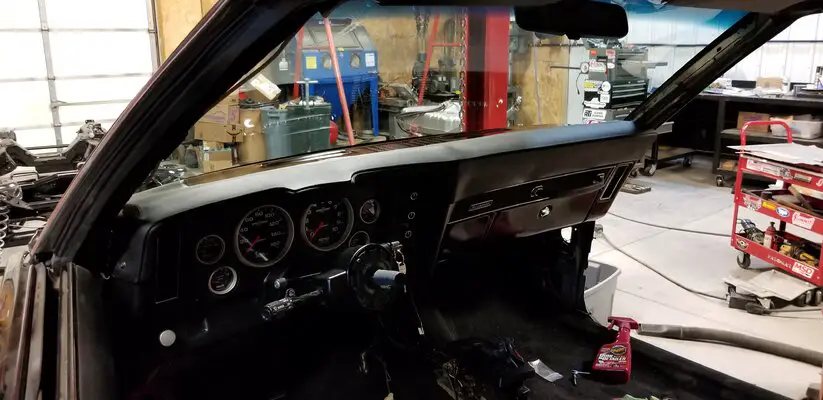
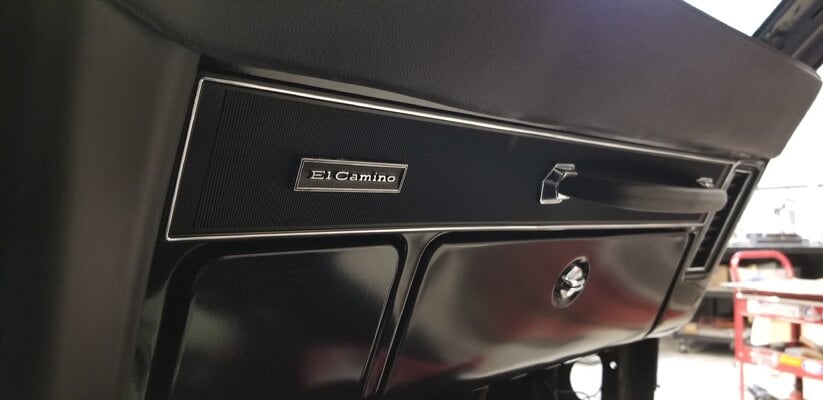
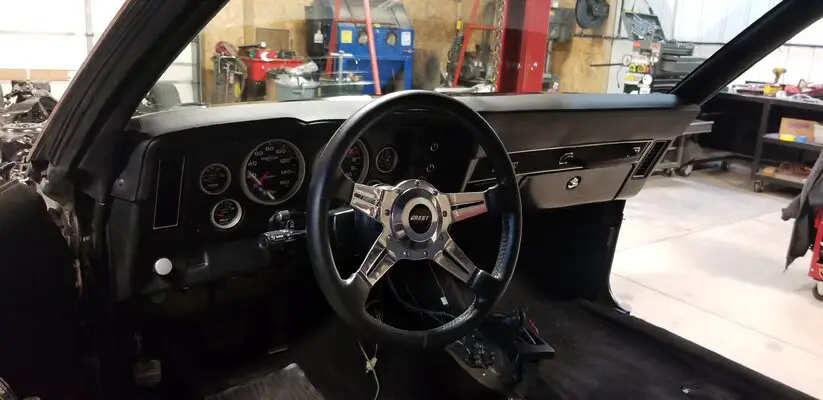
Wrapping up the "El Camaro" dash project. Sport comp 2 gauges, keeping it simple. Found an El Camino badge from 68-72 I think that worked in place of the Camaro badge. Everything looks like it should have been there in 82 if you ask me ; ).
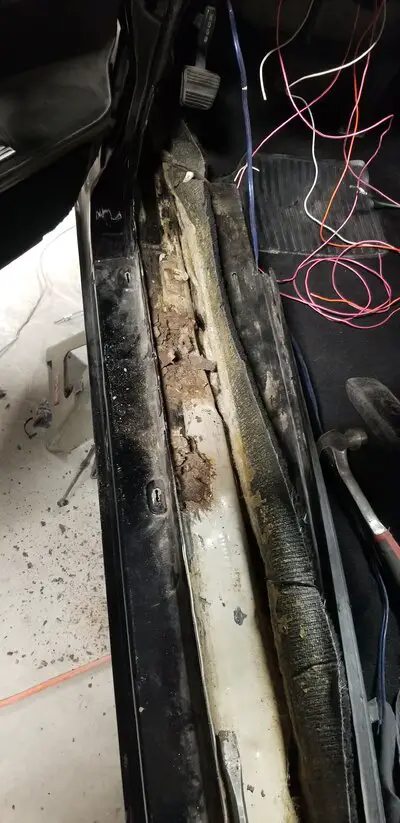
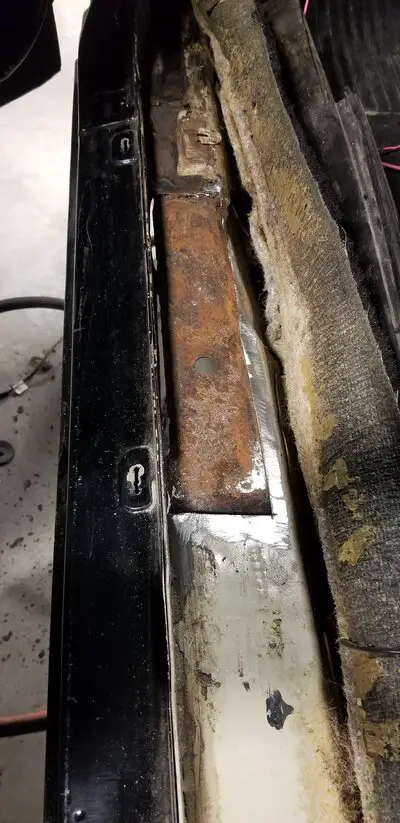
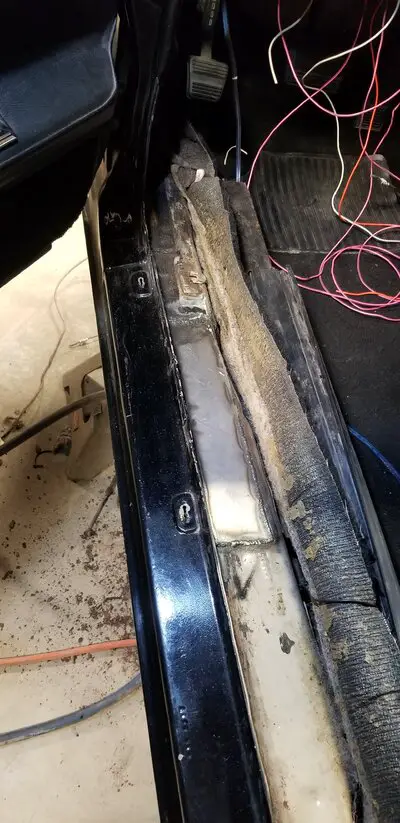
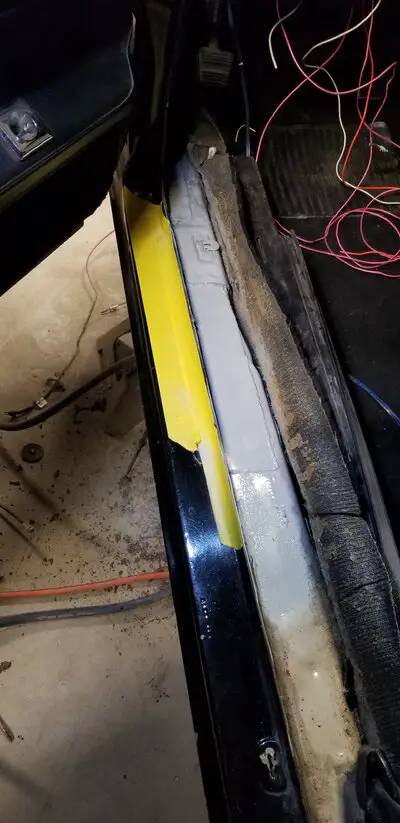
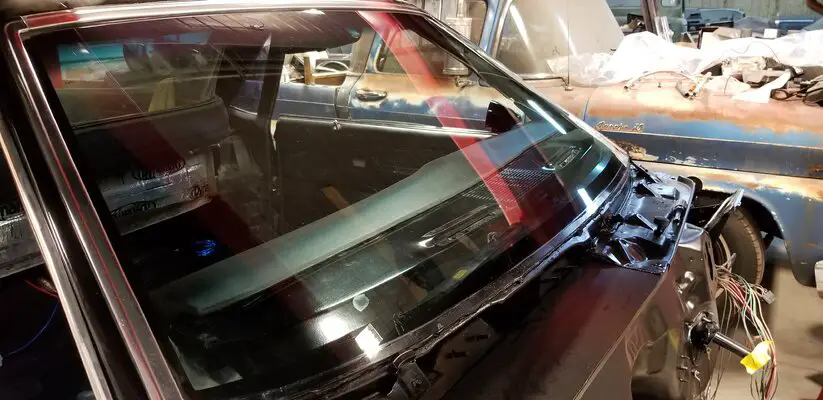
While running some stereo wires I found a nice surprise just inside the driver rocker. It was totally fine from underneath (underbody was blasted) but evidently some moisture got underneath the thinner first layer there it it rotted out. The other side looks fine.
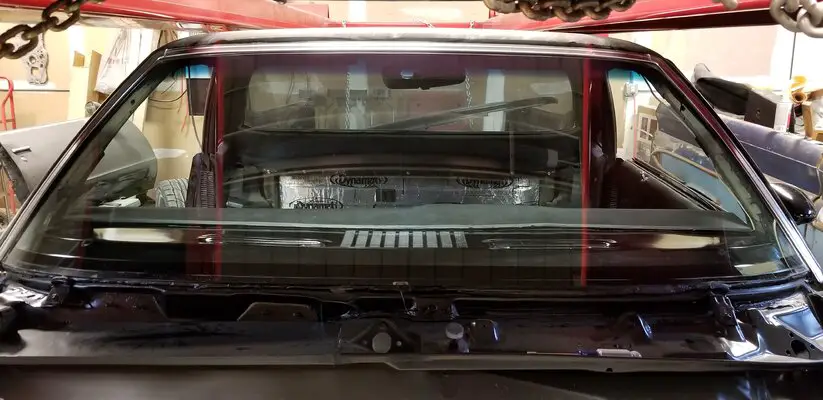
Since taking the pix I found that the pillar moldings actually fit just fine with no modification. BONUS! I figured I'd have to trim them somewhat. Way cool.
While running some stereo wires I found a nice surprise just inside the driver rocker. It was totally fine from underneath (underbody was blasted) but evidently some moisture got underneath the thinner first layer there it it rotted out. The other side looks fine.
Since taking the pix I found that the pillar moldings actually fit just fine with no modification. BONUS! I figured I'd have to trim them somewhat. Way cool.
Attachments
-
 20190207_190314.jpg1.2 MB · Views: 410
 -
 20190207_192106.jpg1.4 MB · Views: 424
 -
 20190207_195645.jpg1.4 MB · Views: 429
 -
 20190207_200016.jpg1 MB · Views: 429
 -
 20190209_161946.jpg2.1 MB · Views: 418
 -
 20190209_161953.jpg2.1 MB · Views: 429
 -
 20190209_163520.jpg2.1 MB · Views: 421
 -
 20190209_163657.jpg2.1 MB · Views: 425
 -
 20190209_164036.jpg2.1 MB · Views: 411
 -
 20190209_163455.jpg2.5 MB · Views: 412
 -
 20190209_163507.jpg2.6 MB · Views: 435
Replaced that worn out steering wheel
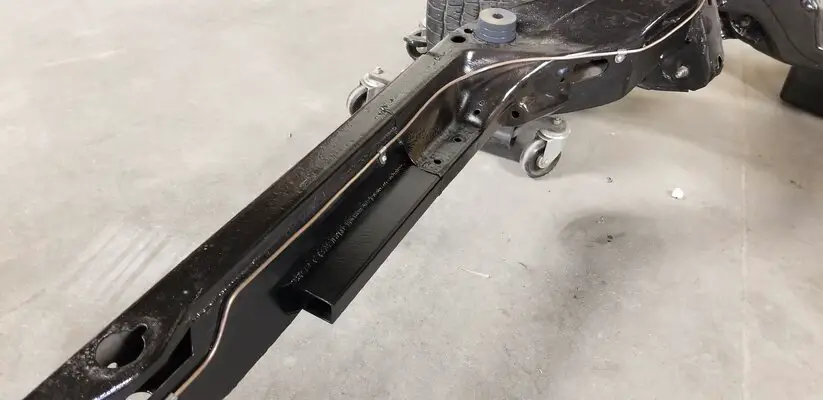
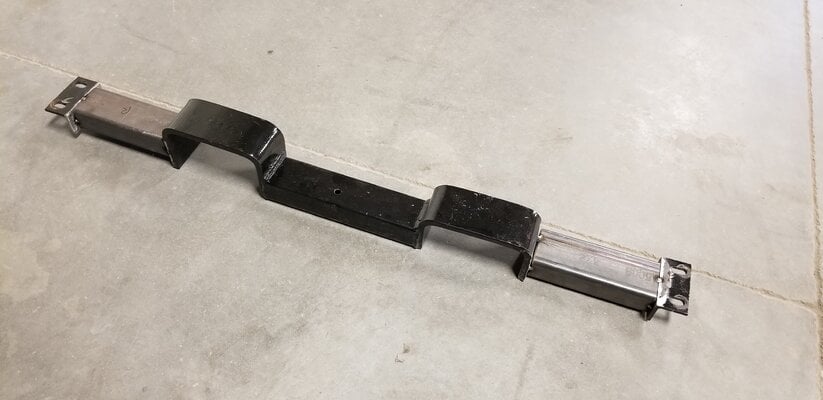
Extended the trans cross member mounting flange and modified my g-force cross member. Will finalize once I get my engine and trans dropped in.
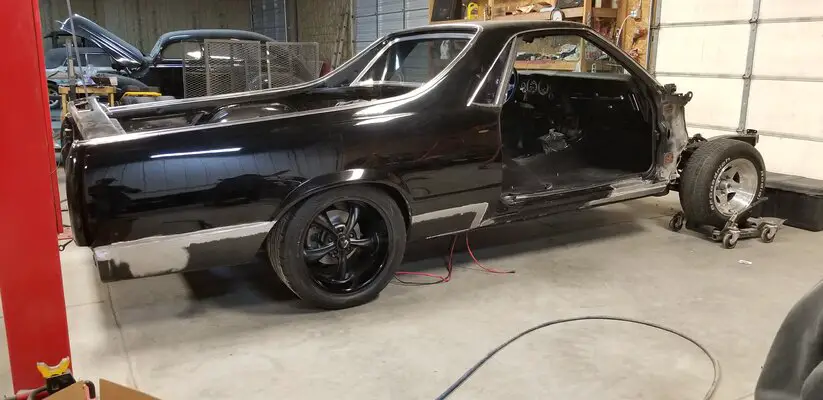
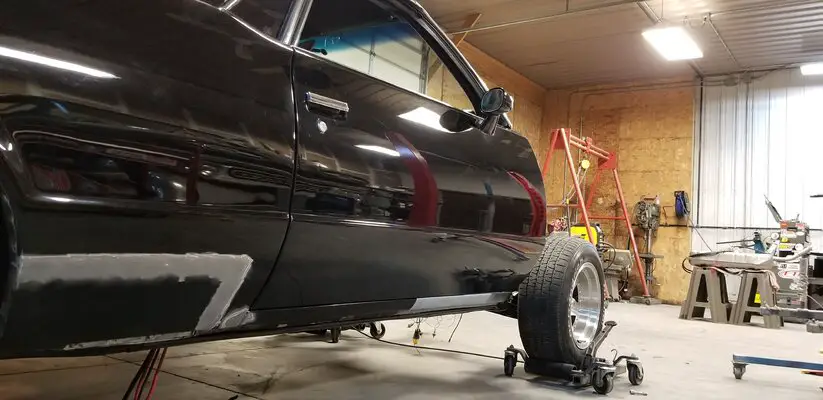
Body back on the frame.
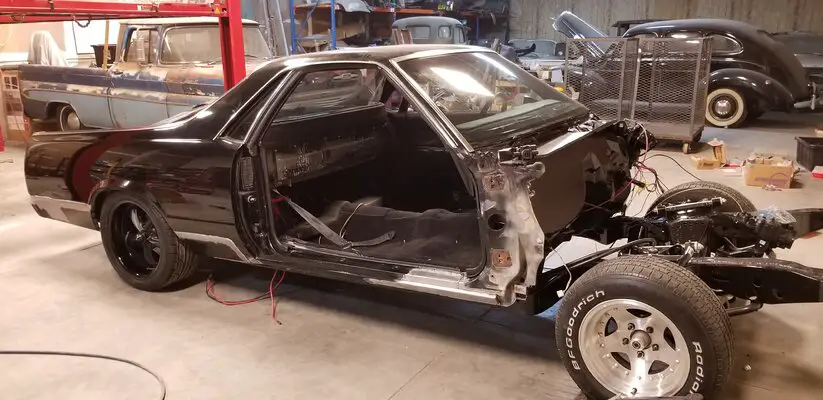
Reinstalled passenger door (man they are heavy bastards). Luckily got to borrow a door caddy from my local body shop.
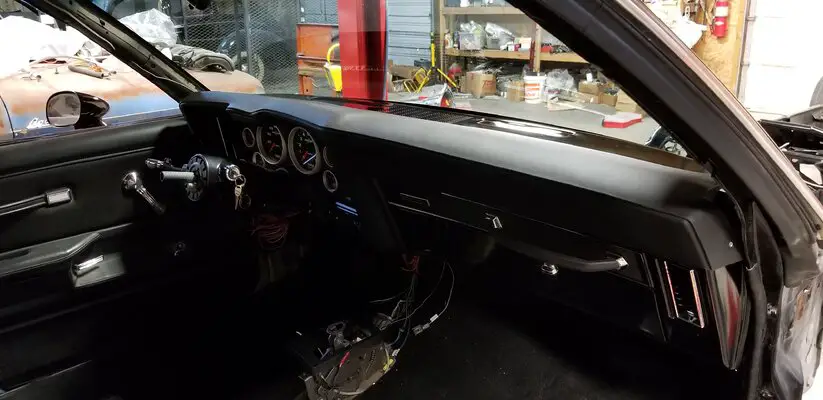
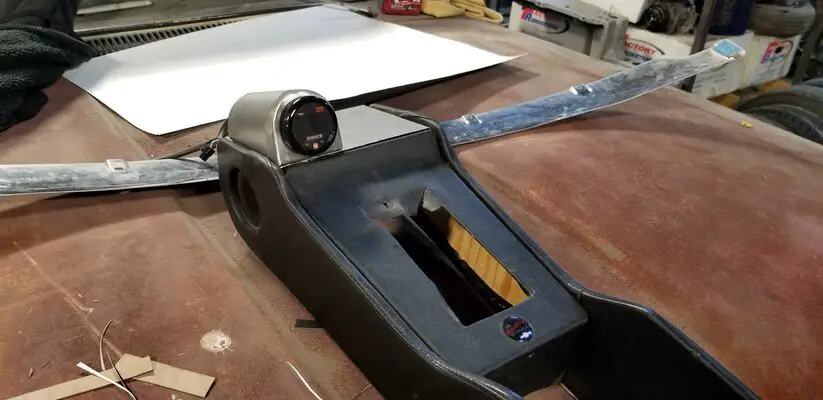
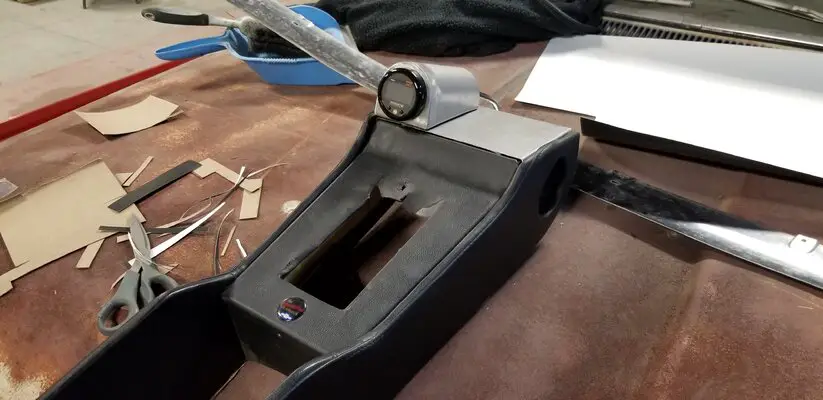
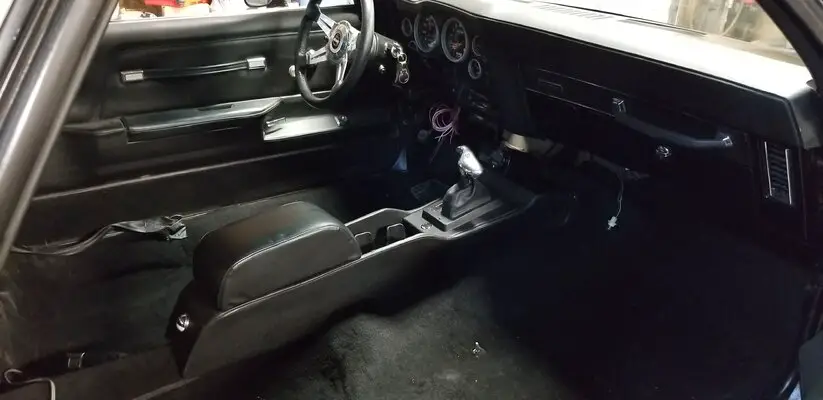
Originally my custom center console ran all the way up under the stock dash but the Camaro dash is shorter so had to make a panel to close it off and made a gauge pod to put my boost/AFR gauge in. (Innovate Motorsports).
Extended the trans cross member mounting flange and modified my g-force cross member. Will finalize once I get my engine and trans dropped in.
Body back on the frame.
Reinstalled passenger door (man they are heavy bastards). Luckily got to borrow a door caddy from my local body shop.
Originally my custom center console ran all the way up under the stock dash but the Camaro dash is shorter so had to make a panel to close it off and made a gauge pod to put my boost/AFR gauge in. (Innovate Motorsports).
Attachments
-
 20190212_200734.jpg2.2 MB · Views: 412
 -
 20190213_210647 (1).jpg2.1 MB · Views: 422
 -
 20190213_211500 (1).jpg2.1 MB · Views: 405
 -
 20190214_200239.jpg2.8 MB · Views: 438
 -
 20190214_220900.jpg2.3 MB · Views: 421
 -
 20190214_220913.jpg2.6 MB · Views: 408
 -
 20190214_220946.jpg2.4 MB · Views: 466
 -
 20190214_221316.jpg2.4 MB · Views: 438
 -
 20190216_120746.jpg2.2 MB · Views: 417
 -
 20190216_142659.jpg2.3 MB · Views: 433
 -
 20190219_213742.jpg2.3 MB · Views: 441
 -
 20190219_213753.jpg2.3 MB · Views: 428
Last edited:
I was referring to your Grant steering wheel.Those are Ridler 695s. I had the lips painted gloss black, they normally come with a machined lip. Haven't seen any custom center cap options though.
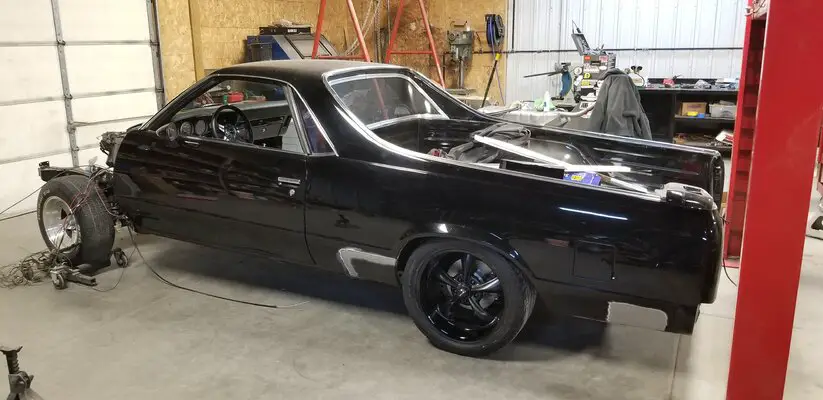
Reinstalled my console
Finished the transmission cross member
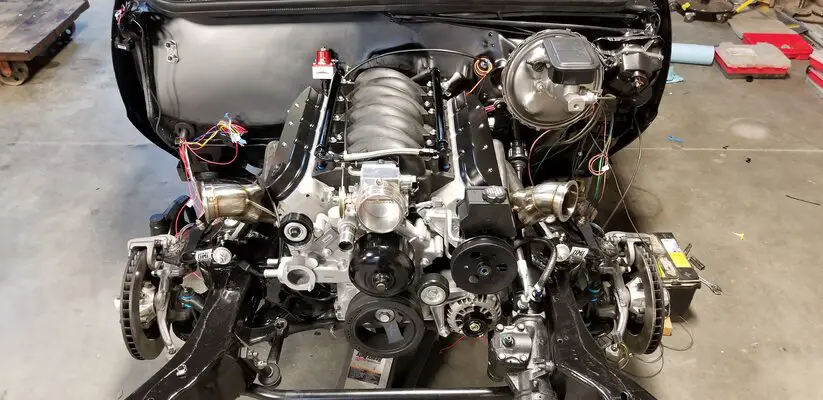
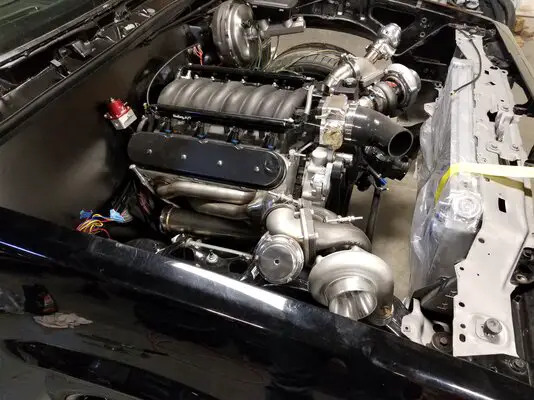
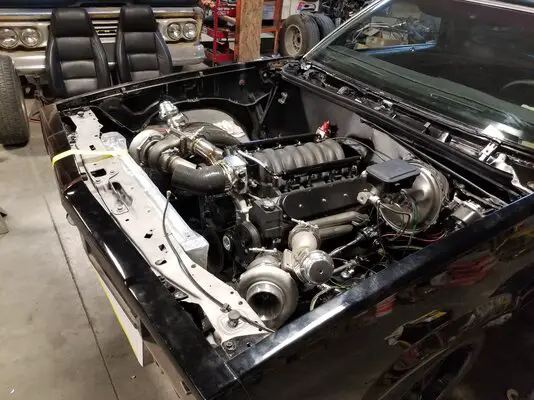
Installed the engine and transmission. Used Hooker LS swap mounts and the factory clamshells.
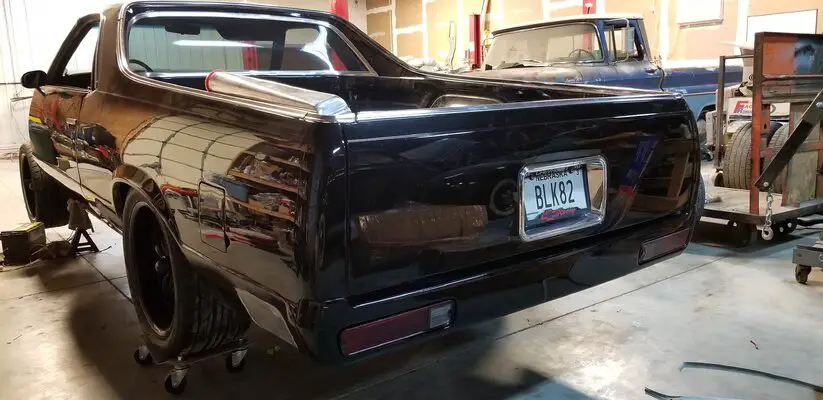
Tinted the tail lights a bit with some peel coat tint -pretty slick
Finished all the under dash wiring, ready for the engine harness and PCM now. Installing that in the engine bay.
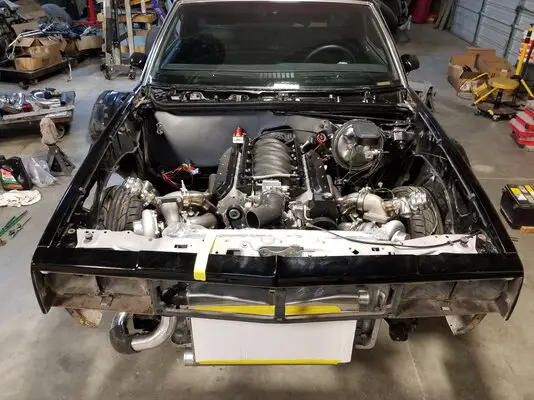
Mocked up the inner fenders, fenders, header panel and core support with a new radiator
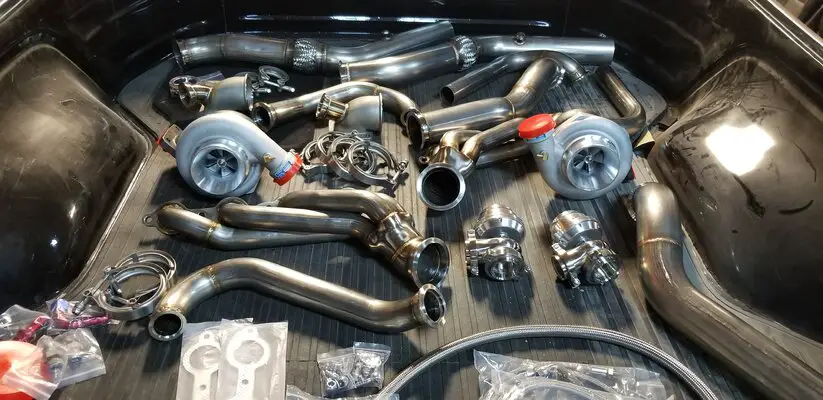
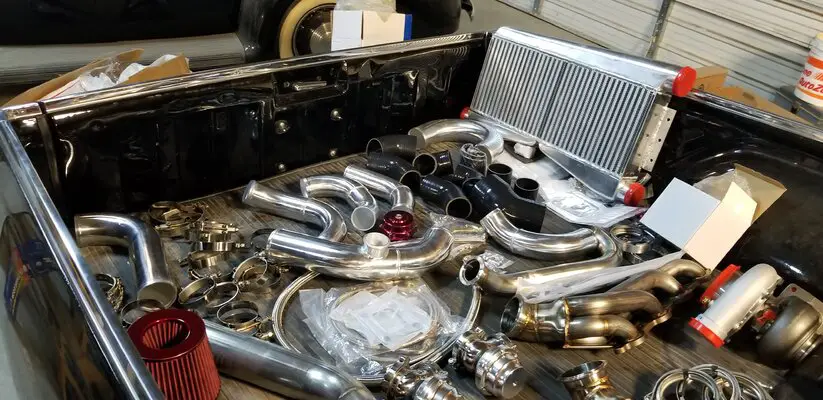
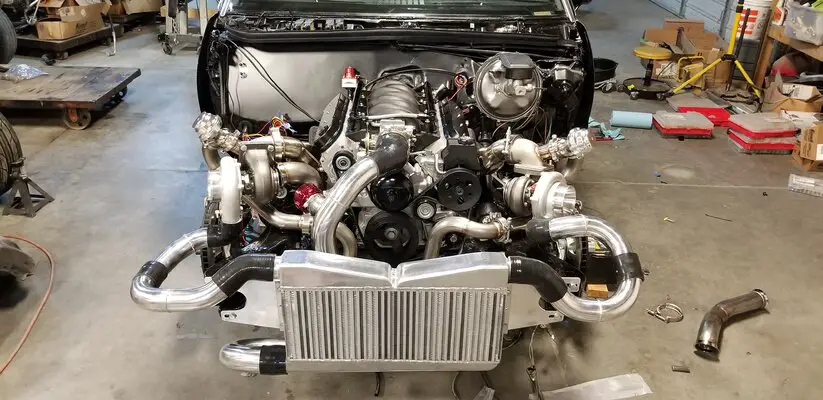
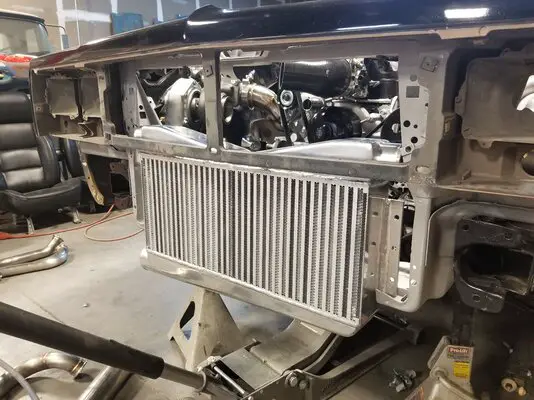
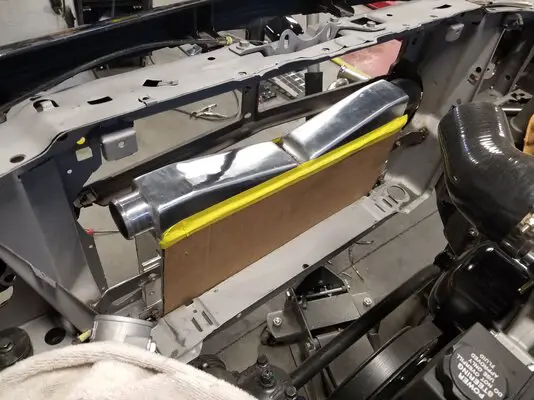
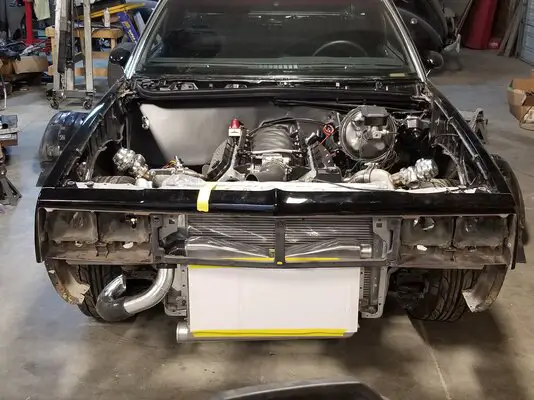
Then began mocking up the CX Racing twin turbo kit. Their test car is a Cutlass and the nose/grille is quite a bit different on the EL Camino plus mine has the tucked fiberglass bumper and chin spoiler so totally different ball game here. I'm basically having to tweak everything from the kit except the headers and turbo flanges. I modified the core support to get the intercooler in there behind everything. I'm clocking the driver side turbo differently, modifying the exhaust pipes to fit around the LS f-body accessories and I will have to modify the dump tubes as well. Should be able to use most of the cold side piping with some cuts etc and just buy a couple more pieces to make the connections.
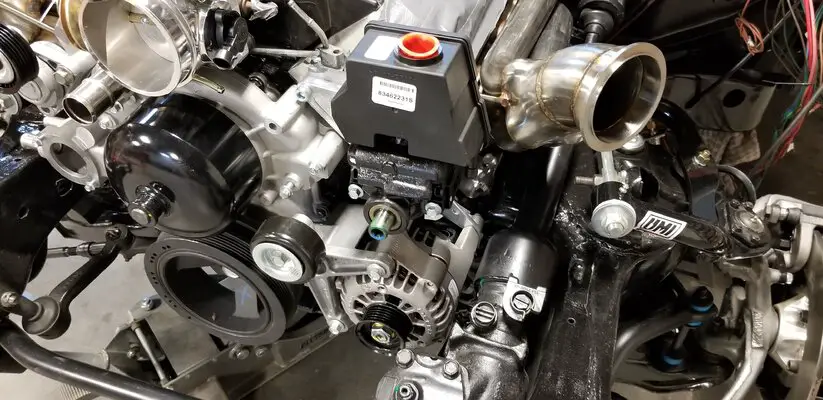
I did not expect it to be a bolt on experience but this is getting a little hairy now. Though I'm getting it figured out. The intercooler will not hang any lower than the chin spoiler. I'll add some structure back to the core support where needed once I get everything setup. The f-body water pump with its side exit heater hose fittings is the culprit on that side and the power steering on the other. But outside of the turbo kit the f-body accessories fit really nice in there. Alternator to power steering gear spacing is great.
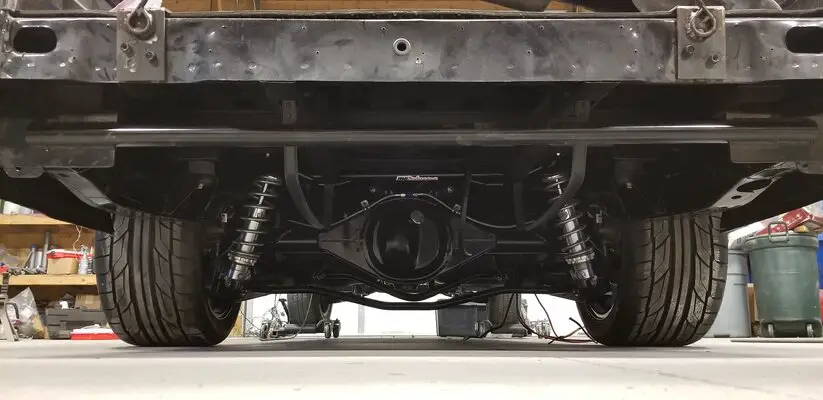
Finally got the car down on its own weight and found that my ride height sucks right now. Need another 1-2 inch more low to look right. I have the 450lb springs and viking coil overs from UMI. You guys think the 350s would drop it a little more? I'm guessing it will settle some but not 2 inches worth. Adjusters are all the way down on the shocks.
Finished the transmission cross member
Installed the engine and transmission. Used Hooker LS swap mounts and the factory clamshells.
Tinted the tail lights a bit with some peel coat tint -pretty slick
Finished all the under dash wiring, ready for the engine harness and PCM now. Installing that in the engine bay.
Mocked up the inner fenders, fenders, header panel and core support with a new radiator
Then began mocking up the CX Racing twin turbo kit. Their test car is a Cutlass and the nose/grille is quite a bit different on the EL Camino plus mine has the tucked fiberglass bumper and chin spoiler so totally different ball game here. I'm basically having to tweak everything from the kit except the headers and turbo flanges. I modified the core support to get the intercooler in there behind everything. I'm clocking the driver side turbo differently, modifying the exhaust pipes to fit around the LS f-body accessories and I will have to modify the dump tubes as well. Should be able to use most of the cold side piping with some cuts etc and just buy a couple more pieces to make the connections.
I did not expect it to be a bolt on experience but this is getting a little hairy now. Though I'm getting it figured out. The intercooler will not hang any lower than the chin spoiler. I'll add some structure back to the core support where needed once I get everything setup. The f-body water pump with its side exit heater hose fittings is the culprit on that side and the power steering on the other. But outside of the turbo kit the f-body accessories fit really nice in there. Alternator to power steering gear spacing is great.
Finally got the car down on its own weight and found that my ride height sucks right now. Need another 1-2 inch more low to look right. I have the 450lb springs and viking coil overs from UMI. You guys think the 350s would drop it a little more? I'm guessing it will settle some but not 2 inches worth. Adjusters are all the way down on the shocks.
Attachments
-
 20190220_215156.jpg2.1 MB · Views: 409
 -
 20190220_215320.jpg2.1 MB · Views: 411
 -
 20190305_194804.jpg2.9 MB · Views: 408
 -
 20190305_202834.jpg2.8 MB · Views: 407
 -
 20190305_221415.jpg2.5 MB · Views: 415
 -
 20190309_170239.jpg2.7 MB · Views: 430
 -
 20190318_221022.jpg2.8 MB · Views: 383
 -
 20190319_213437.jpg2.9 MB · Views: 406
 -
 20190321_190004.jpg4.5 MB · Views: 440
 -
 20190321_205311.jpg3.5 MB · Views: 409
 -
 20190323_162128.jpg4 MB · Views: 418
 -
 20190323_162137.jpg4.2 MB · Views: 401
 -
 20190323_162142.jpg4 MB · Views: 418
 -
 20190323_162555.jpg3.6 MB · Views: 385
- Status
- Not open for further replies.
Similar threads
- Replies
- 0
- Views
- 374
GBodyForum is a participant in the Amazon Services LLC Associates Program, an affiliate advertising program designed to provide a means for sites to earn advertising fees by advertising and linking to amazon.com. Amazon, the Amazon logo, AmazonSupply, and the AmazonSupply logo are trademarks of Amazon.com, Inc. or its affiliates.