Front Coil Springs Install

Status
Not open for further replies.

KILLSHOTB

Not-quite-so-new-guy
Jan 24, 2008
40
0
6
Saginaw, Michigan
I have a few questions on installing front coil springs
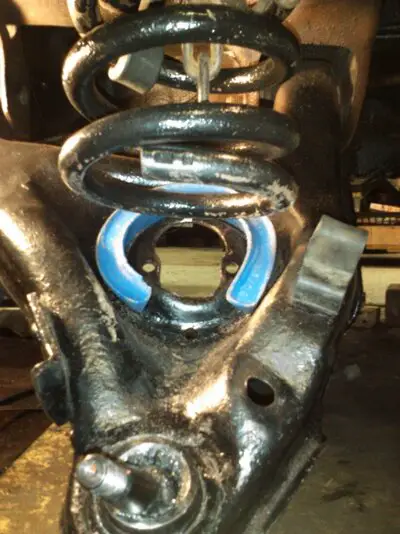
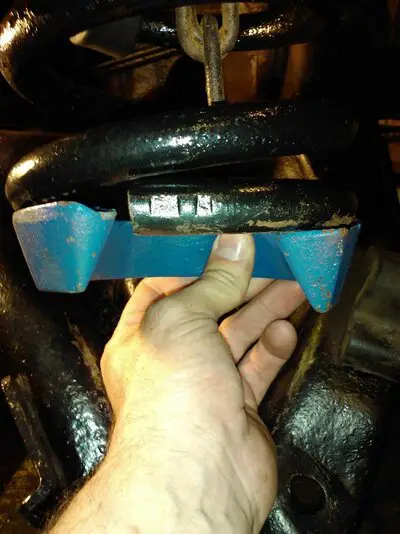
1) There is a (blue) horse shoe shaped spacer that sits in the lower control arm (see pic). What is the orientation? Open end facing out or in? Picture shows outward. Is this right? This also determines the rotation of the spring because the end of the spring would be touching the end of the horse shoe spacer (like in pic 2). Correct?
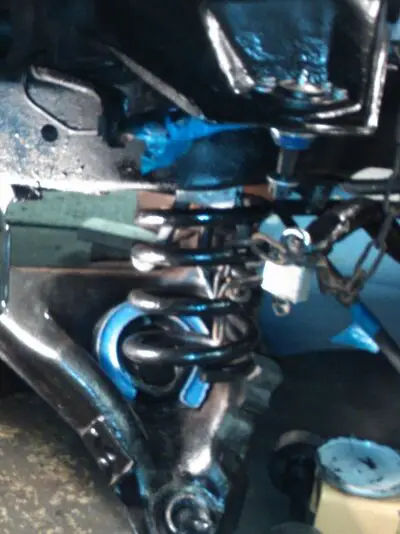
2) Is there a method to keep the spring centered when pulling it in with the compressor? It seems to always angle outward from the vehicle no matter where I start compressing at any rotation or orientation of the spring.
3) There was a wedge shaped fork piece that came with my spring compressor. It has indentations at the crotch of the fork where the washers on the top of the compressor bolt would fit. It is formed with a slight bend to give more prying action. What is the necessity for this wedge tool?

Thanks all.
Mike
 

Attachments

  • WP_000337.jpg
    WP_000337.jpg
    132.2 KB · Views: 6,658
  • WP_000339.jpg
    WP_000339.jpg
    129.3 KB · Views: 4,669
  • WP_000340.jpg
    WP_000340.jpg
    105.5 KB · Views: 5,275
I have never seen that part on a spring but it looks like you have the spring upside down. The formed side is on top and sits on the isolator. The lower side is open and sits in the channel on the lower control arm
 
I have never seen a U-shaped spacer exactly like that before. I can see where it would be hard to install the springs with this spacer in. If it were me, I would have to get rid of those if it meant buying new springs.
 
That must be some sort of "fixer" for shot springs or something, not a stock piece. As far as I recall, top or bottom are formed the same, the insulator goes on top and I keep it on with some electrical tape so it doesn't move while I play around. The bottom coil must be located right at the 2 drain holes, which you are covering with the insulator, another reason for it to go up top. Yes, the spring tries to go away from the lower pocket because that is the straight line direction down from the top. I use a long 6' pry bar to nudge it into the pocket carefully without relaxing the spring, while lifting the "A" arm from underneath with a jack. The wedge shaped part is for an older style spring tool I rarely see anymore, now all I see is the finger type. Everyone please use a safety chain to secure the spring to the frame while playing with it-if that sucker gets loose it will maim you! He is doing it the right way!
 
Mark, the top of the front spring is formed to keep it a flat surface so it sits proper around the fingers on top. If you cut the front spring you have to cut the bottom since that part fits into the pocket on the lower. I just did my front springs last fall so the memory is still relatively fresh in my antique noggin.. :mrgreen:
 
Thanks to all so far for posting.
So you guys have never seen the horse shoe shaped piece before aye? It is formed to make up for the bottom of the spring being uneven. I am sure it mounts on the bottom of the spring on the lower control arm. I don't know what you are referring to when you say "insulator". On top in the spring hole under the frame there are raised taps for the ID of the spring to center on as well as a thin piece of rubber for the spring to press on for noise I guess.
Can anyone tell me the orientation of the blue horse shoe in my 2nd pic. Please. Its May.
 
The "BLUE" thing you are referring to is a spring spacer. They are used to add height to worn springs or some use it to fix having cut a little too much off of the spring. If you are putting new springs in, the only reason you would need to keep them is if you are running big rims.

Here is a link to a thread about front springs, almost to the bottom of the page you will see a pic of them. http://www.turbobuick.com/forums/thread ... 936/page-2
 
Thank's Steve, I forgot all about that flat. I was probably thinking rear springs being the same top and bottom. This old age sh*t sucks. 😳 KILLSHOTB that blue thing is unnecessary. If you look at the lower control arm you will see a depression that the end of the spring fits into as well as 2 drain holes. The end of the spring covers 1 hole.
85948011.gif
 
That's why I'm saying the spring is upside down. That closed end on the bottom will not sit in the channel
 
I finished the right side. The spindle is inplace with the ball joints pined as well as the shock mounted. The spring went in smooth as well with the help of a friend to jack up the L.C. arm. I did what you said Bonewagon. I elect. taped the spacer on the bottom of the spring, good tip. With the spring compressed into the upper frame hole as far as it needs to be, I used a pry bar to position it as he raised the L.C.arm. It was aligned good and concentric.
I painted and reused the springs and spacers. I was getting new springs but got frustrated with the Autozone Idiots and said "F" it. I'm painting them, saving $ and walking out the door with my finger in the air. So I did.
Job well done, thanks fellas.
 
Status
Not open for further replies.

GBodyForum is a participant in the Amazon Services LLC Associates Program, an affiliate advertising program designed to provide a means for sites to earn advertising fees by advertising and linking to amazon.com. Amazon, the Amazon logo, AmazonSupply, and the AmazonSupply logo are trademarks of Amazon.com, Inc. or its affiliates.

Please support GBodyForum Sponsors

Classic Truck Consoles Dixie Restoration Depot UMI Performance

Contact [email protected] for info on becoming a sponsor