GRAND PRIX Headliner

buick7332

Master Mechanic
Oct 21, 2014
351
589
93
N.E. Philadelphia area
Today I pulled the masking tape off the corner repair. The epoxy really bonded well and seems to be really ridgid. I put the silver tape on the back and I think it's good to go. I have more cleaning to do on the board before I move to the next step.
 

Attachments

  • IMG_20231017_134009.jpg
    IMG_20231017_134009.jpg
    1.9 MB · Views: 38
  • IMG_20231016_130816.jpg
    IMG_20231016_130816.jpg
    2.7 MB · Views: 37
  • Like
Reactions: 2 users

78Delta88

Royal Smart Person
Supporting Member
May 23, 2022
1,306
1
1,098
113
SW Arizona
Very informative. I looked at the Cutlass today and back window portion is hanging down to the back seat.

So just another project to do. Around here it's very difficult to find old school artisans, so in the near future I will be trying what was shown here.
 

buick7332

Master Mechanic
Oct 21, 2014
351
589
93
N.E. Philadelphia area
Today I painted the interior trim I pulled to get the headliner out. Trim was very sun faded and chalky. Steel wool worked good on the chalky area's then I scrubbed with hot water and dish soap, wiped down with acetone, then with alcohol, and painted with SEM. I am very pleased with the results. Next is the headliner fabric.
 

Attachments

  • IMG_20231028_203556.jpg
    IMG_20231028_203556.jpg
    1.8 MB · Views: 34
  • IMG_20231028_131755.jpg
    IMG_20231028_131755.jpg
    1.9 MB · Views: 30
  • IMG_20231028_112822.jpg
    IMG_20231028_112822.jpg
    1.9 MB · Views: 32
  • Like
Reactions: 6 users

SS_Malibu

Royal Smart Person
Supporting Member
Sep 27, 2021
1,183
2,090
113
Mesa, AZ
When any of my plastic trim comes off around the windows I’m done. It won’t be going back on because it will be completely crumbled and gone
 
  • Like
Reactions: 1 user

buick7332

Master Mechanic
Oct 21, 2014
351
589
93
N.E. Philadelphia area
Finally had good weather this weekend so I worked on the headliner. I bought 2 1/2 yards of fabric from a upholstery supply shop, and 2 cans of 3M headliner adhesive. Turns out I only needed 1 but my motto is "better looking at it than looking for it". 2 1/2 yards left me plenty of extra for sunvisors. I spent hours prepping the board. Probably overkill but it was clean. We rough cut the fabric to size leaving plenty of overhang for all sides. Layed the fabric on the board, got everything squared up, and then folded the fabric back half way on top of itself exposing the bottom. Sprayed the board and fabric with 2 coat's of glue. Be careful not to get any glue on the fabric face. We used cardboard to protect against over spray. After a few minutes to get tacky we carefully started working down the fabric from the center of the board to the front. We used no tools, just clean hands and gentle pressure to smooth it out. To much hand pressure will stretch the fabric causing it to want to "pull back on itself". Next fold back the other half and repeat the process. Flipped the board and with a new pair of scissors, trimmed all 4 sides leaving about an inch to fold over. We made several relief cuts along the front edge and the corners so we would get a good fold with no lumps. after cuts were made and verified, we sprayed the edges and folded them over. I let the board sit overnight to dry and then cut my dome light, coat hooks, and visor holes. I used a razor knife with new blade and an awe. Everything looks good so far. I'll be installing tomorrow.
 

Attachments

  • IMG_20231105_093017.jpg
    IMG_20231105_093017.jpg
    2.2 MB · Views: 32
  • IMG_20231105_132211.jpg
    IMG_20231105_132211.jpg
    1.3 MB · Views: 30
  • IMG_20231105_133817.jpg
    IMG_20231105_133817.jpg
    2.2 MB · Views: 35
  • IMG_20231105_134238.jpg
    IMG_20231105_134238.jpg
    2.8 MB · Views: 35
  • IMG_20231105_134256.jpg
    IMG_20231105_134256.jpg
    3.6 MB · Views: 35
  • IMG_20231105_134821.jpg
    IMG_20231105_134821.jpg
    2.2 MB · Views: 35
  • IMG_20231106_100515.jpg
    IMG_20231106_100515.jpg
    1.3 MB · Views: 34
  • Like
  • Winner
Reactions: 4 users

buick7332

Master Mechanic
Oct 21, 2014
351
589
93
N.E. Philadelphia area
I finally finished the installation today. Everything went well but it was very difficult to install the trim above the back window and the windshield. I got new clips from Mike's Monte's. Sure is hard to get everything lined up and clipped to the headliner and then pushed into place. I had a helper for the piece above the windshield. That one gets 5 clips and it's tough to hold everything together. I hope the 3m adhesive holds up because I'd hate to do this again.
 

Attachments

  • IMG_20231111_133706.jpg
    IMG_20231111_133706.jpg
    1.3 MB · Views: 31
  • IMG_20231111_133701.jpg
    IMG_20231111_133701.jpg
    1.3 MB · Views: 31
  • Like
Reactions: 1 users

69hurstolds

Geezer
Supporting Member
Jan 2, 2006
8,242
17,743
113
Looks great! Gotta ask because I never remember...was it 3 or 4 clips for the rear upper trim piece?

Yeah, nobody LIKES doing them, even the auto upholstery shops.

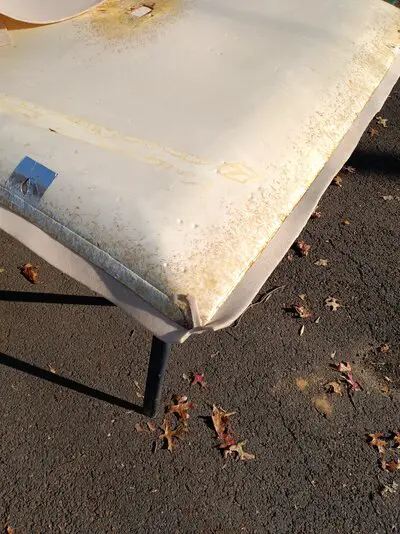
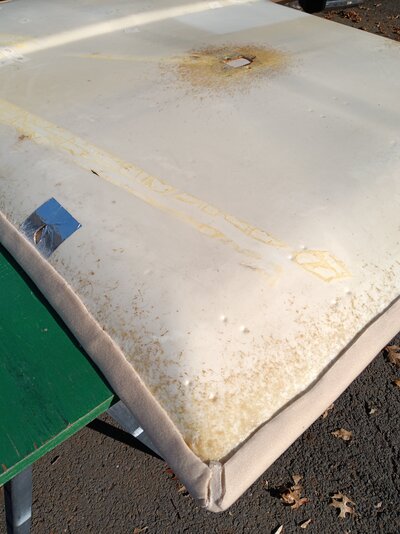
But make sure that you can get someone who can refurbish or resew the visors for you with new fabric to give it that final good look as well if you can't get a spot-on match. Reason I say this is because it can be tough to find the exact shade to OEM you need. If yours do match, you're very lucky. My 87 442 is exactly the case in point as it had a few irritating blisters that surely weren't going to heal themselves.

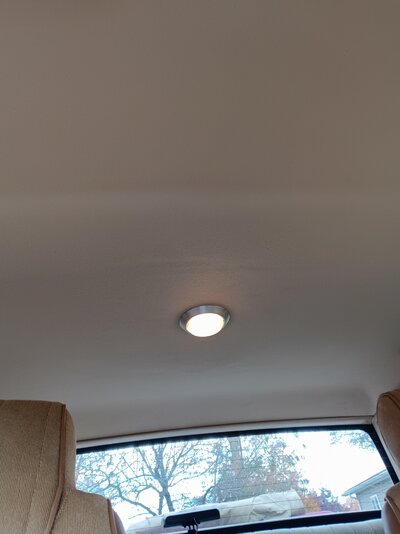
Here it is after I reinstalled the newly refurbished headliner. Not too bad of a match at first glance. Those lines aren't wrinkles, it's just sun reflections. It's been 11 years now using 3M headliner adhesive and it's still looking great. So I have confidence in the 3M stuff. It's been at least 20 years ago (yikes) for the 84 H/O done with 3M glue and it still looks good as well. But keep reading.
headliner4.JPG


Samples are usually off with dark blues and maroons. The 87 442's original material is bottom right triangle looking piece without any foam on it. Nothing looks exactly like OEM here. This is just a few samples I had out of seemingly a dozen blues from various places.
87 442 interior color swatches 1.JPG


OEM on far right.
87 442 interior color swatches 2.JPG


I finally got something "close" but still, not exact. I don't look up much when I'm driving anyway. And this is why I said you have to have enough new material to redo the visors, just to keep things matching. You can see here it doesn't exactly match the OEM visor color. Redoing the visor makes it look "even" and in the case of the blue or maroon it would blend effortlessly where someone might not even notice. It was a bright day and the camera didn't capture the correct hues, but in this pic, there's no doubt there's a difference.
headliner2.jpg
 
  • Like
Reactions: 3 users

GBodyForum is a participant in the Amazon Services LLC Associates Program, an affiliate advertising program designed to provide a means for sites to earn advertising fees by advertising and linking to amazon.com. Amazon, the Amazon logo, AmazonSupply, and the AmazonSupply logo are trademarks of Amazon.com, Inc. or its affiliates.

Please support GBodyForum Sponsors

Classic Truck Consoles Dixie Restoration Depot UMI Performance

Contact [email protected] for info on becoming a sponsor