Question about Holley LS swap frame mounts

Status
Not open for further replies.
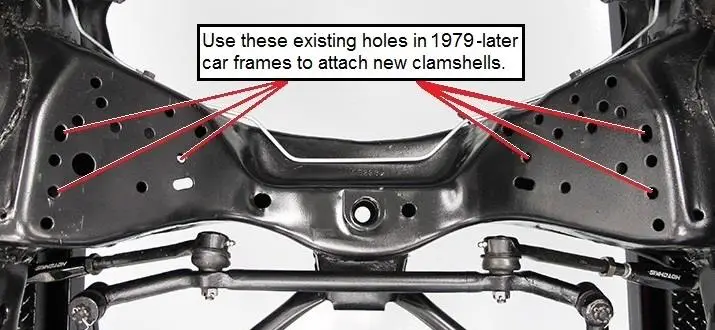
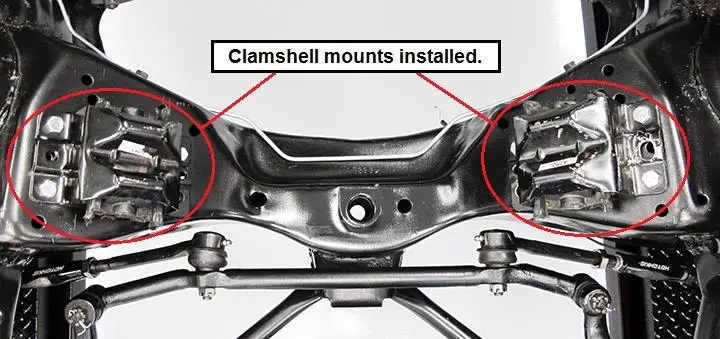
When mating to the factory mount locations, know that GM only used three bolts. One corner of the legacy motor mounts always hung over the crossmember edge.

The mounts in the link below are not factory, but they're in the factory Chevy locations.

 
Last edited:
When mating to the factory mount locations, know that GM only used three bolts. One corner of the legacy motor mounts always hung over the crossmember edge.

The mounts in the link below are not factory, but they're in the factory Chevy locations.

yes, this is correct. the pic in the above link that ssn696 provided shows positioning of mounts on frame for a small block chevy.

ls motor with holley mounts also use 3 bolts per mount. but the mounts are set back compared to the sbc location. please reference holley instructions for ls mount locations.
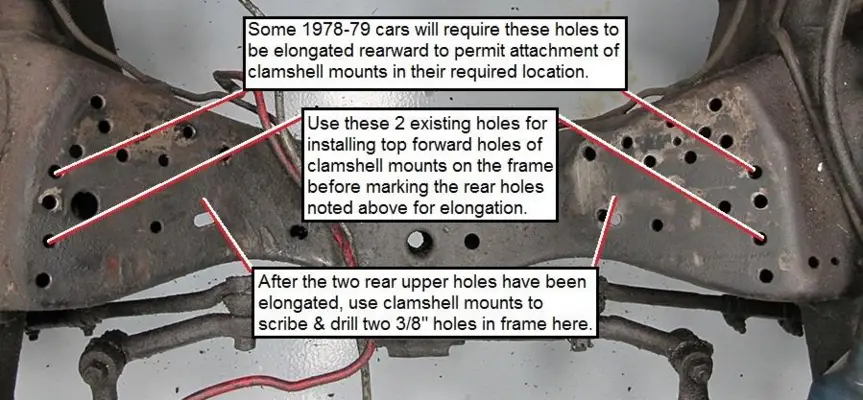
my frame was an early edition, '79, so i needed to elongate the upper rear bolt holes. i used a straight edge and scribed lines that extended past the factory hole so i knew how far to extend the holes and keep them in the same plane.
 
  • Like
Reactions: Tony1968
20190817_205140.jpg
 
Ok got it. Didn’t know I had to go online for instructions
 
  • Like
Reactions: Tony1968
got it. here you go from the holley site

SWAP ENGINE/TRANS PREP:
  1. Carefullyremovethefollowingcomponentsfromtheengine:sparkplugwiresexhaustmanifolds/O2sensors,wiring harness/computer, MAF sensor, starter motor/plate and dust covers, A/C compressor and bracket, the oil dipstick/tube, and engine mounts/brackets.
  2. Cleanandpaintpartstobere-used,ifdesired.
  3. Secureengine/transassemblytoliftingslingandenginehoist.
  4. AttachtheleftandrightsideHookerenginebracketstotheengineusingthesuppliedM10flatheadscrews.
ENGINE/TRANS INSTALL:
1. Install a new set of clamshell engine mounts (aftermarket rubber replacement clamshell mounts, or the Hooker/Holley clamshell mount cages and poly inserts previously mentioned on page 1) onto the vehicle chassis as shown in Figures 1, 2 and 3 below.

page3image7720
page3image7888
page3image8048
page3image8208
page3image8632
page3image8792
page3image9216
page3image9640
page3image9800
page3image10224


page3image12728

1577295003995.png1577295003857.png1577295004087.png1577295004189.png1577295004306.png1577295004495.png1577295004400.png1577295004651.png1577295004783.png1577295003668.png1577295049182.png
 
  • Like
Reactions: Tony1968
be very careful when placing motor in car. if you have a/c heater box, be care that the right valve cover doesn't damage it. or remove valve cover while engine is being installed. i ended up trimming the ignition coil bracket mount closest to heater box as a precaution. its a tight fit.
also, it is recommended to install trans after motor placement. others may chime in on this, but i was fortunate to perform mine at work on a car hoist and transmission jack.
it might be possible to install trans and motor assembled if the front clip was removed, or a/c heater box block off plate is used. like i said, others may have more info.
 
Status
Not open for further replies.

GBodyForum is a participant in the Amazon Services LLC Associates Program, an affiliate advertising program designed to provide a means for sites to earn advertising fees by advertising and linking to amazon.com. Amazon, the Amazon logo, AmazonSupply, and the AmazonSupply logo are trademarks of Amazon.com, Inc. or its affiliates.

Please support GBodyForum Sponsors

Classic Truck Consoles Dixie Restoration Depot UMI Performance

Contact [email protected] for info on becoming a sponsor