Just about like CK80 described. However, just because the canister is mia doesn't mean the supporting infrastructure got snatched as well. So, first thing would be to drop the tank and see for sure what type of sending unit is installed into it. In 81, that being the year of your car?, there should be Three (3) 90 degree tubes exiting the sending unit lid. They are feed, return, and vent. You will likely find that feed and return have rubber tubing hanging off them while vent might have the stump of a piece of tube attached to it or possibly just a short length of tube, just enough to jam some kind of plug or stopper into the other end.
If you go snakey and slide underneath the driver side of the car, attached to the driver's side frame rail, along with the master brake line from the proportioning valve back to the diff you should also find another steel tube; could be nice, could be nasty, that shares the same frame mounting "P" clamps as the brake line. This is the hard line for the canister/vent and it will travel back to around the same crossmember that the brake line does and from there, there would have been the rubber hose to complete the system. The vent is not pressurized the same way the feed line is; it just allows fumes and associated gases to be siphoned off and disposed of.
In the engine bay, on the driver's side inner fender well, just before the rad cradle, you should see a circular depression stamped or molded into the heavy PVC that also shows two tab depressions as well. This is the factory location for the vapor canister. When you go to install the canister you should notice two metal tabs attached to the bottom at 180 degrees from each other. These index into the small square areas which should also be drilled to accept the mounting bolts. The screws are two of those metric coarse threaded hex head items that look a bit like a lag screw; 13mm hex heads on them. If the holes in the panel have been wallowed out then you can use 1/4" bolts with flats and nuts and get the same results.
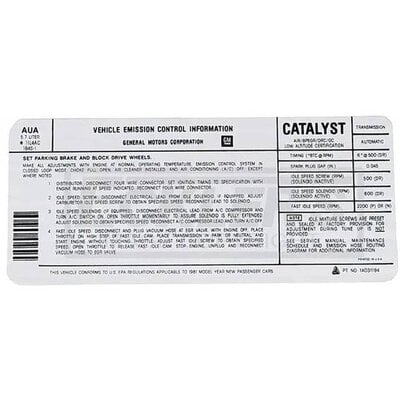
Close by the location of the canister you may or may not find a hard line of steel attached to the frame by a clamp and heading in the general direction of the firewall. This is the other end of the vent line and it is also attaches to the canister with a short length of hose. On the top of the canister is where things get interesting. Depending on year and application you can find as many as 1+4 nipples or ports. The 1 nipple or port is attached to the vent line from the tank. The other 4 are delivery lines that, from the factory, would take vapors and fumes from the canister and direct them back to the engine to be included with the fresh air/fuel as part of the smog reduction system. If you check the top of the canister, the ports or nipples are actually labelled or tagged according to what they do and where they go. You can try and do it by the diagram but that is actually a picture of the entire recycling system. Using the tags on the canister itself is probably faster and easier. What the diagram can tell you is how many ports or nipples your canister had from the factory which will help if you are about to go diving on a wreck at the local pick-a-part and aren't sure before hand.
One other thing to consider is that you can install the canister, attach it to the vent line, and stop right there. Depending on how stock your engine bay and motor are, the oem locations for the various delivery hoses from the canister may not exist any more.
As for the operation of the canister any fumes and vapors that get to it will be absorbed by the internal media located in the can. There is also a fibre filter fitted into the bottom of the can and it is a part number than can be replaced, so you can score a physically nasty looking lump, clean it, replace the filter, and you should have a working unit again. Just be aware that that thin piece of filter material is just there to "scrub" any vapors that do end up getting discharged out to the environment. It can and will trap dirt and debris that might otherwise contaminate the vent system or plug it but it is not a true filter like, say, an oil filter; more like an carb air cleaner element if you take my point.
Nick