Valve Adjustment ... With Engine Running or not ?

Status
Not open for further replies.

Tynan918

Royal Smart Person
Aug 2, 2021
1,136
249
63
I just did an oil change and I have adjusted the valves both with the engine running and while the engine is shut off but I still have light ticking/tapping that gets louder as I accelerate.

At first I thought maybe the engine was low on oil, or I'm not adjusting the valves correctly, but now I'm stumped and can't figure out why I can't get rid of the tapping/ticking.
 

Tynan918

Royal Smart Person
Aug 2, 2021
1,136
249
63
Narrow downing my engine ticking to be on the driver side but I don't know if it's the exhaust or a worn part in the valve train that is causing the tick..

Using a stethoscope I can hear the taking real good if I place it on the intake manifold and if I place it on the valve covers the sound fades and I can't really hear the ticking and if I put it on the driver side exhaust manifold it sounds the same as putting it on the valve cover...

Driver side exhaust manifolds do seem to have a little soot coming from the exhaust gaskets (can see it good on the front manifold gasket), and my pipe to manifold looks like s*** on both sides..
IMG_20220912_165851899.jpg
IMG_20220912_165944340.jpg
IMG_20220912_170013407.jpg
 

78Delta88

Royal Smart Person
Supporting Member
May 23, 2022
1,249
1
1,012
113
SW Arizona
I know you done a lot of great work on your ride so far, and budget is key, but my suggestion below...

Pull manifolds and wire brush or media blast. Then paint everything with good quality high temp paint and put back on with new gaskets.

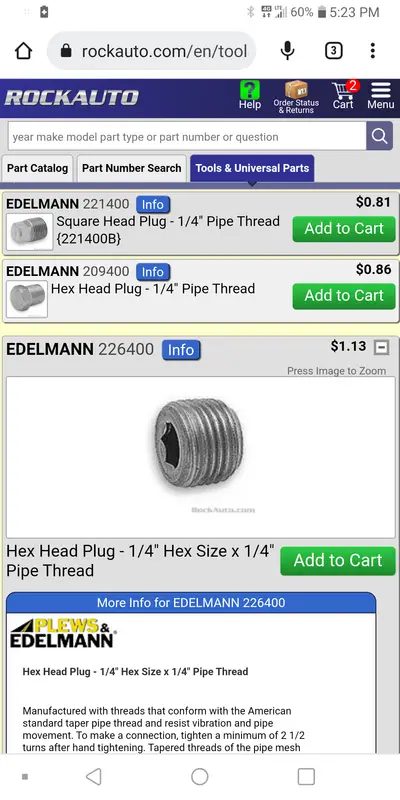
Paint the studs and nuts too or go to ACE or True Value ... Etc... And get the brass nuts. The fittings that are welded over from the air injection pull those out and replace with 1/4 pipe plugs, so when you paint the manifold it looks much more professional.

Reset all your exhaust. Remove the Y pipe and get those bells reshaped or cut and replace as a temporary measure until you can get the duals on.

Get a proper wire loom and work on getting the wires secured correctly. You have good quality red 8/9 mm, yet they are just flopped in there. All this is basic elbow grease and don't cost much, yet makes the under-hood look much more professional.

Check your size but I think the nozzles were 1/4 pipe. Attached are the ones I get, 1/8, 3/8, 1/2 inch also available. When I was doing the show cars I would just buy 20 or so at a time. Buying these at hardware store gets too expensive. Screenshot_20220913-172343.png
 
  • Like
Reactions: 1 user

Tynan918

Royal Smart Person
Aug 2, 2021
1,136
249
63
I know you done a lot of great work on your ride so far, and budget is key, but my suggestion below...

Pull manifolds and wire brush or media blast. Then paint everything with good quality high temp paint and put back on with new gaskets.

Paint the studs and nuts too or go to ACE or True Value ... Etc... And get the brass nuts. The fittings that are welded over from the air injection pull those out and replace with 1/4 pipe plugs, so when you paint the manifold it looks much more professional.

Reset all your exhaust. Remove the Y pipe and get those bells reshaped or cut and replace as a temporary measure until you can get the duals on.

Get a proper wire loom and work on getting the wires secured correctly. You have good quality red 8/9 mm, yet they are just flopped in there. All this is basic elbow grease and don't cost much, yet makes the under-hood look much more professional.

Check your size but I think the nozzles were 1/4 pipe. Attached are the ones I get, 1/8, 3/8, 1/2 inch also available. When I was doing the show cars I would just buy 20 or so at a time. Buying these at hardware store gets too expensive. View attachment 206782
I'm nervous about tackling the exhaust manifolds and piping...I'm aware of these parts rusting up real good and breaking trying to remove things... 🤦🏾‍♂️... if something breaks breaking down the exhaust system, I'm f'd.
 
  • Like
Reactions: 1 user

86LK

Royal Smart Person
Jul 23, 2018
1,937
1,986
113
I'm nervous about tackling the exhaust manifolds and piping...I'm aware of these parts rusting up real good and breaking trying to remove things... 🤦🏾‍♂️... if something breaks breaking down the exhaust system, I'm f'd.
lots of PBlaster pre-soaking and a torch are your friends
 
  • Like
Reactions: 1 user

78Delta88

Royal Smart Person
Supporting Member
May 23, 2022
1,249
1
1,012
113
SW Arizona
I'm nervous about tackling the exhaust manifolds and piping...I'm aware of these parts rusting up real good and breaking trying to remove things... 🤦🏾‍♂️... if something breaks breaking down the exhaust system, I'm f'd.
Just take your time, but if uncomfortable about doing it don't. Yet like 86Lk said... PB Blaster and heat...., just take your time.
 
  • Like
Reactions: 1 user

Tynan918

Royal Smart Person
Aug 2, 2021
1,136
249
63
Just take your time, but if uncomfortable about doing it don't. Yet like 86Lk said... PB Blaster and heat...., just take your time.
Looks like I'll need to get my hands on a heating torch then..

I need to go back to work for about a month or so at least, so I can hustle up this money for this exhaust system... Do you guys think I have that much driveability time ?
 

78Delta88

Royal Smart Person
Supporting Member
May 23, 2022
1,249
1
1,012
113
SW Arizona
Looks like I'll need to get my hands on a heating torch then..

I need to go back to work for about a month or so at least, so I can hustle up this money for this exhaust system... Do you guys think I have that much driveability time ?
Exhaust tick is more annoying than anything. As long as exhaust is not getting into cabin air, melting things... Etc...
 

78Delta88

Royal Smart Person
Supporting Member
May 23, 2022
1,249
1
1,012
113
SW Arizona
Just an FYI.... Found some stuff on the LG4 305. Interesting read.

LG4 vs. L69​

Starting with a standard issue Chevy 305 small block, here are some interesting notes:

  • both use aluminum intake
    • early LG4 models had a cast iron intake however
  • both use the same heads
    • casting: 601
    • 58cc chambers (60cc ?), 178cc runners (158cc ?)
  • valve size in L69 heads were larger
    • L69 : 1.84/1.50
    • LG4 : 1.76/1.46
  • L69 has 9.5:1 CR (flat tops) [these numbers changed]
  • LG4 has 8.6:1 CR (dished pistons) [these numbers changed]
  • L69 has a special cam, from the L-81 Corvette (hydraulic)
    • This is NOT a roller cam
  • L69 uses a performance calibrated PROM
  • L69 takes advantage of special exhaust/catalytic converter
  • L69 takes advantage of a higher stall torque converter
    • L69 : approximately 1900 RPM stall
    • LG4 : approximately 1200-1500 RPM stall
  • L69 uses a better fuel pump (from the Z/28)
  • the changes in the L69 setup yielded *roughly* 30 more horse power
  • the same changes actually yielded slightly less peak torque for the L69, but had the advantage of a flatter torque curve overall


  • Back to the main Monte page.
 
  • Like
Reactions: 1 user

SSMonteMan

Greasemonkey
Jun 12, 2015
111
225
43
A good rap with a hammer directly to the face of the bolt, use a punch if needed, and a couple days of soaking with PB blaster should be all you need.

It looks like these manifolds have been off before, so I doubt they'll be too stuck on. Just take it slow. You should be able to tell when a bolt is breaking loose or breaking off.
 
  • Like
Reactions: 1 users
Status
Not open for further replies.

GBodyForum is a participant in the Amazon Services LLC Associates Program, an affiliate advertising program designed to provide a means for sites to earn advertising fees by advertising and linking to amazon.com. Amazon, the Amazon logo, AmazonSupply, and the AmazonSupply logo are trademarks of Amazon.com, Inc. or its affiliates.

Please support GBodyForum Sponsors

Classic Truck Consoles Dixie Restoration Depot UMI Performance

Contact [email protected] for info on becoming a sponsor