

Ehh, th350s are cheap and plentiful. Good plan on the front end: Jounce bars, a Grand Prix bar, springs/shocks, and about a 32mm front sway bar will do it. Fender braces and firewall to cowl supports can help as well to a much lesser extent as they're not suspension parts. You'll also want a decent rear sway bar to get great steering response, but don't go too large or you'll suffer snap oversteer. Keep in mind that the front and rear bars work in tandem and mismatching them can also be problematic (24-28mm rear works very well with 32mm fronts). Switch to a rear sway bar that bolts to the frame and differential instead of the control arms to eliminate binding. The F-Body or Blazer versions are the best, it's what Hellwig and others simply made stouter models of, and there are multiple threads on the forum that cover them in pretty good detail. Oh, and get Pro Forged tie rod ends for safety.I'm kicking myself for giving away that 20,000 mile thm250 with the chevy v6 in 2020.
Numerous things seem better built on the '78, but this car is definitely rough compared to the '84 Monte. I'll just replace sh*t in the front end like a mad man until it takes exit ramps at 50 MPH...
BUILD THREAD '78 Cutlass Supreme Lichen Edition
- Thread starter doood
- Start date
You are using an out of date browser. It may not display this or other websites correctly.
You should upgrade or use an alternative browser.
You should upgrade or use an alternative browser.

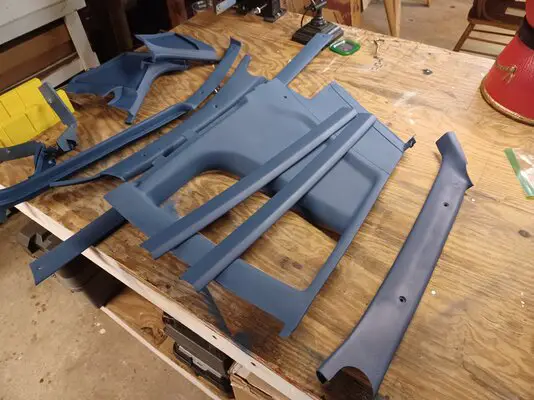
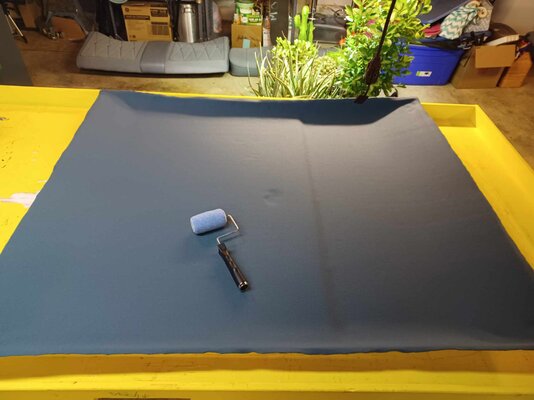

I did the typical headliner rebuild. 1) carefully removed old headliner 2) vacuumed scraped and scotch-brited the polystyrene backing board 3) repaired cracks and reattached missing pieces with polyester resin and glass fabric 4) used 3M headliner adhesive to attach OEM style foam-backed fabric pressed firmly with a paint roller.Headliner looks good, how are you reinstalling it?
I believe I will reinstall it by 1) installing front windshield interior trim 2) slipping headliner under windshield trim 3) installing dome lamp with push nuts 4) installing laundry hooks 5) installing rear window interior trim 6) install door ceiling trim. If you have suggestions, let me know. First I need to get the landau delete done by body shop; the rear window is currently held in with duct tape after I removed the old landau top with a box cutter and a scraper to make sure there wasn't some gory hole in the roof. At the time, I didn't know how water was entering the car. Still don't.
I need a few front windshield interior trim clips; I busted two clips not realizing the problem was the urethane windshield adhesive was preventing removal of the trim (was partly glued on by overflow).
After more driving today, the OCD voice in my head is nagging me to replace the steering components this winter. Then, the 'while you're in there voice' is telling me to redo the control arm bushings.
Service manual is telling me to do an oil change on the trans and the rear diff.
Mike
Last edited:
So, going through the back window?
I did the typical headliner rebuild. 1) carefully removed old headliner 2) vacuumed scraped and scotch-brited the polystyrene backing board 3) repaired cracks and reattached missing pieces with polyester resin and glass fabric 4) used 3M headliner adhesive to attach OEM style foam-backed fabric pressed firmly with a paint roller.
I believe I will reinstall it by 1) installing front windshield interior trim 2) slipping headliner under windshield trim 3) installing dome lamp with push nuts 4) installing laundry hooks 5) installing rear window interior trim 6) install door ceiling trim. If you have suggestions, let me know. First I need to get the landau delete done by body shop; the rear window is currently held in with duct tape after I removed the old landau top with a box cutter and a scraper to make sure there wasn't some gory hole in the roof. At the time, I didn't know how water was entering the car. Still don't.
I need a few front windshield interior trim clips; I busted two clips not realizing the problem was the urethane windshield adhesive was preventing removal of the trim (was partly glued on by overflow).
After more driving today, the OCD voice in my head is nagging me to replace the steering components this winter. Then, the 'while you're in there voice' is telling me to redo the control arm bushings.
Service manual is telling me to do an oil change on the trans and the rear diff.
Mike
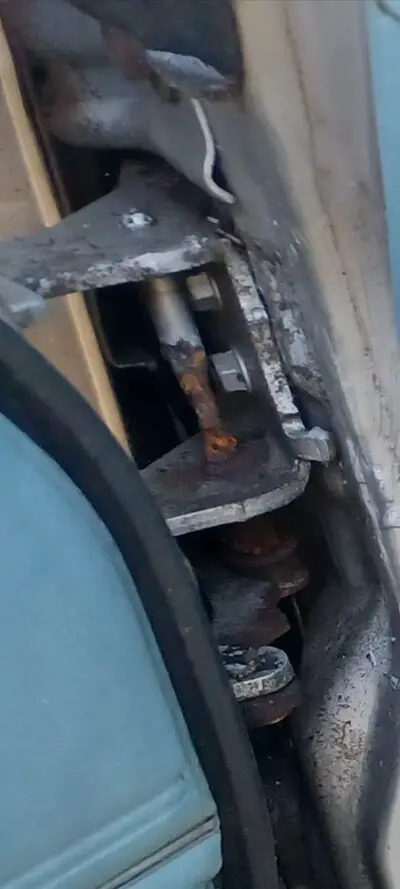
Upper driver side door hinge pin that the detent rides on a roller.... Can I replace that pin, or do I have to replace the hinge?
I've seen the pin replacement for the one with a bushing to improve door sag. This is the other pin with the wheel that rides the detent. It is very rusted and it is going to fail; is very rusted. 60% metal gone
I've seen the pin replacement for the one with a bushing to improve door sag. This is the other pin with the wheel that rides the detent. It is very rusted and it is going to fail; is very rusted. 60% metal gone
I did the hinges/ bushings on my Camino and I don't recall that pin being removable. It may be, but I didn't need to even try and take it out. If you're going to replace the hinge pins and that too you might as well just buy new hinges.Upper driver side door hinge pin that the detent rides on a roller.... Can I replace that pin, or do I have to replace the hinge?
I've seen the pin replacement for the one with a bushing to improve door sag. This is the other pin with the wheel that rides the detent. It is very rusted and it is going to fail; is very rusted. 60% metal gone
You mention doing the hinges so casually. I'm terrified of taking the fender and header panel off and replacing that one hinge... if I screw up the gaps, I'll have a MFing stroke.I did the hinges/ bushings on my Camino and I don't recall that pin being removable. It may be, but I didn't need to even try and take it out. If you're going to replace the hinge pins and that too you might as well just buy new hinges.
I have to get that header panel off anyway because it appears to be caved in a bit from a minor collision. I'm hoping to find where it is pinched and maybe make a relief cut to release it. I'm sure they'll be a lot of "while i'm in there" that should wait.
I expect that hinge to literally pop soon. I have no theory on how ONLY THE PIN is rotten.
Attachments
Last edited:
It's one of those tasks that seems worse than it is, kind of like the first time you pull an engine. Replacing the bushings and hinge pin can be tricky though, especially without a vice, but Vice Grips work to clamp the hinge to something so you can drill the hole to accept a new bushing. It's not complicated, just frustrating at times.You mention doing the hinges so casually. I'm terrified of taking the fender and header panel off and replacing that one hinge... if I screw up the gaps, I'll have a MFing stroke.
I have to get that header panel off anyway because it appears to be caved in a bit from a minor collision. I'm hoping to find where it is pinched and maybe make a relief cut to release it. I'm sure they'll be a lot of "while i'm in there" that should wait.
I expect that hinge to literally pop soon. I have no theory on how ONLY THE PIN is rotten.
Adjustment may be repetitive and it helps if you only loosen the bolts just barely enough to let things move with slight persuasion. Put tape on the edges or faces of anything you don't want to accidentally scratch or chip- door and fender edges are prime places. You may need to buy new door strikers as well, as they tend to wear flat on top. When setting door gaps adjust the striker position first to get the rear of the door to match the car, then work your way forward. Take measurements of any gaps that are currently correct and you can match them later.
Do you have a picture or two of the damaged header panel?
My theory on the pin is that it didn't get completely rust-proofed/ painted and was corroding from day 1.
Similar threads
- Sticky
- Replies
- 2
- Views
- 746
- Replies
- 8
- Views
- 628
GBodyForum is a participant in the Amazon Services LLC Associates Program, an affiliate advertising program designed to provide a means for sites to earn advertising fees by advertising and linking to amazon.com. Amazon, the Amazon logo, AmazonSupply, and the AmazonSupply logo are trademarks of Amazon.com, Inc. or its affiliates.
