BUILD THREAD '78 Cutlass Supreme Lichen Edition

I'm pretty sure I did not expose any lead here. Looks like body filler instead of lead. Is that true some cars have body filler and not lead?

Some cars may have had filler there, but it was usually the hardtop non-vinyl roof ones. More often than not, the seam was sloppily filled with thick seam sealer at the factory on the vinyl roof cars. It was getting covered up anyways so they just didn’t care. As long as it was sealed up.
You’ll be able to tell pretty quickly once you start sanding it, if it doesn’t sand nicely and balls up on the paper, it’s seam sealer.
 
  • Haha
  • Like
Reactions: doood and Rktpwrd
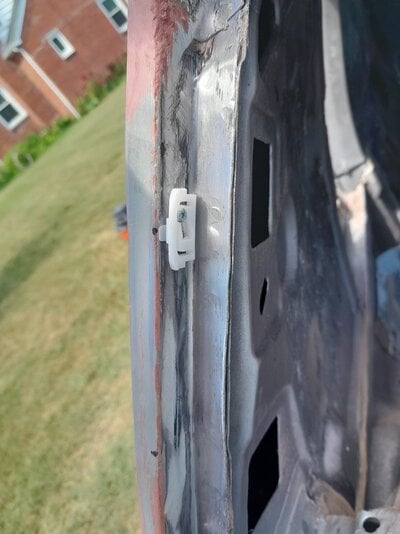
So, prolly was seam sealer; it was soft, but didnt ball up (age?) and sanded well enough. I guess I did a boo boo by filling over it? Should I have torched it and dug it out? I have a very good solvent (SEM solve) for surface clean up after. That SEM solve is made to remove silicone and butyl rubber, and it didn't make the seam tacky. Maybe it was filler? That's what I thought? There was factory paint over it and it was bended smoothly... pic attached.

Gotta do it right, even though it looks like a rat rod right now.
20231015_082951.jpg
 
Last edited:
So, prolly was seam sealer; it was soft, but didnt ball up (age?) and sanded well enough. I guess I did a boo boo by filling over it? Should I have torched it and dug it out? I have a very good solvent (SEM solve) for surface clean up after. That SEM solve is made to remove silicone and butyl rubber, and it didn't make the seam tacky. Maybe it was filler? That's what I thought? There was factory paint over it and it was bended smoothly... pic attached.

Gotta do it right, even though it looks like a rat rod right now. View attachment 237810

Yeah, if it was soft it was most likely seam sealer. It’s worth mentioning too, that in my experiences with G bodies I’ve found that they used several different types of seam sealers, depending on the application. Some remained soft and flexible, some were very hard and of an odd consistency. Almost like filler, and pink IIRC in color.

I personally wouldn’t run the risk of applying body filler over an unknown substrate. If it’s too soft and flexible, your filler over top will crack. If it’s made of a material that’s incompatible with with filler, it’ll separate. You can see where I’m going with this. Best to fully remove it right down to bare metal and start over unfortunately.

I would highly recommend using a short strand fibreglass filler for the bulk of the filling, conventional body filler should have a build thickness of no more than 1/4”. Fibreglass filler is waterproof and designed to handle a little more thickness as well as able to tolerate a little movement in the sheetmetal. I’ve successfully done 2 vinyl top to hardtop conversions now this way with no side effects or unwanted issues.
understood. dig it out. Well, at least the metal is protected for the time being.

Update: Body shop owner says it is factory body filler over the lead joint. I think that is good news.
 
Last edited:
  • Like
Reactions: Sweet_Johnny
Progressing slowly, because everything is new to me. Gonna rattlecan adhesion promoter and urethane sandable primer after 400 grit and colormatch urethane after that. Then the windows are going in with urethane caulk and butyl rubber where appropriate... might need to glaze some scratches or skim coat a thin filler.
20240619_105931.jpg
20240619_105917.jpg
 

Attachments

  • 20240619_105907.jpg
    20240619_105907.jpg
    1.2 MB · Views: 31
Last edited:
I opened up the 7.5 that came out of the Monte Carlo... the rear howled on coast from day one after shop rebuilt with 3.55 and clutch posi from Quick performance. I think I'm going to rebuild this rear and put it in the Oldsmobile and I'm posting these pictures here so I can take a look at the wear pattern closely on the pc. I think I'm going to toss these gears and buy 3.08. There was some metal on the magnet but nothing alarming. I'd like to find out why it was howling. Everything was new bearings, carrier, gears, seals.

Edit: this carrier only goes down to 3.23, so that's how I'll gear the Olds. Verdict on gear setting forum is cheap gears overheated during break-in period. Multiple comments about "drive side looks like shyt. pinion looks like shyt."

20240619_204312.jpg
20240619_204236.jpg
20240619_204151.jpg
20240619_204148.jpg
20240619_204126.jpg
20240619_201855.jpg
 
Last edited:
Does anybody have a 2004R and associated throttle valve kick-down cable working with a dualjet carburetor? The 260 SBO runs really well and has low miles and I don't want to swap it now.

To be honest, I've never taken a look at a TV cable on a 700R4 or 2004R; I've only had experience with the THM200/250/350 and the 4L60E.

What I think I know: a cable, much like a throttle cable, attaches to the throttle of the carburetor and attaches to the transmission, and when foot goes 90%+ throttle position, transmission downshifts. (correct me if wrong)

If I'm going to rebuild this 7.5" as a 3.23, well then I will likely cop the $700 to get a 2004R from a 442 from CGimbel when I get some loot.

Consensus on the FB gear setting forum is that I cooked the gears with an improper break-in, which is funny because the gears were swapped when the v6 was in the car, and that v6 didn't have the guts to smoke one wheel on wet leaves.
 
Your understanding of the kickdown cable is correct for something like a th350. The cable on the 200/700 trannies sets the line pressure and can fry the trans in no time if set incorrectly. No idea if the bracketry from a 4bbl will fit the Dual Jet though, and that might be a factor since the geometry of the cable and its arc during operation also matters.
 
Last edited:
  • Like
Reactions: SoFloG
I figured it might be difficult with dualjet.
 

GBodyForum is a participant in the Amazon Services LLC Associates Program, an affiliate advertising program designed to provide a means for sites to earn advertising fees by advertising and linking to amazon.com. Amazon, the Amazon logo, AmazonSupply, and the AmazonSupply logo are trademarks of Amazon.com, Inc. or its affiliates.

Please support GBodyForum Sponsors

Classic Truck Consoles Dixie Restoration Depot UMI Performance

Contact [email protected] for info on becoming a sponsor