What did you do to your G-Body today 2024

Got my tags today, if the rain stops I'll get it to the alignment shop tomorrow morning/ afternoon, whenever he can get me in. Hope to take a ride down to my folks house and show them the car, they haven't seen it in a while and want to go for a spin. 🤞

A strange thing happened at the MA RMV counter, my title for the car no longer existed in the system, it was dated 1988 when I first registered it. The lady asked how much I bought the car for way back when? I said $1200. She told me the only way to register it, as she saw it, was for me to pay sales tax again, with more than 36 years accrued interest! She was kind of kidding but serious at the same time. The car was registered and the sales tax was paid a long time ago so I wasn't hearing any of it. Her phone rang just at that moment, she answered, the boss was wondering what the issue was with my transaction and taking her so long? I was then sent over to his counter and he got things fixed up, but I have a new title coming by mail from the state to replace my original and it will be up to modern standards as apposed to what I have. Not a big deal, he didn't charge me for the new title and I left with a set of plates!
 
Sort of like this??
Yep, kinda sorta almost exactly like that.

IMG_3123.jpeg
 
I took my car for a drive yesterday for the first time in 33 years. In spite of the time passed it felt very familiar and I enjoyed the short drive down the back roads in town. An arm on the sill, one hand on the wheel and listened to my tail pipes….was terrific!

It still needs a front end alignment, I tried 5 shops and nobody could get me in. Other than that it ran great and the transmission shifts hard with the B&M shift kit.

It’s back on the lift getting some other small items tended to while waiting on the alignment. Have to adjust the e brake and modify the linkage from the trans to the steering column, that has been missing since the engine swap back in 1990. It needs the reverse lights and neutral safety switch to pass safety for the state inspection sticker.
 
Since Sunday was otherwise pretty much of a dead day for stuff to do; got the heavy lifting done early, I elected to sit down and see what was on the Velocity channel. Came across Brian Fuller and Jeremy Bumpus and the flavor of the episode was an 86 Monte Carlo SS that someone had brought to them for some serious rehab.
One of the first things they did was to dismount the complete front fascia including the rad cradle and to do that they first elected to remove the front bumper cover. This exposed some kind of internal support or filler for the cover that looked mostly like a plastic egg crate.
That caught my immediate attention as that particular part is not currently attached to my own front bumper and I had no immediate idea what had become of it. The two most logical places to look were the mezzanine floor in the shop and, oddly enough, the greenhouse. The mezzanine was a bust so out to the greenhouse I went.
The greenhouse is green in terms of intended use only. It is mostly decrepit and needs some of its glass replaced, but for absolute cold storage it is quite suitable. And there, inside, adjacent to a tote of scrap that had missed the truck ride to the salvage yard was the original front bumper with that eggcrate filler piece still attached!! HUH.
At that point the game plan became dragging it out and back over to the shop where I proceeded to remove the filler section and the turn signal pods from the aluminum bumper channel and then return it back outside to lean against the wall and become covered with a fresh coat of wet snow. I should probably put it back in the greenhouse but more likely it will get popped into the blower/tool shed. for the winter.

While neither torn nor missing bits, that filler was twisted at one end, probably from more than a few years of being attached to the channel and standing there on end in the cold, I can push the offending end back into line but it won't stay so the remedy at this point was to clamp the out-of-alignment end to a sawhorse and let the rest of the filler hang in the wind; the theory being that the weight of the free hanging portion plus gravity will slowly cause the kink to come unkinked and the filler to straighten itself out. After that fails, then it will be time to wait for hot weather to come around again and put it out in the sun to soften so I can clamp it straight and hose it down with cold water to fix it back in place.
Or does anyone else hereabouts have other thoughts and suggestions. And don't say new, new = $$$$$ and getting here is now an official hassle due to the mail strike and the airlines being cranky and .................


Nick
 
  • Like
Reactions: MalibuDavyou5
So this afternoon came with a choice of sorts, stay inside and fall asleep while trying to watch the home reno channel, or head out to the shop and expend some energy. The shop won.

Since I had already brought in the spare trunk floor from cold storage in the tool shed, while at the same time moving the spare front bumper into that shed, and dropped it onto a pair of sawhorses, I decided to warm up the compressor and see if the floor could be salvaged against future need or if it was too badly messed up by rust and age. It also gave me a chance to see how my new air drill would perform.

The preliminary event was using my old air drill and a 3M XT stripping wheel to see if I could remove the layers of paint and rock guard that had been applied to the lower rear quarter panel on the passenger's side. And both proved up to the task although the compressor did go through multiple reload cycles while trying to keep up. The biggest nuisance was the rock guard, it was both thick and old but persistence and obstinance won out. The metal underneath was actually not all that bad; one minor piece of acne that will be need to be patched in but a fast series of knuckle raps returned the sound of metal so some promise there. I may have to dig out the porta-power and give that whole panel a gentle push out, I can't be sure but it looks like one small section of the trunk jamb might be tweaked, or maybe it was the factory being complacent about fit and finish. Dunno.

The main event was the spare trunk floor and the new drill proved its value. Loaded it with a spot weld cutter and proceeded to blow away a section of dead metal that used to be part of the rear body mount. I will have to go back with a coarse grit sanding disk to clean up the site but the collateral damage to the panel was minimal so not too bad. There are a few more reminants and bits and stumps left to clean up in other areas from when the floor was harvested but this is a late fall/early winter "keep me busy" project so no white rabbit urgency attached to it.

Once it get it to where I am happy/satisfied I can throw a coat of epoxy primer at both it and the quarter and seal them up against the threat of rusticular cancer as best I can.


Nick
 
Last edited:
A half hour of sanding dried red spot putty on my Monte hood.... I have got to put some bondo or crest caulk to secure the hood skin to the hood frame as it is loose and needs that support I guess the frame could be deflected but what the heck 3/16" verses 1/4" of cement ect. for expansions sake..
 

Attachments

  • 20241127_161159.jpg
    20241127_161159.jpg
    359.8 KB · Views: 9
Last edited:
  • Like
Reactions: Sweet_Johnny
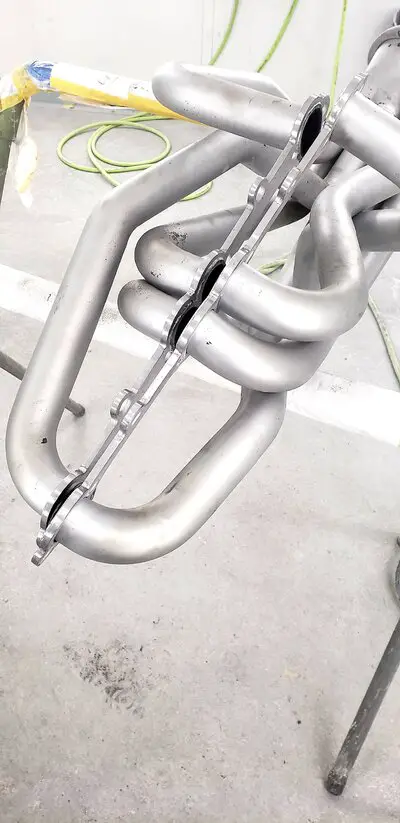
I've had these headers coated more than once over the years and I've never been happy with how rough the flanges were.seeing as everything surrounding them has gone to the wayside,this point there's really no difference i'd get them ready for blasting/recoating...again:popcorn:20241127_183812.jpg
 
Actually those flanges look to be a good candidate for some practice with a die grinder or air motor with a barrel bit chucked into it. When i dismounted the factory exhaust manifolds from my Orphan LS motor, they were chock-a-block loaded with casting flash. By using the die grinder I was able to whittle away almost of it of and smooth down and blend the seams into the adjacent surfaces. For an open edge/face like those flanges I don't think it would take much to knock off the high spots and ease the edges so you don't come away with your finger tips looking like you were using a dull razor blade to remove your finger prints.


Nick
 
  • Like
Reactions: MalibuDavyou5
My arms hurt. I’m tired and hungry… now I have to stop and go make what my kids call “World Famous Mashed Potatoes”.
IMG_8057.jpeg
IMG_8056.jpeg
IMG_8058.jpeg
IMG_8059.jpeg
 

GBodyForum is a participant in the Amazon Services LLC Associates Program, an affiliate advertising program designed to provide a means for sites to earn advertising fees by advertising and linking to amazon.com. Amazon, the Amazon logo, AmazonSupply, and the AmazonSupply logo are trademarks of Amazon.com, Inc. or its affiliates.

Please support GBodyForum Sponsors

Classic Truck Consoles Dixie Restoration Depot UMI Performance

Contact [email protected] for info on becoming a sponsor