What did you do to your G-Body today 2024

Picked up the car at 3pm at the alignment shop, it drives very nice now and my wife and I went for our first ride together, it was apart when we met back in 1991. We went by a local sign shop across town to get an idea on cost for putting the factory painted striping back on the car. They were very busy but came outside in spite of it being late and dark out. I described what I wanted and they were very interested in the job and asked if I would send some reference photos. They are going to call tomorrow with a better idea on cost as they were in the middle of a few jobs this evening. My wife and I rode around a bit on some quiet roads and stopped at our local pizza joint to grab dinner and head home. No highway driving yet but it sure is nice around town and responds to the throttle nicely with the new 3:73 gear set. Will take it on the highway next time out to go and visit my folks. Engine is running great in spite of my questionable tuning skills. 18 degrees at idle and 30 all in on the mechanical advance. I may give it more later on but for now not pushing it too hard since it sat for so long.

View attachment 249118

Congrats Mike, I know it’s been a long road for you up to this point. But now you’ve finally made it, and the car looks great! Very happy for you man, enjoy it!
 
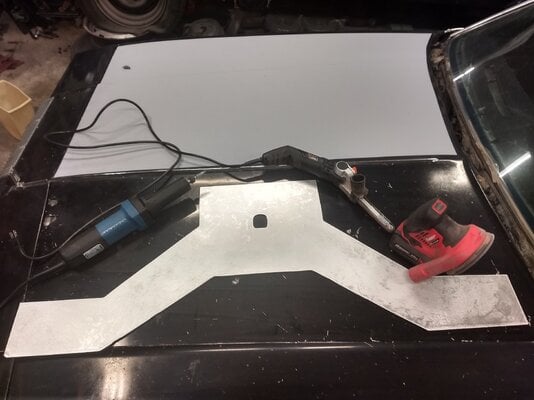
I used a Bauer metal circular saw then jigsaw w/3" Warrior 'medium metal' blades to cut a rear seat brace from 1/8" thick aluminum. Following that I employed a step-bit succeeded by a Hercules die grinder, a Wen bandfile belt sander, and a Bauer bench top belt sander to wrangle things into shape. The palm sander wears 80 grit and now the brace is ready for glue & rivets after a little bend near the top. I just noticed how unflattering this picture is- it's not perfect but the camera angle and sander placement seem to make it look worse. My biggest blunder is visible on the left leg where I cut it crooked, and the corners are purposely not in alignment.

IMG_20241202_210355117_HDR.jpg

In other news, I haven't finished this yet but....:

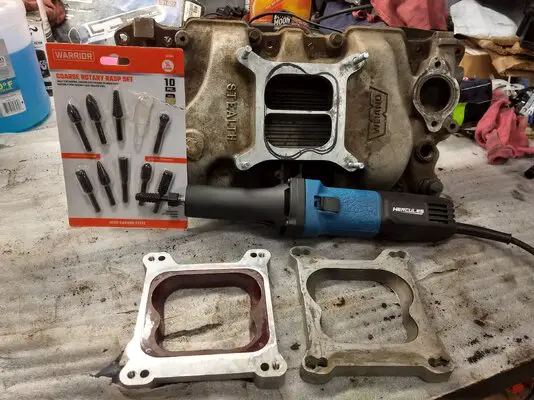
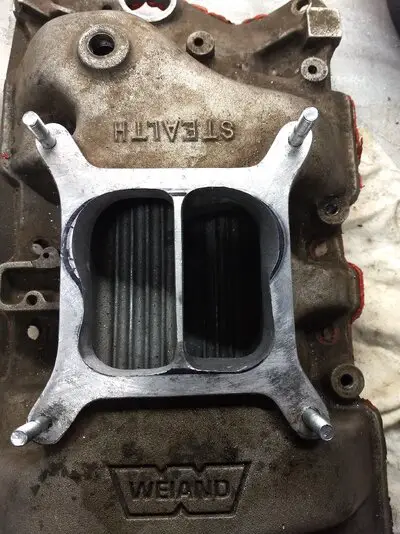
IMG_20241121_182202391_HDR.jpgIMG_20241121_203939971.jpg
For those who cringed- I'll be leaving a 1/4" of material by the butterflies, I'm not retarded although I am on the spectrum.


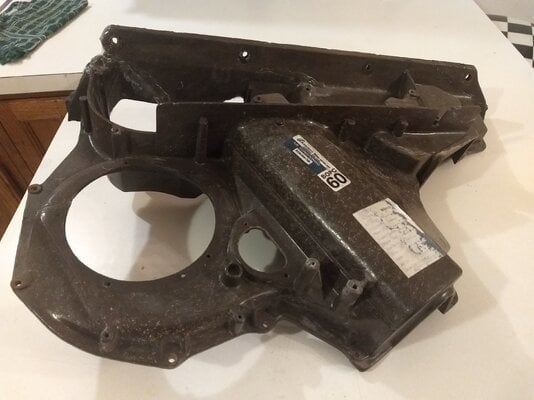
I've also been gluing this back together:

IMG_20241203_000246985.jpg
 
Last edited:
Congrats Mike, I know it’s been a long road for you up to this point. But now you’ve finally made it, and the car looks great! Very happy for you man, enjoy it!
Thanks Donovan, I’m happy with it! It really is like being a 17 year old kid again, just fun to be back in that car after all these years. 👍

Still have some things to tend to and started a punch list for this winter, but nothing that will lay the car up for long. Still hoping they don’t start salting the roads so I can get in a few more drives in it before winter really sets in. The heater works fine and was quite cozy in the 26 degree riding around last night. My folks can’t wait to see it pull up in their driveway. Lol
 
Last edited:
Picked up the car at 3pm at the alignment shop, it drives very nice now and my wife and I went for our first ride together, it was apart when we met back in 1991. We went by a local sign shop across town to get an idea on cost for putting the factory painted striping back on the car. They were very busy but came outside in spite of it being late and dark out. I described what I wanted and they were very interested in the job and asked if I would send some reference photos. They are going to call tomorrow with a better idea on cost as they were in the middle of a few jobs this evening. My wife and I rode around a bit on some quiet roads and stopped at our local pizza joint to grab dinner and head home. No highway driving yet but it sure is nice around town and responds to the throttle nicely with the new 3:73 gear set. Will take it on the highway next time out to go and visit my folks. Engine is running great in spite of my questionable tuning skills. 18 degrees at idle and 30 all in on the mechanical advance. I may give it more later on but for now not pushing it too hard since it sat for so long.

View attachment 249118
Congratulations! I love seeing that you got your car going and are getting to enjoy it!
 
Didn’t have much time today after work.
I was going to pull the bumpers to get them ready to paint and install the lightweight bumper brackets. Pulled the back one off then got distracted. I was wondering if the body mount bolts were going to fight so I checked all of them. They all broke loose super easy. Except for 2 they just decided to break instead. 🤣
The two right behind the rear wheels were toast. Passenger side broke as soon as I touched it. Driver side was gone already.
Luckily the wife works this weekend so I’m going to try and swap the mounts then.
IMG_8157.jpeg
 
  • Like
Reactions: Rktpwrd
DSCN4421.JPG


So since the dust has settled a bit, I thought I'd shoot a few shots of what the hubbub was all about.


DSCN4422.JPG


So this is the passenger side inner drop panel, still attached at this point to a section of the rear curve of the outer wheel house as well as being attached to a reminant of outer skin from the rear lower quarter panel. Laid out in front of it are my ball pein hammer and Steck panel splitter. The splitter got a serious work out on this job and will be the recipient of some axe file work to re-edge its chisel point. Closer in the foreground to the right of the panel are my I-R air drill with a spot weld cutter loaded into the chuck and my Evercraft air drill fitted with a 3M XLT paint/rust stripper wheel on a mandrel. The 3M wheel is great for rust/crud/paint/undercoat removal. The little squeeze bottle in the middle is air tool oil.


DSCN4425.JPG


Just a quick close up of the hammer and splitter. You can see the mushroom effect on the end of the splitter from having to deal with all those factory spot welds after they had been "cut" free.


DSCN4426.JPG


For cutting spot welds, I have two options for the type of spot weld cutter that I can use. The one in the air drill comes with a spring loaded point that indexes into a center punch dimple that you create using a center punch and a hammer. On steady stable surfaces, that dimple is easy to make; on a springy, loose, recalcitrant body panel that is fighting back, the results are highly sub-optimal and repetitive strikes mostly useless. Which is where, the cutter shown above comes in. Instead of the point, it has a drill bit center that will drill a pilot hole and then act as guide for the cutter to follow. Major issue with them is that the bit is fragile and they break, and break, and break, and .............. yeah. So in this case, where the point kept bouncing and deflecting off the weld, I ended up using the drill tipped shank by itself to get a hole just deep enough that the point would sit down in and stay on track. As you can see from the close up, the cutters are replaceable which is a good thing because those factory welds beat them up and chew up the tooth points to where they will not cut at all, just sort of float over the metal.


DSCN4427.JPG


What's left of the panel lip that mates up to the outer wheel house just behind the rear wheel, along with s small flap of metal that used to be part of that wheel house. All this came as part of a complete rear quarter section that included the trunk lid and valence. The donor was an 83 Monte that also gave up a door which, post rehabilitative surgery, now resides on the passenger side hinges of my ride. The previous door went to the table for a total replacement of the lower shelf and flange; it was all gone, totally rotted out and mostly memory. With it I got as far as tacking the replacement metal in place but the other shell was already done and ready to use so it got hung. Still needs to be skinned and there is a brand new EPT coated skin waiting in its box for me to do that not so little thing. (Need to find a child's metal legged swing set and do some editing for size and use.......)


DSCN4428.JPG


DSCN4429.JPG


DSCN4430.JPG


DSCN4431.JPG


From previous experience I knew that the stripping process on the lower rear quarter panel was going to be messy and dusty so I decided to enter my blue period and drape everything adjacent to the work site with blue tarps to keep the dust and debris off them. The only thing i couldn't drape was my lungs and even with a proper breather using dust filters hung off my face, my lungs still had to deal with the stuff. About the consistency of toxic flour and half as tasty. When your sinuses start to bleed, then you know that you are not having fun annn--ymore.

As for the rest of the trunk panel, it went back into the tool shed for the winter. By dissecting this portion off the complete assembly, I no longer have to wrestle with the whole mess. The objective of all this is to score that drop panel intact just in case my archeological exercise in the quarter panel reveals that the OEM panel is crippled or has succumbed to rusticular cancer. They are not an item to be found as a matter of course on a shelf at the dealer's, so having one jic from a hulk is worth the effort of having to dissect it out of its location. Something on the order of 24 or more plug welds and a lot of Steck Splitter "Encouragement".


Nick
 
  • Like
Reactions: UC645

GBodyForum is a participant in the Amazon Services LLC Associates Program, an affiliate advertising program designed to provide a means for sites to earn advertising fees by advertising and linking to amazon.com. Amazon, the Amazon logo, AmazonSupply, and the AmazonSupply logo are trademarks of Amazon.com, Inc. or its affiliates.

Please support GBodyForum Sponsors

Classic Truck Consoles Dixie Restoration Depot UMI Performance

Contact [email protected] for info on becoming a sponsor