1936 Ford Pickup Refresh

Status
Not open for further replies.

DRIVEN

Geezer
Apr 25, 2009
8,074
14,533
113
*CENSORED*
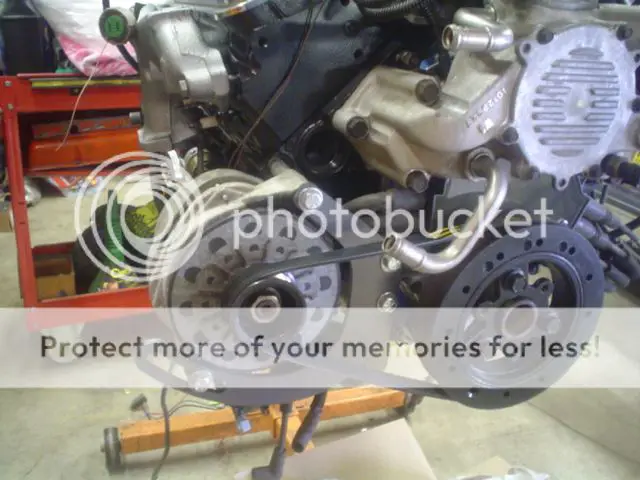
Did a test fit the low-mount alternator kit and took some measurments. Looks like I'll be notching the front crossmember just as anticipated. Might even be into the framerail a bit.
002-77.jpg

Also hooked up the spark tester, noid light and scanner to see if I could verify spark and fuel. Looks good on the stand. Hopefully I can just hook up the dozen or so wires when I drop the engine in and be good to go. We shall see.
003-65.jpg
 

Oldsmoletick

Royal Smart Person
Sep 18, 2009
1,581
10
38
cny
Good idea with the knock outs, 8) . Any reason the alternator can't be mounted up top or higher rather than as low as it is? (keep in mind I have 0 knowledge of chevy engines, :oops: :lol: ).
 

DRIVEN

Geezer
Apr 25, 2009
8,074
14,533
113
*CENSORED*
On the B, D, and F bodys, all the accessories are located on the passenger side. Once you remove the AC compressor and PS pump you are left with a large, awkward aluminum bracket that doesn't allow you to run a belt without adding idler pulleys. The water pump gets in the way too. We just went this route to clean things up. It creates extra work in the front crossmember area but that's not a big deal since someone torched out a hole for the old mechanical fuel pump decades ago. I'll actually be cleaning up that scar at the same time so it's a 2 birds /1 stone deal.
 

DRIVEN

Geezer
Apr 25, 2009
8,074
14,533
113
*CENSORED*
Shortened the driveline. I didn't really take any other pics. Just this one after I had shortened the tube and hammered the end back into the tube before being welded.
007-26.jpg

My brother came by last night and shot the firewall and inner fenders. My camera really sucks but it's kind of a blood red shade in person.
008-24.jpg

Hope to do the crossmember notch and get the engine in this weekend.
 

Oldsmoletick

Royal Smart Person
Sep 18, 2009
1,581
10
38
cny
Did/will you have the shaft balanced after that, or is it just for mock up? I was given quite the rash of sh*t for shortening my own drive shaft and not bothering to have it balanced. It didn't shake so I saw no point, I trust my welds too, lol.
 

DRIVEN

Geezer
Apr 25, 2009
8,074
14,533
113
*CENSORED*
Depends on how it feels when it's back together. The factory balance weight is at the other end so I doubt I upset it too badly by removing 3.5" of bare tube. I've been flamed too for shortening my own on my wagon on a different forum. I shortened it and used the hose clamp method to balance it. It was actually noticeably smoother after I was done than before I started. Even though I had posted pics with my description of the process, those chimps were under the impression that the clamps were somehow holding it together. I ran it that way for quite a while then sent it out to be retubed and balance. It has never been as smooth as when I had the clamps on it. Go figure.
 

DRIVEN

Geezer
Apr 25, 2009
8,074
14,533
113
*CENSORED*
Chapter 6, Dropping it in and hooking it up:
Firewall and inner fenders painted. Frame pre-surgery:
001-87.jpg

After making room for the alternator and reinforcing the crossmember:
002-79.jpg

Engine back in it's home:
003-67.jpg

004-48.jpg

Still need to get the transmission reinstalled then begin the real time consuming stuff. My feet and back are tired so I'm calling it a day. I've set a deadline of September 26th. Seem like a lot of work to do in 10 days. Wish me luck.
 

Oldsmoletick

Royal Smart Person
Sep 18, 2009
1,581
10
38
cny
Good luck :shock: , and man that's a tight fit. Is it just an illusion in the photo, the air itake tube and MAF sensor looks to petrude out past the fenders? Kinda like an "is there room for the radiator"? I Like contrast of the black exterior and red under the hood 8) .
 

DRIVEN

Geezer
Apr 25, 2009
8,074
14,533
113
*CENSORED*
Not an illusion. There's plenty of room for the radiator and fan. Without the air filter it all looks like it'll fit inside the hood too. Still not decided on the final layout. possibly a 90* to point the MAF and filter down or back. May even flip all of it to the passenger side. Plenty of options still. Sometimes you just can't tell how things will fit until it all gets mocked up.

I've got the transmission in now and just got back from Napa with some exhaust gaskets/donuts, a rear U-joint and a set of plugs. Filling my belly with Taco Bell and trying to muster the ambition to get out there and get to it.
 

DRIVEN

Geezer
Apr 25, 2009
8,074
14,533
113
*CENSORED*
Gotta admit, I've been really bad at documenting my progress. I've taken no pics at all. Just a bunch of boring little details.
-Exhaust is done with the exception of the O2 sensor bungs.
-Driveline is installed.
-New, proper battery cables installed.
-Finally located the EGR vacuum harness that was missing.
-Removed and plugged some vacuum ports on the intake.
-Modified throttle cable
-Added fittings and Ts for the oil pressure and temperature gauges.
-Mounted transmission cooler under the bed.
-Welded in wishbone reinforcements and fabbed spacers.
-Shifter linkage hooked up and adjusted.

I have purchased most of the fuel system components but still haven't decided if I'm completely happy about my plan. May put it off for a couple days and think about it. Having trouble finding 3/8" high pressure hose. Apparently, Gates recalled all of it recently. My brother wants to do the radiator/fan mount so he was over a couple nights ago and we mocked it up. Hopefully it'll be done by the end of the week.

I need to do a 250 mile trip today to pick up a new project for my dad so I probably won't do much on the '36 today. I'll post it in the Compound Thread when I get home and get some pics.
 
Status
Not open for further replies.

GBodyForum is a participant in the Amazon Services LLC Associates Program, an affiliate advertising program designed to provide a means for sites to earn advertising fees by advertising and linking to amazon.com. Amazon, the Amazon logo, AmazonSupply, and the AmazonSupply logo are trademarks of Amazon.com, Inc. or its affiliates.

Please support GBodyForum Sponsors

Classic Truck Consoles Dixie Restoration Depot UMI Performance

Contact [email protected] for info on becoming a sponsor