1979 Malibu "A Body" pulse delay wiper conversion

Status
Not open for further replies.
i recently removed a delay wiper motor and switch from an 81 malibu in the junk yard. this particular unit had a hole drilled in the firewall at the upper left (drivers side upper) corner of the brake booster area. the green wire with grommet was fitted in this hole. this was the first time i had seen this, as most on my experience is with the green wire routed through the firewall connector. I'm sorry, i didn't take a pic of the hole location. this vehicle had a lot of sealer on the firewall in this area. sometimes the factory with place a dimple in the firewall to indicate where to drill a hole.
joe
 
  • Like
Reactions: Longroof79
Thank you all for the support and information I greatly appreciate all the help I have been given on this. Joe, per your junk yard 81 find, Was it just the wiper motor, delay dash switch and the green wire with the grommet in the firewall, or was there any other wires aside form the main harness wires 3 power, and the 2 washer pump? According to the 79 electrical wiring diagram I have, it illustrates a wire connected to the fuse block in the accessory terminal. I know that is is for 79 but was wondering if there was anything else for the 80 and 81 models since I have parts for either setup.

It seems the 81 may be easier to go with due to the fact that a single green wire is all that I have to run as opposed to 3 additional wires for the 79. 2 to the delay circuit and one for the power from the fuse block. I would like to use the 79 style due to it matching the rest of the car. Pagrunt, I like the idea of using an open hole in the fuse block, however I don't seem to see any openings, do just choose some connector that is missing the connector and use that? If I use the 79 style I would need to run 2 additional wires to the engine compartment.
 
Pagrunt, I like the idea of using an open hole in the fuse block, however I don't seem to see any openings, do just choose some connector that is missing the connector and use that? If I use the 79 style I would need to run 2 additional wires to the engine compartment.
I just used an open port that the light/forward harness would use. I crimped on the O.E. male & female conectors, cleaned out a matched set of ports, pushed the ends in till they clicked/locked in. My green wire is running with the wires for the wiper motor as if GM did it that way.
 
I just used an open port that the light/forward harness would use. I crimped on the O.E. male & female conectors, cleaned out a matched set of ports, pushed the ends in till they clicked/locked in. My green wire is running with the wires for the wiper motor as if GM did it that way.
So you actually put a connector in the fuse block, and a connector on the other end to plug into, I was thinking you actually used a blank connector port and ran the wire through the hole.
 
I'm anal about my wire work. I want it to look as factory. I really don't want to punch holes unless I have to. Everything from that to adding the dome dimer, the newer '86 up radio, fixing the hacks my brother did in high school to pigtail replacement I try to copy O.E. work. There is no red/blue/yellow crimp ends in my wiring.
 
  • Like
Reactions: Longroof79
That's great, not many people care about butchering things just to get the job done. I like you, attempt to make things I do as close to factory as I can, regardless of what I'm working on. I am trying to make this conversion as factory as possible hence being a bit annoying which I apologize for. I just wish GM had punched the firewall or at least made an outline or something so I could just stick the grommet on the wiring harness when I receive it through the firewall and be done with this.

I saw there was a hole for factory cruse control in a picture I found browsing on Google. My dad installed an aftermarket Sears (Dana) vacuum cruse control in the car and for the longest time I thought it was actually OEM GM. I asked him one day what happened to the cruse control and he said the computer kept going out on him so he ripped out the wiring and everything but the speed sensor, magnet on the drive shaft, and brake disengagement switch on the pedal as well as the down hill tilt switch on the firewall. A few years a go, I was able to locate some kits on eBay and repair the cruse control.

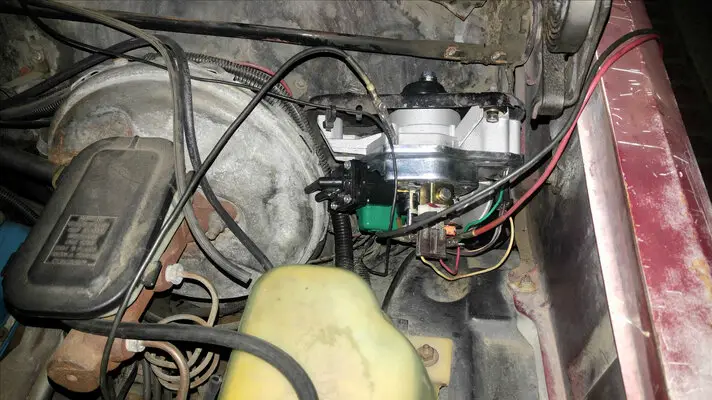
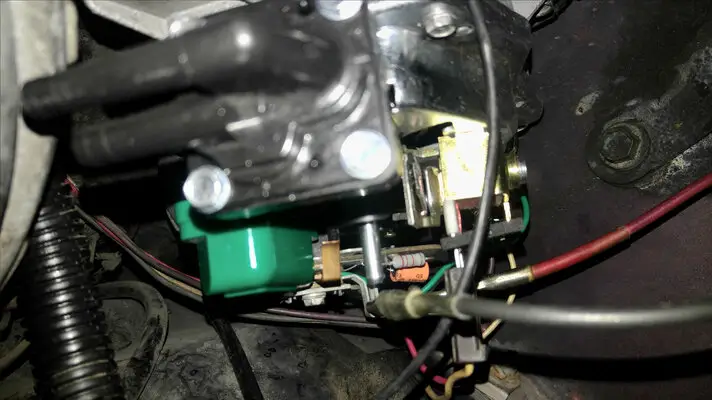
The point of this story was that the way he mounted the vacuum actuator servo and ran the throttle cable It looks as if it came that way from GM I always wondered why the tach filter wire grommet appeared to be broken in two, My dad popped the grommet out to install a new grommet to run the wires and vacuum hose for the cruse control through leaving the original tach filter grommet wire in front of the one he put in. The kit came with a clamp on style switch which was ok, however I wanted to make it even better and as stock as possible so I discovered that Rostra Precision Controls formerly Dana Corp manufactures a GM push in style turn signal cruse control lever and now I have the aftermarket stalk in and it looks amazing, no additional wires to be seen or a clamp on or dash mounted switch setup.

My dad used to work for Toyota a long time a go installing car alarms, he was instructed to use a punch and whack a hole in the firewall and run the alarm wiring through it as is. The sharp burs would easily destroy the insulation on the wires but that's how Toyota wanted it. He didn't like the idea of butchering up brand new Toyota's so he ordered hood rod grommets from the parts department drilled a pilot hole, and got a chassis punch and made nice clean round holes and put the grommets in them. He was told he was working too slow and was fired...
 
Great news! so I got home form work and laid down for a little bit and kinda fell asleep. Woke up and wanted to tackle this project again, I looked over the 1979 wiring diagrams for the standard 2 speed and pulse delay wipers. Not being 100% sure, I figured I'd test the 2 NOS delay wiper switches I have one for the 78-79 and the other 80-81 with the original 2 speed wiper motor since I knew that motor functioned properly in the car.

After just plugging in the 2 delay switches, the 2 speed motor worked as it should 🙂 what a pleasant surprise that was. This led me to believe the main wiring for the wiper switch is the same regardless of standard or delay wipers. I was being cautious and reviewing side by side the 2 schematics and decided they appeared the same as well.

Next was the moment of truth, either I was going to be out some money on a burned up wiper motor and switch or worse have to replace the cars wiring harness if the fuse didn't blow for some reason. I used several long alligator jumpers for hooking up the switch to delay board (green and white wires) and 12V DC from the alternator bolt for the (white wire) on the switch for accessory power.

Next was a little worrisome and was to turn the key to the on position. To my surprise the wiper relays or park switch clicked which was more than I had before which was absolutely nothing 😀 I had a loose switch connection because I didn't fully plug in the main switch to dash wiring harness and snap the locking clip in. After wiggling it a little bit the motor cranked away! 🙂 I tested the hi, low, washer pump, delay settings, and off. At first the delay didn't function because I intentionally left the 12V accessory wire off for safety purposes so after things looked good I plugged in the accessory power and had a continuous delay until I realized I had the rheostat in the fast position which is continuous low speed.

Now all I need to do is impatiently wait for M & H Electric Fabricators to manufacture the 1979 Malibu/ Monte Carlo/ El Camino delay wiper harness (3 wire) harness and worst of all decide if when, and where to use a chassis punch and make a new hole in the firewall, or splice the M & H Harness when I receive it to make it longer and run it through the speedometer (and I believe if equipped cruse control) grommet to the lower passenger side of the power brake booster, or utilize the mentioned pagrunt mentioned and run the 3 wires through C100 bulkhead fuse block.

I would love some pictures if anyone has any of a factory 78-81 with delay wipers so I'm able to get a better understanding of where the hole is supposed to be as I don't want to just punch a hole anywhere in the area

A huge thank you to all who contributed to my successful delay wiper conversion and will be posting pictures of the testing phase as well as of the Malibu in a bit

BTW for anyone who is interested in this conversion using the dash switch any year between 1978 and 1981 the M & H wiring harness part numbers are for the difference between the 1978 and 1979 harnesses are just the length form the switch to the firewall grommet. 1978 is 100 mm longer than 1979 per M & H Tech Support

1978 Part# 41862
1979 Part# 41876
1980- 1981 Part# 41896
 
Last edited:
  • Like
Reactions: Longroof79
Sorry for the double post, I'm not sure if It's against forum rules or not however would be interested to know 🙂 Here are some pictures I took however it became dark out by the time I took them. Also had to compress the images since they were over the limit for this forum. In the last picture with all the parts, you can clearly see I have quite the collection of parts. the old used motor in the picture is the original 2 speed motor along with its 2 speed switch. The rest is 80- 81 style pulse boards on the pumps however the motors are for 78-81 vehicles. I have to return the OEM one to Pep Boys as I no longer have any use for it.

I purchased the Remanufactured Delco motor due to the fact I don't like aftermarket parts especially ones from Cardone however wanted to test the setup before purchasing an original. At least if this setup fails for some reason in the future I can always convert to the 80- 81 style single green wire 😀 I got a good deal on the standalone washer pump from Rock Auto and all the pump rebuild kits are form them as well and super cheap too 🙂 Oh and for anyone wanting to see a sneak peak of the turn singnal lever with cruse control switches, you can see it in the picture of the wiper switch. Looks clean and stock IMO which is how I like it.
 

Attachments

  • Delay switch .jpg
    Delay switch .jpg
    784.2 KB · Views: 892
  • Delay switch wiring.jpg
    Delay switch wiring.jpg
    569.5 KB · Views: 661
  • Delay wiper motor 1.jpg
    Delay wiper motor 1.jpg
    1.3 MB · Views: 953
  • Delay wiper motor pulse board.jpg
    Delay wiper motor pulse board.jpg
    987.6 KB · Views: 1,005
  • Spare delay wiper parts.jpg
    Spare delay wiper parts.jpg
    862.5 KB · Views: 617
Nice work, Scott...perseverance pays off.
 
  • Agree
Reactions: pontiacgp
Status
Not open for further replies.

GBodyForum is a participant in the Amazon Services LLC Associates Program, an affiliate advertising program designed to provide a means for sites to earn advertising fees by advertising and linking to amazon.com. Amazon, the Amazon logo, AmazonSupply, and the AmazonSupply logo are trademarks of Amazon.com, Inc. or its affiliates.

Please support GBodyForum Sponsors

Classic Truck Consoles Dixie Restoration Depot UMI Performance

Contact [email protected] for info on becoming a sponsor