

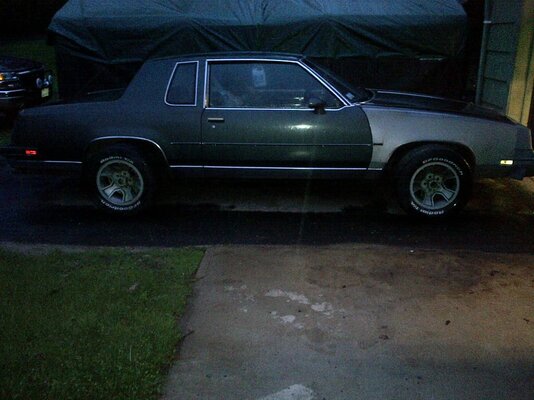
1981 Oldsmobile Cutlass Brougham- my thread
- Thread starter GT_80
- Start date
You are using an out of date browser. It may not display this or other websites correctly.
You should upgrade or use an alternative browser.
You should upgrade or use an alternative browser.
- Status
- Not open for further replies.
You should definitely consider not going with the two tone paint. There are soooo many gbodies in my neighborhood & I also owned an 82 monte with a 2 tone paint job myself & it was just terrible & it's impossible to keep the two colors from blurring together when the paint gets old + I have never seen one come out perfectly that I actually liked & seen it tried dozens of times! IF you do follow through on it, study other people's 2 tone paint job attempts and see where they went wrong. Really get down on your knees and judge how accurate their paint jobs are. I have NEVER seen one that I thought wasn't flawed somehow
Glad to see it going back together. Normally I'm not a fan of mixing and matching factory wheels between brands but I think I like the Pontiac ralleys better than the Iroc wheels on your car. Of course, Olds wheels would look even better 8) .
Good progress!
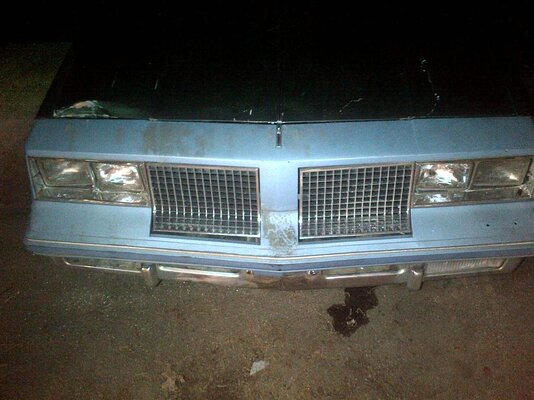
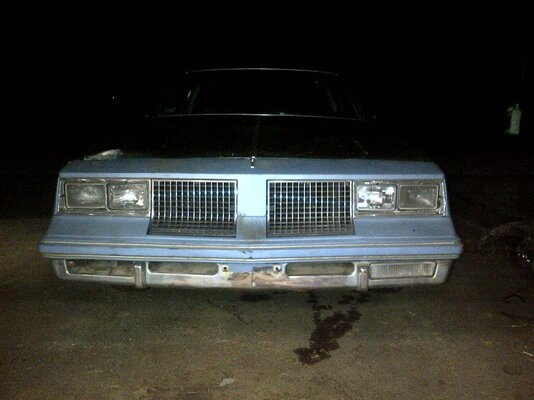
You need to replace that passenger side bumper shock and your bumper will line up better.
The oil all over it is a clear sign it was collapsed in the accident and is no longer useable...
You need to replace that passenger side bumper shock and your bumper will line up better.
The oil all over it is a clear sign it was collapsed in the accident and is no longer useable...
My buddy who is planning on painting my car for me paints 100K corvettes all day long... I am not too worried about paint bleed ") Besides, I plan on putting a pinstripe on the break line. I want it to look like the older cutlass Hurst edition where the trunk lid, roof, and hood are bright silver with heavy metallic, and the sides and front black. I will have to try to do some renditions to see how it will look.
Besides, I plan on putting a pinstripe on the break line. I want it to look like the older cutlass Hurst edition where the trunk lid, roof, and hood are bright silver with heavy metallic, and the sides and front black. I will have to try to do some renditions to see how it will look.
I replaced both bumper shocks when I put the new bumper on- this one had good shocks that have not been collapsed, but the front frame on the pass side must be slightly twisted, the bottom hole didn't quite line up when i Put the new bumper on- it could be that the shock on the bumper could be twisted as well.
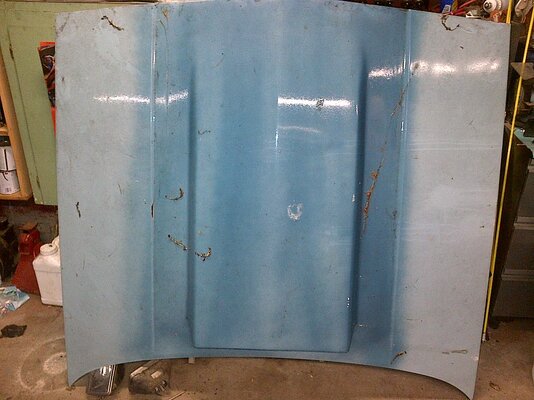
I got some more new parts for it today I drove from my work two hours north to Tilton NH to get a hood- It is a stock hood with a fiberglass scoop riveted and glassed on, not a great job, it is cracking everywhere and I will need to cut the scoop back off, shove it further back on the hood, glue it back on, cut out the metal in between the supports so it actually works, and finish the body work. For $100 I think it is worth it- even if I cut the scoop off for $100 it is worth it to me. I didn't want a 4" scoop, I wanted a 2" scoop so it is very subtle, not I have one
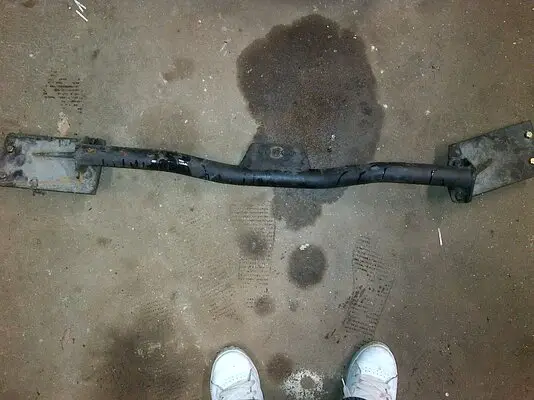
The real good news at the yard I bought the hood from, there was a custom made dual exhaust crossmember in the car (looks like its off a newer truck with plates welded on the ends) as well as a complete set of drivers and passengers door and trunk rubber seals that the guy threw in for $20! I also grabbed a newer style din and 1/2 dash stereo bezel as well!
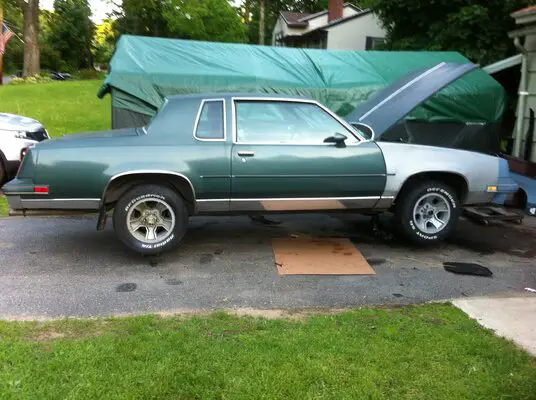
To the dismay of the Cutlass purists on here, and at the risk of having someone else calling my cutty a monte... I bought a mint set of 5 Monte SS wheels with 2 decent BF Goodrich Radial TA tires (245/60-15) and three junk tires-
so this is my update for today, I will have some more updates tomorrow probably. I have all the parts to build my new 350, just need to find time. Right now, I want to get the wiring for the car back together and drive it a little so I can have some fun while working on my new motor. The motor that is in it need valve stem seals badly, and the choke is messed up, but I can drive it for now, and or do valve stem seals and really take my time on the new motor.
Besides, I plan on putting a pinstripe on the break line. I want it to look like the older cutlass Hurst edition where the trunk lid, roof, and hood are bright silver with heavy metallic, and the sides and front black. I will have to try to do some renditions to see how it will look.I replaced both bumper shocks when I put the new bumper on- this one had good shocks that have not been collapsed, but the front frame on the pass side must be slightly twisted, the bottom hole didn't quite line up when i Put the new bumper on- it could be that the shock on the bumper could be twisted as well.
I got some more new parts for it today
I drove from my work two hours north to Tilton NH to get a hood- It is a stock hood with a fiberglass scoop riveted and glassed on, not a great job, it is cracking everywhere and I will need to cut the scoop back off, shove it further back on the hood, glue it back on, cut out the metal in between the supports so it actually works, and finish the body work. For $100 I think it is worth it- even if I cut the scoop off for $100 it is worth it to me. I didn't want a 4" scoop, I wanted a 2" scoop so it is very subtle, not I have one The real good news at the yard I bought the hood from, there was a custom made dual exhaust crossmember in the car (looks like its off a newer truck with plates welded on the ends) as well as a complete set of drivers and passengers door and trunk rubber seals that the guy threw in for $20! I also grabbed a newer style din and 1/2 dash stereo bezel as well!
To the dismay of the Cutlass purists on here, and at the risk of having someone else calling my cutty a monte... I bought a mint set of 5 Monte SS wheels with 2 decent BF Goodrich Radial TA tires (245/60-15) and three junk tires-
so this is my update for today, I will have some more updates tomorrow probably. I have all the parts to build my new 350, just need to find time. Right now, I want to get the wiring for the car back together and drive it a little so I can have some fun while working on my new motor. The motor that is in it need valve stem seals badly, and the choke is messed up, but I can drive it for now, and or do valve stem seals and really take my time on the new motor.
Attachments
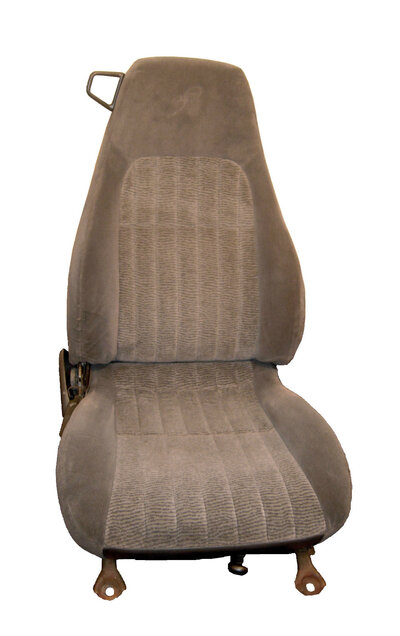
OHHHH and I forgot to mention, I am picking up a really nice pair of 30th anniversary Camaro cloth bucket seats on monday from a local guy for the front!
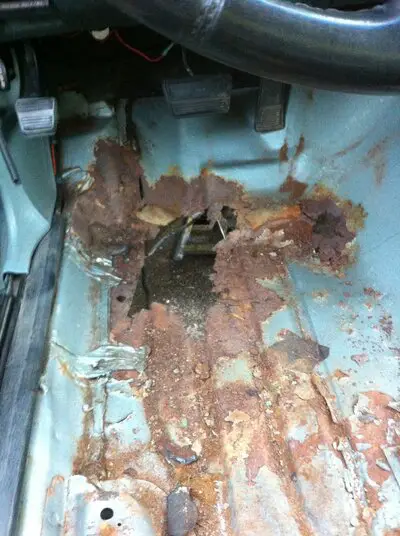
Quick update... Trans blew when I went to drive the car last week. So I pulled it out, already found a replacement that has been rebuilt ( not sure how long ago) but was pulled from a running car. Pulled the motor while I was at it, gutted the interior so I can fix the floors, test fit the new crossmember i got which is about an inch too short - I may work on it yet because it is better than what was in the car. I got new shocks in it, and will be working on the floors first then finishing my motor.
Got more work done saturday.
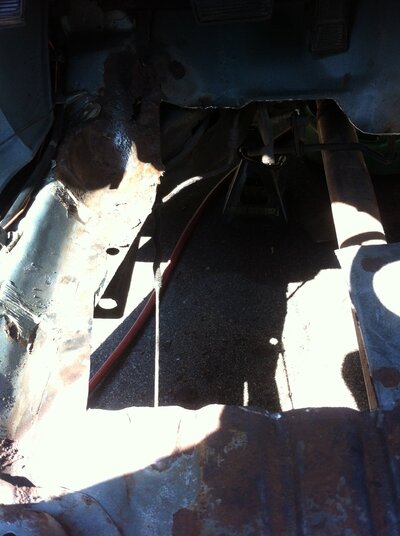
The drivers side rusty floor has been cut out.
I am replacing it with medium gauge (18 or 22) flat steel that I am 'fitting' as I go- It is not as nice as a replacement floor pan, but it will last, and I have been dumping all my funds from selling my truck into the motor, and drivetrain. I cannot get the body up on a rotisserie, so I am fixing it as best as I can without lifting it. The exterior will look nice, the interior will be solid, but not look original, and I am OK with that.
Changing the body mounts may prove to be a challenge... any way, the drivers side floor pan is about 75% done- I ran out of welding wire so I set to work on my motor- Learned a hard lesson about how SBC cam bearings have 3 size od's and they are staggered... I ruined my first set of cam bearings that I used. Oh well, didn't hurt the block and learned from it- I can handle the $13 price tag on new bearings So the motor is at a standstill till more parts come in from summit, then it will fly together. The floors will get more work done soon, as I got more welding wire today. I also have to pant my garden this week- A little late in the season, but better late than never. Nothing like garden fresh veggies all summer and canned tomatoes all winter!
The drivers side rusty floor has been cut out.
I am replacing it with medium gauge (18 or 22) flat steel that I am 'fitting' as I go- It is not as nice as a replacement floor pan, but it will last, and I have been dumping all my funds from selling my truck into the motor, and drivetrain. I cannot get the body up on a rotisserie, so I am fixing it as best as I can without lifting it. The exterior will look nice, the interior will be solid, but not look original, and I am OK with that.
Changing the body mounts may prove to be a challenge... any way, the drivers side floor pan is about 75% done- I ran out of welding wire so I set to work on my motor- Learned a hard lesson about how SBC cam bearings have 3 size od's and they are staggered... I ruined my first set of cam bearings that I used.
Oh well, didn't hurt the block and learned from it- I can handle the $13 price tag on new bearings So the motor is at a standstill till more parts come in from summit, then it will fly together. The floors will get more work done soon, as I got more welding wire today. I also have to pant my garden this week- A little late in the season, but better late than never. Nothing like garden fresh veggies all summer and canned tomatoes all winter! Attachments
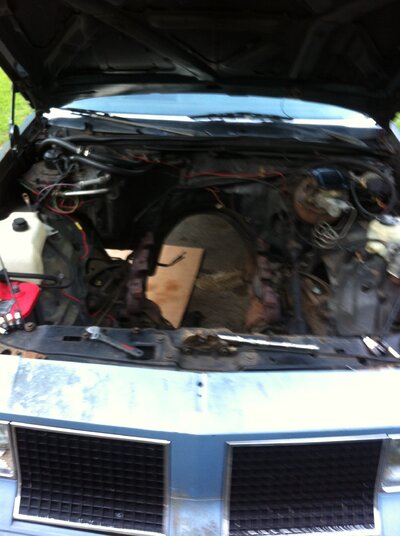
Got some more work done this week. Been tough working round my wifes work schedule an enjoying spending time with my daughter. BUT, I got the lower end in the motor assembled, cam in, heads on with new springs and valve stem seals, Got the block and heads painted, ready for all the Chrome! I am typically not a fan of Chrome, but I accidentally ordered a Chrome oil pan, already had a Chrome timing chain cover, have a chrome transmission pan and tq converter cover, so I figured what the hell. It will be very shiny- just a lot to keep clean
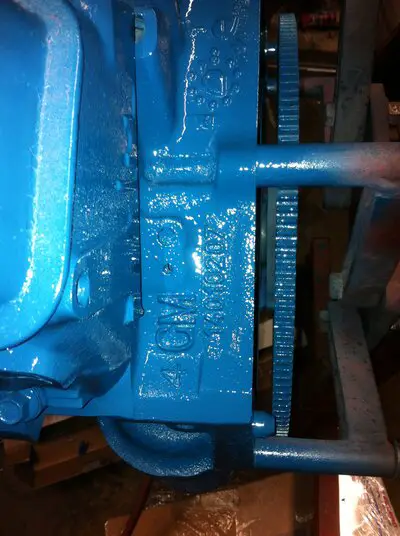
I had a good surprise the other day too. I had the motor I pulled from the car up for sale, and had a guy interested in it, but I wanted to make sure it wasn't a 4 bolt main before I let it go, so I pulled the pan, and lo and behold... 4 bolt main high nickel block! So the motor is not for sale any more lol. I am instead going to sell the 1 piece rear main seal motor that is bored 40 over- that is a 4 bolt main too.
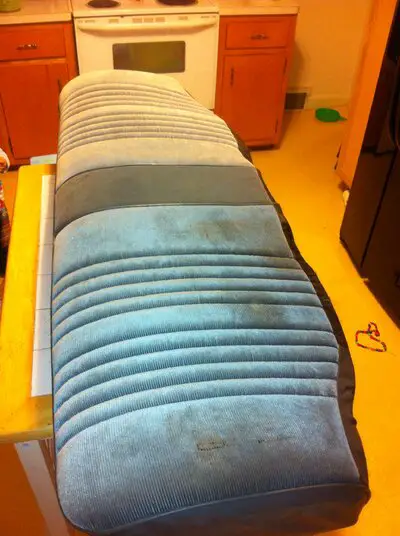
I also got some seat covers off ebay from an 87 Monte Carlo, and I got those installed last night. They have a few small stains, but nothing too bad. I can shampoo them and they will be mostly clean. Knowing me, because they are light gray I will probably keep a towel on them when my daughter is in my car anyway
I had a good surprise the other day too. I had the motor I pulled from the car up for sale, and had a guy interested in it, but I wanted to make sure it wasn't a 4 bolt main before I let it go, so I pulled the pan, and lo and behold... 4 bolt main high nickel block! So the motor is not for sale any more lol. I am instead going to sell the 1 piece rear main seal motor that is bored 40 over- that is a 4 bolt main too.
I also got some seat covers off ebay from an 87 Monte Carlo, and I got those installed last night. They have a few small stains, but nothing too bad. I can shampoo them and they will be mostly clean. Knowing me, because they are light gray I will probably keep a towel on them when my daughter is in my car anyway
Attachments
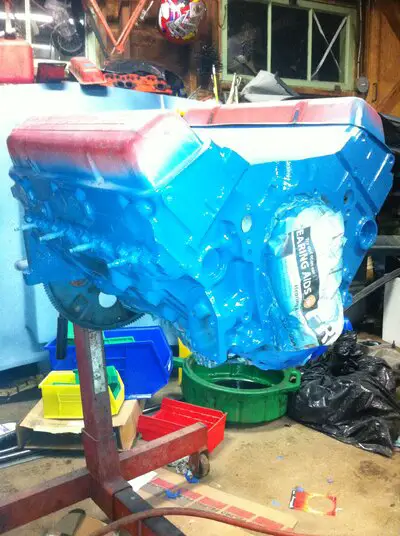

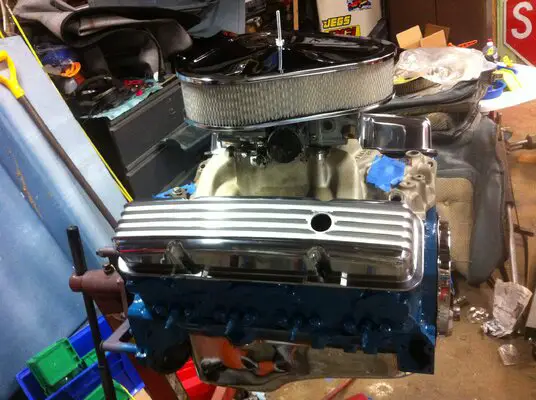
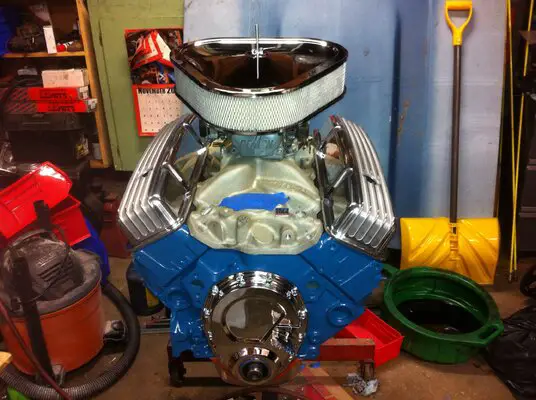
So the motor is almost done... Lower end is all buttoned up. I have the top end together, need to adjust the rockers, bolt on the intake and grind the valve covers so they clear the intake, bolt those on dry, then it's ready to go in the car! I am excited!! Here are some teaser pics-
the final output is:
Stock bore 350, new main and rod bolts, new Chromoly faced rings, 13cc dished pistons, Felpro shim head gaskets (sprayed with copper gasket sealer), sbc 305 HO '416' mild ported heads, edelbrock valve springs, Summit .427 lift cam, edelbrock Performer EPS or Performer RPM intake (not sure the rpm will fit under my hood), Demon 625 vac secondary carb, HEI distributor with MSD electronic ignition control module, 50K volt coil. Should run pretty nice! I can't wait to fire it!
Attachments
- Status
- Not open for further replies.
Similar threads
- Replies
- 0
- Views
- 250
- Replies
- 0
- Views
- 317
- Replies
- 2
- Views
- 546
GBodyForum is a participant in the Amazon Services LLC Associates Program, an affiliate advertising program designed to provide a means for sites to earn advertising fees by advertising and linking to amazon.com. Amazon, the Amazon logo, AmazonSupply, and the AmazonSupply logo are trademarks of Amazon.com, Inc. or its affiliates.