EL CAMINO 1983 El Camino 5.3 Swap / Build Thread

JohnIL

Greasemonkey
Sep 9, 2020
131
310
63
Central Illinois
Subscribed. Welcome to the site from Houston. Thanks for the awesome introduction and a great write-up on your project. It is always appreciated when you put the effort into making a great post like that.

A few ramblings on the Hydroboost:

I bought my car (82 Grand Prix) in September of 2014. It was originally a diesel car as well. When I got it, the diesel was long gone and in its place was a SBC 400 and a four speed Saginaw manual transmission. It still had the hydroboost in it though. I took the car apart in December of 2014 and it hasn't run since. Unfortunately the guy who did the engine/transmission swap was a hack and I couldn't live with it. I'm in the process of un-f***ing pretty much everything the previous owner did.

I did drive the car some in the fall of 2014 and I really liked the pedal feel of the hydroboost. I like a I high, firm, responsive brake pedal. I do not like a soft, effortless, touchy one. I decided to keep the hydroboost. The 400 in my car just had a standard G-Body SBC power steering pump in it. The difference between it and the diesel pump is that the reservoir on the diesel pump has two return nipples instead of just one. With the hydroboost system, there is a return line from the steering gear and there is one from the hydroboost unit. The hack previous owner of my car overcame this by tying the two return hoses together with a menagerie of hose clamps, wrong sized hoses and brass fittings. It worked fine but leaked like a sieve. I'm going back with a 350 in my car and I'm running the early 90's Camaro serpentine front accessory drive. My plan is to swap a diesel reservoir onto the power steering pump that came with my GM front accessory drive kit. The point of this story is to illustrate that all you really need to do to keep the hydroboost is to come up with a second return to the pump or do a better job of joining the two return lines than the previous owner of my car did. What front accessory drive are you going to run? If you run the truck setup, it doesn't seem like it would be too hard to add a second return port to the reservoir on the pump. If you are going to run a remote reservoir, I think adding a return to it would be even easier.

Still, the hydroboost isn't for everyone. The extra hoses can look a bit cluttered I guess. FYI...I believe the diesel master cylinder has the largest bore. Also, if you swap away from the hydroboost, I think you are going to need to get a pedal from a vacuum brake car. If I'm not mistaken, the pivot point for the actuator rod is in a different location between the two. If I'm wrong, I hope one of the other members will chime in and correct me. I haven't seen a thread here with both pedals side by side so I'm not certain. I think I've read it on the Turbo Buick site though.

Hopefully this information is helpful. I'll be watching for updates on your build.

Best,

Jared

Thank you for the information on the hydroboost. You've definitely given me something to think about. Before I make any major changes, I'll take a close look at adding a second return line to the LS-style pump. We plan to use the truck accessory drive that comes with the engine. I'm not at all afraid of the hydroboost. In fact, I did this conversion, in reverse, about twenty years ago when I dropped one of these same Olds 350 Diesels into a 3/4 ton square-nose Chevy truck. I used the power steering pump and the hydro master cylinder from the donor vehicle. The only "adapting" we had to do was to change the actuating rod from the pedal to the master cylinder. We found one in a junk yard that worked perfectly. I don't know if the pedal was any different that it should have been, but it was located in the right position, compared to the "go" pedal and the brakes worked perfectly. That was a fun conversion. The Olds diesel didn't go very fast, but I got 35mpg with that silly old truck!
 
  • Like
Reactions: 1 user

JohnIL

Greasemonkey
Sep 9, 2020
131
310
63
Central Illinois
Subscribed. Welcome to the site from Houston. Thanks for the awesome introduction and a great write-up on your project. It is always appreciated when you put the effort into making a great post like that.

A few ramblings on the Hydroboost:

I bought my car (82 Grand Prix) in September of 2014. It was originally a diesel car as well. When I got it, the diesel was long gone and in its place was a SBC 400 and a four speed Saginaw manual transmission. It still had the hydroboost in it though. I took the car apart in December of 2014 and it hasn't run since. Unfortunately the guy who did the engine/transmission swap was a hack and I couldn't live with it. I'm in the process of un-f***ing pretty much everything the previous owner did.

I did drive the car some in the fall of 2014 and I really liked the pedal feel of the hydroboost. I like a I high, firm, responsive brake pedal. I do not like a soft, effortless, touchy one. I decided to keep the hydroboost. The 400 in my car just had a standard G-Body SBC power steering pump in it. The difference between it and the diesel pump is that the reservoir on the diesel pump has two return nipples instead of just one. With the hydroboost system, there is a return line from the steering gear and there is one from the hydroboost unit. The hack previous owner of my car overcame this by tying the two return hoses together with a menagerie of hose clamps, wrong sized hoses and brass fittings. It worked fine but leaked like a sieve. I'm going back with a 350 in my car and I'm running the early 90's Camaro serpentine front accessory drive. My plan is to swap a diesel reservoir onto the power steering pump that came with my GM front accessory drive kit. The point of this story is to illustrate that all you really need to do to keep the hydroboost is to come up with a second return to the pump or do a better job of joining the two return lines than the previous owner of my car did. What front accessory drive are you going to run? If you run the truck setup, it doesn't seem like it would be too hard to add a second return port to the reservoir on the pump. If you are going to run a remote reservoir, I think adding a return to it would be even easier.

Still, the hydroboost isn't for everyone. The extra hoses can look a bit cluttered I guess. FYI...I believe the diesel master cylinder has the largest bore. Also, if you swap away from the hydroboost, I think you are going to need to get a pedal from a vacuum brake car. If I'm not mistaken, the pivot point for the actuator rod is in a different location between the two. If I'm wrong, I hope one of the other members will chime in and correct me. I haven't seen a thread here with both pedals side by side so I'm not certain. I think I've read it on the Turbo Buick site though.

Hopefully this information is helpful. I'll be watching for updates on your build.

Best,

Jared

By the way Jared, that's a beautiful GP in your avatar. I had a '79 back in the early '90's. I pulled the stock v6 and dropped in a 301 small block Pontiac from a wrecked Bonneville. That little thing was wicked fast for a stock engine. I beat up on a new Mustang GT with that car. He never saw it coming. Good times...
 
  • Like
Reactions: 1 user

81cutlass

Comic Book Super Hero
Feb 16, 2009
4,649
13,565
113
Western MN
Yep, it's a factory SS with a diesel. My uncle even had the build sheet. It really was a strange order. SS trim, diesel engine, and the most boring color combination available.

I didn't even know there was a market for the Olds 350 Diesel. I really don't have any future plans for that engine. How much is it worth and where would one go to sell it? Is there a forum/classifieds for that particular engine?

Thanks for the advice on the oil pan and the speedometer. I already have both of them. My son is dead set on preserving the original dash, so we'll keep the speedometer adapter. As for the oil pan, we plan to run a stock ride height, but extra ground clearance is always a good thing. I will do some careful measuring before I install the pan. I can always return the one I have and order the Holley instead.

Keep the advice coming. I have a LOT to learn about this conversion. Thanks!
I did some quick measuring on the Lh8 pan. It is about 2 inches lower than the Holley 302-2, but the sump on the Holley is about 2" longer (further forward). Wouldn't that cause interference with the front cross member? That's why Muscle Rods recommended the Lh8 pan to begin with. They also have a "high clearance" pan that is flush with the cross member. It sells for $467, so I'd like to avoid that if I can. Is there a better alternative?

The olds diesel is probably a $200 item on CL or FB marketplace. Not really any specific place to sell it but someone probably will buy it.

The Lh8 pan height is OK if you drive like a reasonable human being. I ran a stock truck pan on my car for probably 10k+ miles and never hit anything. If you don't drive like a hooligan it will be fine. I swapped mine because the gasket was leaking and I wanted to lower the car a bit. Really just peace of mind.

That moroso pan BRP has is one I don't know much about. Never really seen anyone use one.

There really isn't much issue with front clearance on anything but a 4th gen camaro F body pan. Honestly the CTSv is probably the best fitting one I have seen. I have an inch or more from the front of the 302-2 pan and the cross member.

At one point the Lh8 pan was the only real option that fit. It's not wrong I just never saw the benefit over the truck pan.
 

JohnIL

Greasemonkey
Sep 9, 2020
131
310
63
Central Illinois
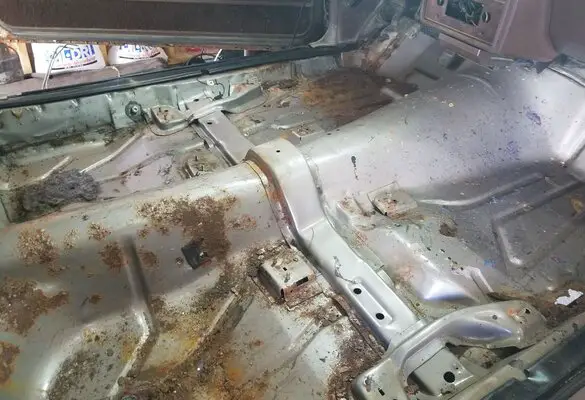
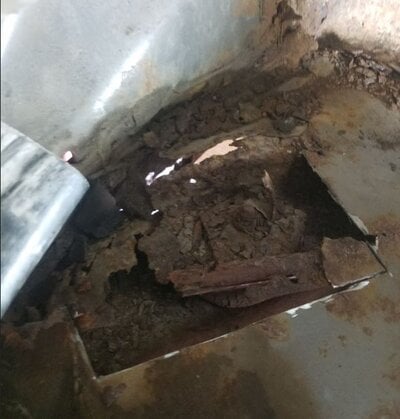
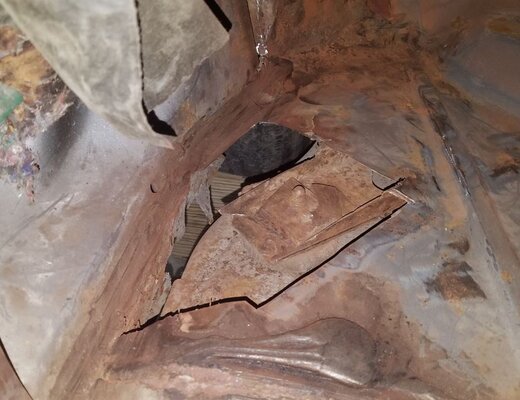
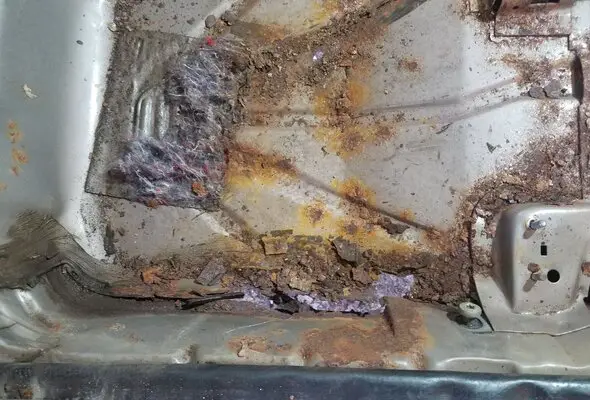
Update - Rust Repair Begins

When I built my '81 El Camino, back in the mid '90's, it had more than it's share of body rot. I spent the better part of a summer break patching the doors and rear quarters with scrap steel cut from the hoods and door skins from a wrecked Bonneville. That was in the old days before late model G body patch panels were available. What I learned that summer was that I really hate body work. Rust is stupid and filler dust tastes horrible. One thing that my El Co didn't have was rotten floor pans. Looking back, I think the floor pans were probably preserved by the copious amounts of Pennzoil 10w30 and Dextron that leaked from my engine and trans. In any case, the floors were blissfully rust free.

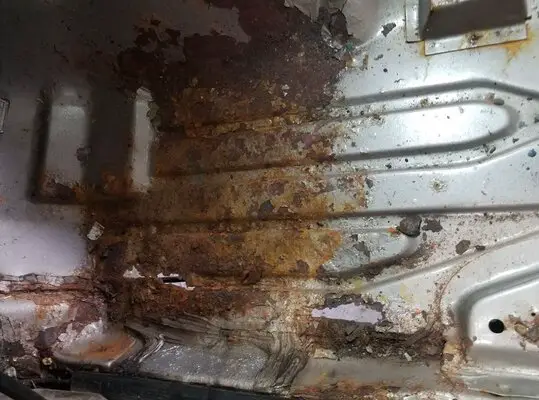
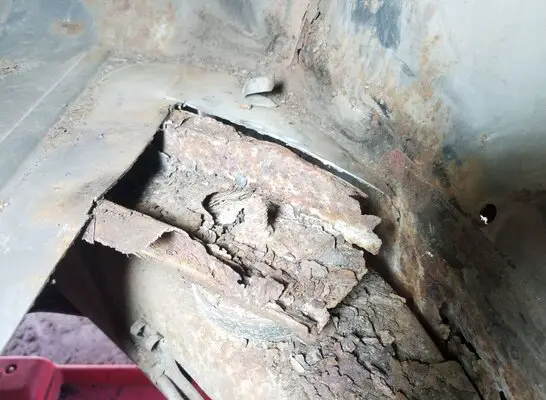
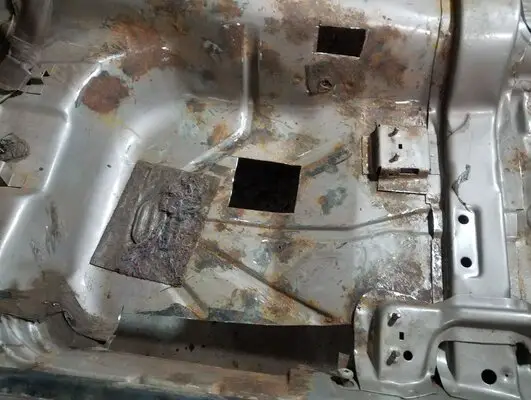
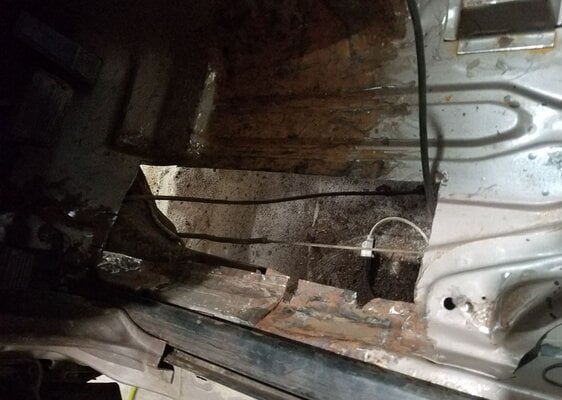
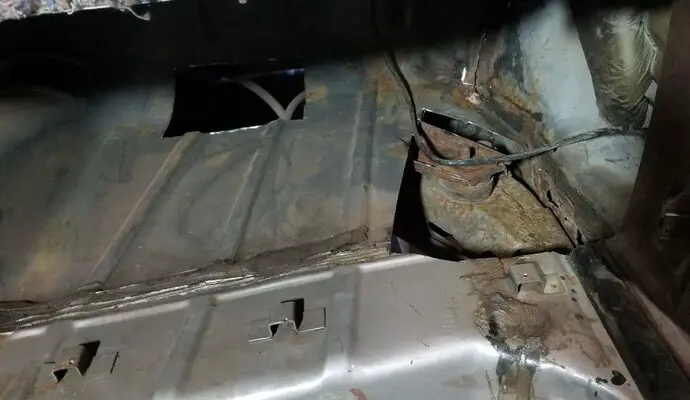
Unfortunately, the same can't be said for the floors in my son's '83. Last night, we spent a few hours grinding away the scaling rust on the underside of the pans. Our plan was to clean them up, hit them with some rust converter, rust encapsulator, and chassis paint. Clean and preserve. Simple, right? Wrong! We found signs of rot around the mid-ship body mounts at the rear of the cab and some thin spots elsewhere in the floor. So, this morning, we pull out the seats and carpets. What we found was pretty disheartening. The floors are indeed rotten around the body mounts. And, there are a half dozen other holes in the floor, including a huge hole under the drivers left foot. It's all patchable. At least we won't have to replace the entire floor pan. We spent all afternoon and evening cleaning up scaly rust and cutting out rot. We'll have to order some patch panels for the driver side front pan and the passenger side rear pan. The rest of the holes will be patched with sheet steel. It wasn't the way we planned to spend today, but all-in-all, a pretty productive day. Needless to say, we're going to need more rust converter for all of that leftover surface rust.

Here are some shots of the mess we found this morning and the new and improved mess at the end of the evening.
 

Attachments

  • FloorPanRepair00.jpg
    FloorPanRepair00.jpg
    156.6 KB · Views: 269
  • FloorPanRepair01.jpg
    FloorPanRepair01.jpg
    54.3 KB · Views: 259
  • FloorPanRepair02.jpg
    FloorPanRepair02.jpg
    84.9 KB · Views: 269
  • FloorPanRepair03.jpg
    FloorPanRepair03.jpg
    177.9 KB · Views: 251
  • FloorPanRepair04.jpg
    FloorPanRepair04.jpg
    160.8 KB · Views: 250
  • FloorPanRepair05.jpg
    FloorPanRepair05.jpg
    159.1 KB · Views: 253
  • FloorPanRepair06.jpg
    FloorPanRepair06.jpg
    141.3 KB · Views: 243
  • FloorPanRepair07.jpg
    FloorPanRepair07.jpg
    112.6 KB · Views: 249
  • FloorPanRepair08.jpg
    FloorPanRepair08.jpg
    84.6 KB · Views: 246
  • Like
Reactions: 3 users

64nailhead

Goat Herder
Dec 1, 2014
5,704
1
12,215
113
Upstate NY
I'm following - just seen this. I have to say that your plan with your son, has been in my past as well. The car in my avatar is my sons.

Best of luck and I'm sure it will go well once the rust repair is complete (I hate rust repair - uggh)
 
Last edited:
  • Like
Reactions: 2 users

superbon54

G-Body Guru
Apr 15, 2014
755
2,439
93
Wisco
Just saw this thread - too cool! Keep the updates coming, and post questions when you run into roadblocks. We can be smart asses and maybe sometimes a little too blunt, but there are a lot of experienced people here willing to help.

Hopefully your boy is into this as much as you are. If so, it’s so much more than just getting an old car running. I’ve got a picture on my toolbox taken on the day my dad and I - well, mostly my dad - got my first car (82 Malibu with olds 350) rebuilt and running. I’ve been a gear head ever since.
 
  • Like
Reactions: 4 users

superbon54

G-Body Guru
Apr 15, 2014
755
2,439
93
Wisco
Update - Rust Repair Begins

When I built my '81 El Camino, back in the mid '90's, it had more than it's share of body rot. I spent the better part of a summer break patching the doors and rear quarters with scrap steel cut from the hoods and door skins from a wrecked Bonneville. That was in the old days before late model G body patch panels were available. What I learned that summer was that I really hate body work. Rust is stupid and filler dust tastes horrible. One thing that my El Co didn't have was rotten floor pans. Looking back, I think the floor pans were probably preserved by the copious amounts of Pennzoil 10w30 and Dextron that leaked from my engine and trans. In any case, the floors were blissfully rust free.

Unfortunately, the same can't be said for the floors in my son's '83. Last night, we spent a few hours grinding away the scaling rust on the underside of the pans. Our plan was to clean them up, hit them with some rust converter, rust encapsulator, and chassis paint. Clean and preserve. Simple, right? Wrong! We found signs of rot around the mid-ship body mounts at the rear of the cab and some thin spots elsewhere in the floor. So, this morning, we pull out the seats and carpets. What we found was pretty disheartening. The floors are indeed rotten around the body mounts. And, there are a half dozen other holes in the floor, including a huge hole under the drivers left foot. It's all patchable. At least we won't have to replace the entire floor pan. We spent all afternoon and evening cleaning up scaly rust and cutting out rot. We'll have to order some patch panels for the driver side front pan and the passenger side rear pan. The rest of the holes will be patched with sheet steel. It wasn't the way we planned to spend today, but all-in-all, a pretty productive day. Needless to say, we're going to need more rust converter for all of that leftover surface rust.

Here are some shots of the mess we found this morning and the new and improved mess at the end of the evening.
I read all the words before looking at pictures and had a much worse mental image of the rot. This is going to be a very clean ride when you’re done!

If you haven’t, check out the frame rails behind the rear end. They’re known to rot out, and aren’t the worst thing in the world to replace. If you can patch the floor, you can fix the frame.
 
  • Like
Reactions: 1 users

airboatgreg

Comic Book Super Hero
Oct 2, 2016
2,867
3,115
113
Welcome from SW Georgia. A great project that your son will treasure and remember his entire life
 

JohnIL

Greasemonkey
Sep 9, 2020
131
310
63
Central Illinois
Thanks to everyone for the words of encouragement. There's plenty left to do, but we're making good progress.

I read all the words before looking at pictures and had a much worse mental image of the rot. This is going to be a very clean ride when you’re done!

If you haven’t, check out the frame rails behind the rear end. They’re known to rot out, and aren’t the worst thing in the world to replace. If you can patch the floor, you can fix the frame.

The frame is solid, thankfully. It just needs some cleanup and paint. All of the rot appears to be isolated to the body.
 
  • Like
Reactions: 4 users

JohnIL

Greasemonkey
Sep 9, 2020
131
310
63
Central Illinois
Update - More Rust Repair and Suspension Work Begins

I'm on furlough this week from work, so I've got some dedicated time to spend in the garage. I started the day by doing a bit more cleanup on the floor pans and spraying a couple coats of rust converter on everything. While I wait for the floor pan patch panels to arrive, I'm turning my attention to suspension work.

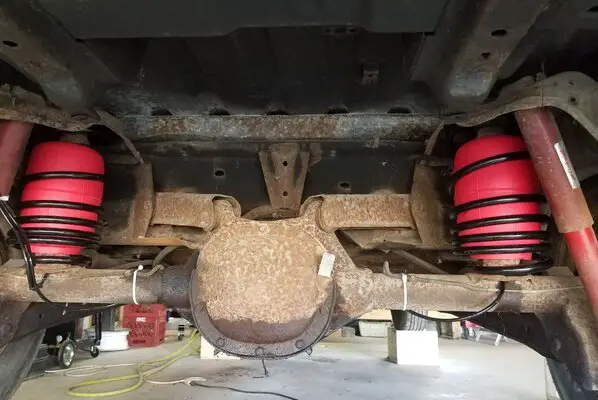
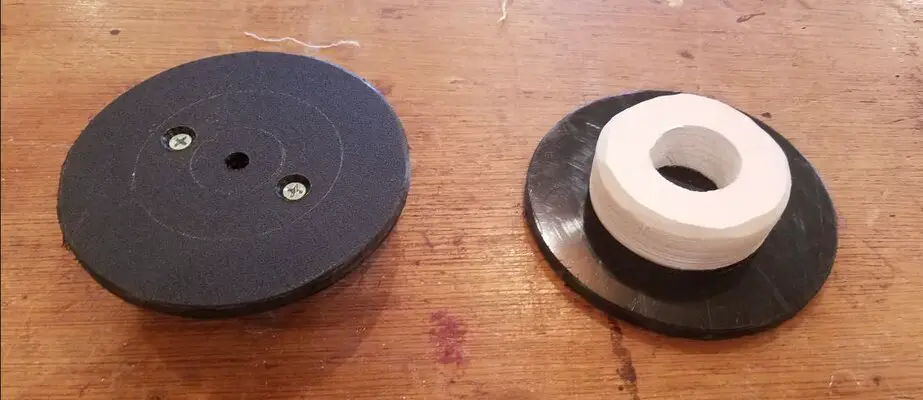
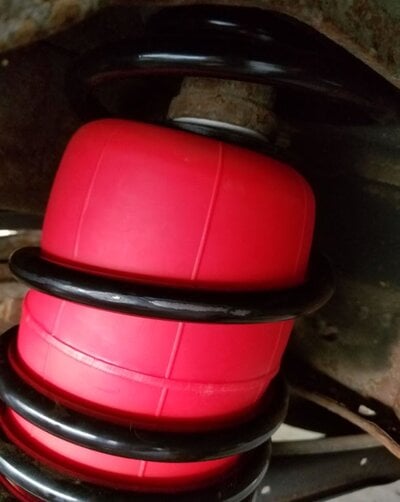
I pulled out the old sagging rear springs and replaced them with a set of Moog CC627 cargo control springs. There is a visible difference in the gauge of the springs. The Moogs are clearly heavier. The new springs raised the rear of the car 1" at the wheel wells. Next, I installed a set of Air Lift 1000 air bags. After plumbing the air lines, I fabbed up a pair of PVC spacers to add some protection between the upper spring cups and the tops of the air bags. 25psi in the bags raised the rear another 1". Unless my son is hauling something heavy in the bed, we'll probably keep the bags around 15psi to soften the ride a bit. When I was a teenager, I used my El Camino like a 1/2 ton truck and I suspect my son will do the same. The airbags will give him the additional hauling capacity that I never had. It will be interesting to see the stance once the 4.8L engine is installed. We might have to replace the front springs too.

Tomorrow, my goal is to install the new Hellwig 5815 rear anti-sway bar and dig into the rear brakes. If the brake lines cooperate, I plan to install new brake cylinders and shoes.

Here are some pics of the rear springs and bags. And yes, that rear diff will be getting a new cover, seal, and refill. Somebody did a number on the old diff cover with a floor jack.
 

Attachments

  • RearSpringsAndAirBags.jpg
    RearSpringsAndAirBags.jpg
    132.9 KB · Views: 308
  • AirBagTopSpacers01.jpg
    AirBagTopSpacers01.jpg
    86.4 KB · Views: 263
  • AirBagTopSpacers02.jpg
    AirBagTopSpacers02.jpg
    49.3 KB · Views: 272
  • Like
Reactions: 3 users

GBodyForum is a participant in the Amazon Services LLC Associates Program, an affiliate advertising program designed to provide a means for sites to earn advertising fees by advertising and linking to amazon.com. Amazon, the Amazon logo, AmazonSupply, and the AmazonSupply logo are trademarks of Amazon.com, Inc. or its affiliates.

Please support GBodyForum Sponsors

Classic Truck Consoles Dixie Restoration Depot UMI Performance

Contact [email protected] for info on becoming a sponsor