BETTY RUMBLE - '87 Cutlass

Status
Not open for further replies.
Ack, this wasn't the part that required two people. My memory is getting as bad as a California psychiatrist's. This actually has a pin that must be positioned to fit into a clocked slot on top of the A/C housing because it has double tabs on the end of the pivot. THEN you plug in the clips and rod retainer. It's still a PITA but doesn't really take a long time.

yep that's the one. unfortunately the part that's broke off inside it won't come out, either through the top or pushed down thru.... there's the problem. the pic shows how it broke, with a chunk of the flat part (that I can't grab onto) still attached to the pin, holding it in place. If I can just push it thru then cool I'll keep working on that, but if not....

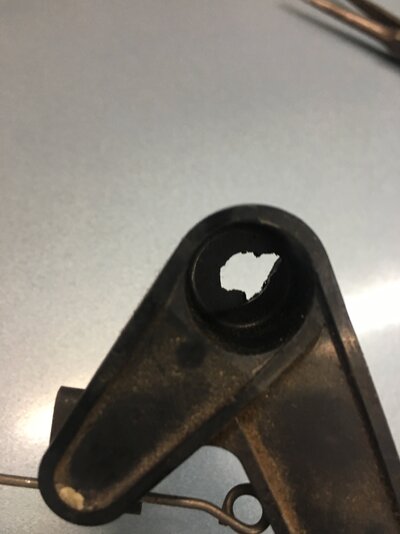
Screen Shot 2018-10-07 at 10.07.37 AM.png


83440-0bc8973149a40d5c390790cd0a4e3884.jpg
 
It sounds to me like there's still a big enough chunk of where it mounted to the lever keeping it from dropping through the keyhole.

I found the box and took a picture of the lever. The end is what you're missing, and I'm thinking a larger piece is still on top of that. Wondering if you could get some side cutters up in there and try and "lift and snip" the top part of that stem that's left?

heater control lever.JPG
 
Hmm. You would think you could pull up a little and turn it around until the tabs lined up with the keyhole and be able to remove it, unless the keyhole is somehow mucked up.
 
Or the tabs might be worn pushing excess plastic around where it won't let it be pulled out of the keyhole.
 
Another option, and I hate to say it, is to perform a little surgery on the box under where the pin goes in. Then epoxy it back into place. I dunno. That's getting a little overboard.
 
after a little bit of head scratching I figured out a way to get some leverage on that b*ch and FINALLY push it down inside.. It didn't want to go willingly. Then of course putting it all back together took about 5 minutes and I have cold air coming out the top vents again. I used the new vacuum switch since I don't know if the old one was bad or not, but what the heck. So heckyeah.

I'm on the fence whether or not to take both Betty and the GP to a car show tomorrow. Supposed to be a high of like 50* with a chance of rain starting about 1pm. Not an ideal day for it.....
 
I'm on the fence whether or not to take both Betty and the GP to a car show tomorrow. Supposed to be a high of like 50* with a chance of rain starting about 1pm. Not an ideal day for it.....

Do it. DO IT.
These cars ain’t made of sugar, they won’t melt in the rain, I promise.
😉
We all spend enough time building, wrenching and fixing them up, we all should be driving and enjoying them more.
 
Screen Shot 2018-10-12 at 6.49.18 PM.png


wind chills in the 30s. I'd love to take the girls out, but....


plus the park its supposed to be in will likely be a mud hole.
 
Wow last update was October? Dang.

So, since I'm planning on taking Betty up to Cleveland this weekend, some little things needed to get done. Shot some video which I'll get to editing here in a minute, but here's what happened:
  • Put 1" spacers on top of the rear springs to try and correct the stance. Ever since I put the 2" lowering springs/shocks the rear has at least looked like it was lower than the front. Now it looks correct. It might be my imagination but it feels better, too. Not sure how to explain that one. Maybe the angle I'm sitting at in the car has changed just enough, who knows. Definitely doesn't want to bottom out on medium size bumps any more. Yes I realize its a kludge but IDGAF.
  • I thought maybe I'd try and secure the exhaust a little better, but I really couldn't find any good places to put additional hangers on the body, at least without drilling holes. It'll have to do. If you see me on I-70 or I-71 Friday/Saturday with a roll of bailing wire you know what happened.
  • Mostly fixed the falling-out cigarette lighter. The sleeve had fallen back inside the dash and it took me a while to find the bugger. Once I did that it was like "ooooooh I get it" and its secure again. Gotta have 12V-USB for phones and bluetooth.
  • Replaced the kick panel under the drivers side dash. This is the only g-body I have ever seen this on. I guess people take them off to mess with fuses or bulbs or wiring and just leave them off.
  • Cleaned the glass and put the new GBF logo sticker on. Yeah I know.
  • Marveled at how shot to hell the paint is on this thing.
  • Fluid check etc.
Time to get some lunch, drink something cold and start editing video. Got enough for a couple of short vids and a "trailer" I think. Freiburger ain't got nothing on me man.

Got to put together a basic tool bag for the trip and a batch of spare belts just in case. Have a cap/rotor in the trunk that needs putting on eventually, too. So glad I got the AC blowing like its supposed to or it would have been a real miserable trip.
 
Status
Not open for further replies.

GBodyForum is a participant in the Amazon Services LLC Associates Program, an affiliate advertising program designed to provide a means for sites to earn advertising fees by advertising and linking to amazon.com. Amazon, the Amazon logo, AmazonSupply, and the AmazonSupply logo are trademarks of Amazon.com, Inc. or its affiliates.

Please support GBodyForum Sponsors

Classic Truck Consoles Dixie Restoration Depot UMI Performance

Contact [email protected] for info on becoming a sponsor