Blazer brake upgrade - Proportioning valve change required?

Clarkwb100

Not-quite-so-new-guy
Feb 7, 2019
44
38
18
72
Sugar Land, Texas
I upgraded the factory single piston brakes to the S-10 / Blazer dual piston assembly a couple years ago. The spindles were from a 2001 2wd Trailblazer, all the rotating assembly, the brake rotors, pads and brake lines were replaced at that time. The master cylinder was replaced with a stock 1987 El Camino unit prior to this major replacement.
I did NOT replace the proportioning valve.
Rear brake drums and pads were replaced with stock GM 1987 El Camino units.
The difference after replacing the single piston brakes was tremendous. But the dual piston brakes have always seemed "touchy". The front brakes lock up quickly now. Even at low speed in parking lots they will lock up if not careful. Inspection of the rear linings shows them working.
How do I get rid of this "touchiness". Replace the proportioning valve? Is this the fundamental problem? What brand & part # is recommended?

Your thoughts and guidance is appreciated.
 
Good info as i”m wanting to switch my brakes over on my 79 Malibu to the blazer set up as well.
You should just be able to pop them on and go.

We did all this babbling about brake master cylinders and low-drag stuff, we forgot to even talk about the "proportioning" valve.

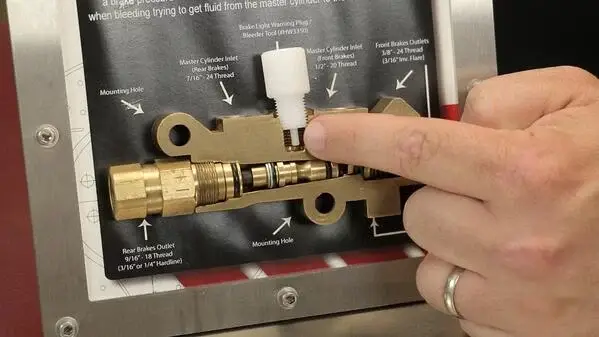
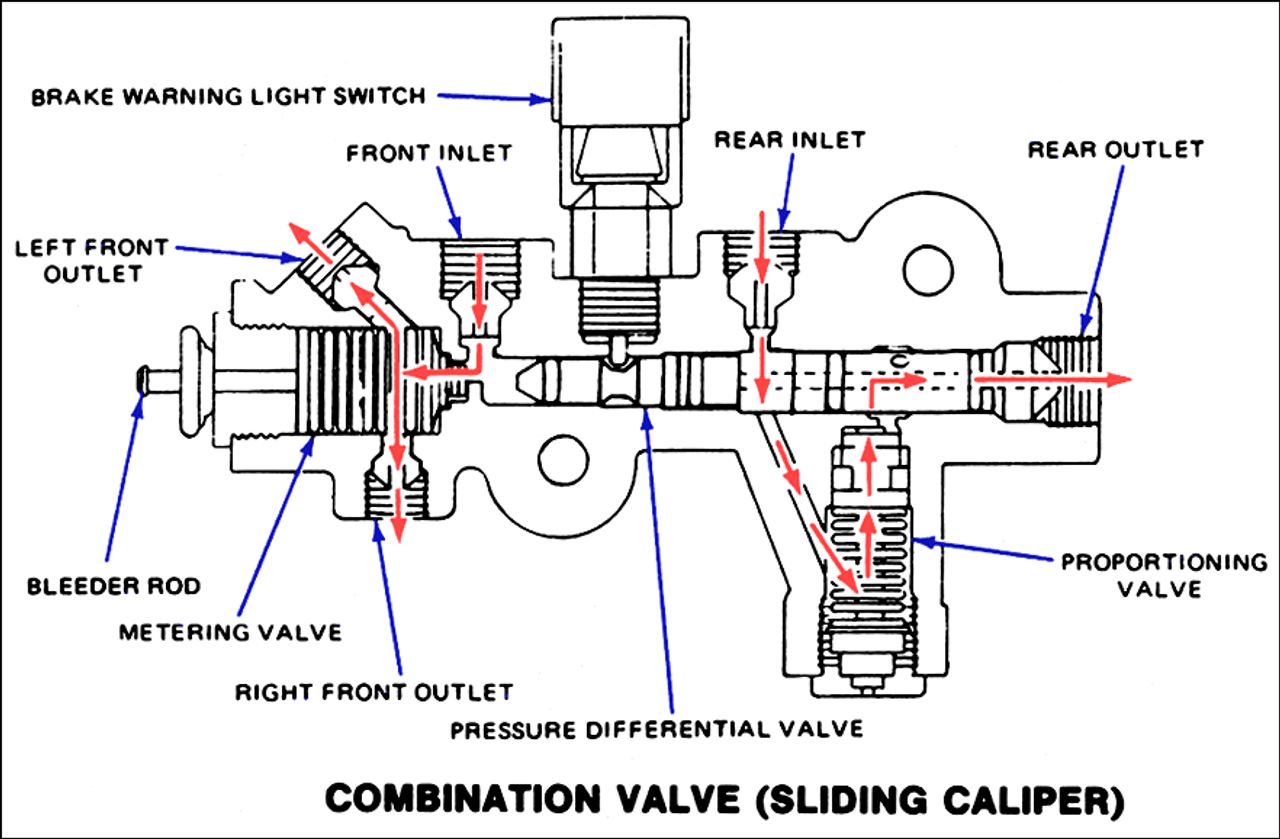
As far as the "proportioning" valve, the 78-88 A/G cars with the disc/drum used what is officially called the combination valve. Because...it does a combination of things. It's a metering block for the front as well as a rear "proportioning" system for the rear. It also has the differential pressure valve, sometimes called a shuttle valve, which in the event of a rear or front fluid line failure, will slide to cut off flow to the failed side, saving fluid. It's an emergency system to keep at least one end of the brake system working so you can get home or to a service garage. It also grounds a switch which illuminates the "BRAKE" warning light on the dash. Remember this tidbit of info when bleeding the brakes. If you set the light while bleeding your life is going to suck for a while. Buy one of those cheap plastic shuttle valve locking pins that screw into where the switch mounts when doing a brake bleeding task. You'll thank me later. Remove switch lead, use a socket to unscrew the switch. Hand screw in the little plastic stop and then go bleed your brakes. Then remove pin and reinstall switch and wiring. It's a bit of a PITA to get to it, but it's worth it when you compare it to having to reset that shuttle valve by not using the pin tool.
bleeder_tool_1.png


The metering valve in front is sometimes called a hold-off valve. What it does is when brakes are applied, it very briefly holds off fluid to the front discs until the rear shoes start to apply. This keeps you from nose-diving when you hit the brakes. It's so brief you never even feel it working.

The proportioning system is for the rear shoe brakes. Which, does absolutely NOTHING when you're driving through town, and slowly apply your brakes as normal coming to a stop light. It only does something when you panic stop. When you promptly stomp the pedal hard, it reduces pressure to the rear shoes to help minimize the apply pressure and try to keep the drums from locking up. This could put your tail into an uncontrollable slide and spin you around. Not good.

Unless the valve is leaking or otherwise not functioning, you shouldn't have any issues using the existing disc/drum setup on your car even with the new calipers up front.
 
That last post needs to be in a brake system 'stickie'.
 
  • Like
Reactions: Sweet_Johnny
69hurstolds 'a bit of a pita to get to it' is an understatement haha.

Should also be mentioned, are your front end components in good condition? Such as BJ's, tie rod ends, etc? If they are loose enough to turn the wheel slightly during braking, then they are prone to lockup relatively easy.
 
  • Like
Reactions: john87442
69hurstolds 'a bit of a pita to get to it' is an understatement haha.

Should also be mentioned, are your front end components in good condition? Such as BJ's, tie rod ends, etc? If they are loose enough to turn the wheel slightly during braking, then they are prone to lockup relatively easy.

Ok, didn't want to make it scary for those who have yet to tackle it. 🙂

But if you got to reset your shuttle valve manually, or even plain bleed the brakes with the valve holding tool, you can see by this pic what you're up against. It's not impossible, but it's never any fun if you have to go playing with the combination vavle for any reason just because of where it is. You have to get the shifter/backdrive linkage out of the way to just get to it. Advice, if you mark the end of where the rod sticks out of the adjuster before you start, you can get the linkage right back to where it was before you took it apart without having to re-adjust it over and over finding the right spot again. Personally, I've wrapped a couple of rounds of electrical tape around the top of the rod where it sticks through the adjuster so if I take it loose for whatever reason, it goes right back where it was. YMMV.
86 442 heat riser decal original A.jpg


Just a caveat...you CANNOT simply use the rubber cap on the front of the combination valve to reset it. That's not for that. The rubber cap is just really a dust cover for the metering valve bleeder override pin. GM had a brake bleed tool for the G-bodies, more like a fork like tool that you clamped to the end of the combination valve to hold the metering valve open for easier front brake bleeding when using a pressure bleeder setup. You don't need to do this if you're using the brake pedal method since you'll get enough pressure. But if you pressure bleed your brakes from the master cylinder, it only supposed to generate a few PSI (20-25) of pressure to the system and you should override the metering valve to the front brakes. Kent Moore tool J-23709 or equivalent is used to do just that. There are various tools out there availble to do that very thing. Remember, it's only needed if you have a pressure bleeder. Manual, or pedal style bleeding, doesn't really require the tool.

1704029080588.png


You can see in the pic below that resetting the combination valve to center the shuttle valve isn't going to be easy. Some reports of people having success by reaching down where the switch is with a pick tool and sliding the valve back into position. I've re-O-ringed a couple of these things and even redoing them is a huge PITA. The original valves were cast iron, and would succumb to rust over the years when moisture was present. This is why they went to the brass ones.

brake-combo-valve__29441.1516141632.1280.1280__69023.1680612163.png
 
Sounds like non quick take up calipers being driven by a quick take up master cylinder.

Not to me. But if they don't match then it's still wrong. I had a QTU master on my truck with non QTU calipers before I knew that was a thing and the brakes still sucked.
 
I am changing out the "quick take up master cylinder" next week. I'll let you know if that was the issue.
I got my Cutlass back on the road after serious brake issues. I still think my front right blazer caliper has issues, but I've eliminated the frame valve and now have an adjustable setup coming from a RHD Blazer master. Brakes are better for now, but keeping a close eye on them.
20240130_205626.jpg
20240130_205104.jpg
 
I upgraded the factory single piston brakes to the S-10 / Blazer dual piston assembly a couple years ago. The spindles were from a 2001 2wd Trailblazer, all the rotating assembly, the brake rotors, pads and brake lines were replaced at that time. The master cylinder was replaced with a stock 1987 El Camino unit prior to this major replacement.
I did NOT replace the proportioning valve.
Rear brake drums and pads were replaced with stock GM 1987 El Camino units.
The difference after replacing the single piston brakes was tremendous. But the dual piston brakes have always seemed "touchy". The front brakes lock up quickly now. Even at low speed in parking lots they will lock up if not careful. Inspection of the rear linings shows them working.
How do I get rid of this "touchiness". Replace the proportioning valve? Is this the fundamental problem? What brand & part # is recommended?

Your thoughts and guidance is appreciated.
i have done the brake upgrade now with 2 of my g-bodys one is a 1986 cutlass with a BBC and the other is a 1983 cutlass LS swapped with all stock components that came with it from factory with no issues at all. i would say one of your components isn't working correctly.
 
  • Like
Reactions: Sweet_Johnny

GBodyForum is a participant in the Amazon Services LLC Associates Program, an affiliate advertising program designed to provide a means for sites to earn advertising fees by advertising and linking to amazon.com. Amazon, the Amazon logo, AmazonSupply, and the AmazonSupply logo are trademarks of Amazon.com, Inc. or its affiliates.

Please support GBodyForum Sponsors

Classic Truck Consoles Dixie Restoration Depot UMI Performance

Contact [email protected] for info on becoming a sponsor