

looking somewhere,i swear someone before you used LEDs in a g body before,dunno if its been done very often,either way i'm dying to see how it looks.
Build Thread-85 Cutlass Brougham-New Pics Added!
- Thread starter 85 Cutlass Brougham
- Start date
You are using an out of date browser. It may not display this or other websites correctly.
You should upgrade or use an alternative browser.
You should upgrade or use an alternative browser.
- Status
- Not open for further replies.
Trust me when I say that I am almost clueless when it comes to electronics. I can barely solder two wires together, but I am just willing to try. I won't know how this ends up for at least another week or two because it will take that long for the stuff I ordered to ship here from Hong Kong. However, it will be a fun learning experience for me, and anyone who wants to follow along. I found this tutorial on how to wire LEDs which I will be using to figure out the basics of it all when I build my circuit board:http://www.theledlight.com/ledcircuits.html. I will again stress that I have never built a circuit board before, so my results may be... well... "interesting". I did test an LED I already have in my collection ( I bought the blues and greens one time when I was bored), and these little things throw off an amazing amount of light. What is also cool is that they don't get very hot like the normal incandescent bulbs do, so they won't burn up the board like the old bulbs do the plastic thingie that separates the terminals.
Here is my short but sweet DIY headliner tutorial. Please note, I didn't get it perfect as I wound up with a small wrinkle in the back, but if you are better at it than me (or luckier), you shouldn't have any issues.
First off, clean off all the old foam and some of the glue. It should look like this:

Next,lay out the headliner material and be sure it has a little overlap everywhere. Now, fold it in half and be sure to cover all the other half of the material with the new. Alternatively, put a piece of paper between the layers so that the side you will see is covered. You don't want to get any glue on it!

This is the glue I used. Just follow the directions on the can and give both the half of the board and the half of the material that is exposed 2 good coats of it. It shouldn't be runny, but it should be covered. You will need two cans to do the job right, and it cost me $9.99 per can at the local Wal Mart.

Now, I don't have a pic of me doing the next step, but I'll walk you through it. I would advise doing all this on a sturdy table (outside!) as it will let you do this step much easier. There is a reason upholstery guys have tables to work on and not front porch floors! Anyhow, put your hands in the middle at the fold, and work the material out to the edges. Move up, and repeat until you get to the end. If it folds back on itself ( it will), pull the pieces apart GENTLY but firmly. Do this to prevent folds. After you are done, fold the material over and repeat the process. When you are done, it should look like this:

Don't worry about a few hand print depressions. They will come out with a few days in the sun. Anyhow, all you have left to do is trim the edges with some sharp scissors and the upholstery part is done! Now all that is left is to install the board back in the car and enjoy having head room once again!
Here's mine after installation: Note the color is not a good match, but I got 3 yards for $20 after a 40% off coupon at Jo-Ann Fabrics, so I couldn't really complain.

First off, clean off all the old foam and some of the glue. It should look like this:
Next,lay out the headliner material and be sure it has a little overlap everywhere. Now, fold it in half and be sure to cover all the other half of the material with the new. Alternatively, put a piece of paper between the layers so that the side you will see is covered. You don't want to get any glue on it!
This is the glue I used. Just follow the directions on the can and give both the half of the board and the half of the material that is exposed 2 good coats of it. It shouldn't be runny, but it should be covered. You will need two cans to do the job right, and it cost me $9.99 per can at the local Wal Mart.
Now, I don't have a pic of me doing the next step, but I'll walk you through it. I would advise doing all this on a sturdy table (outside!) as it will let you do this step much easier. There is a reason upholstery guys have tables to work on and not front porch floors! Anyhow, put your hands in the middle at the fold, and work the material out to the edges. Move up, and repeat until you get to the end. If it folds back on itself ( it will), pull the pieces apart GENTLY but firmly. Do this to prevent folds. After you are done, fold the material over and repeat the process. When you are done, it should look like this:
Don't worry about a few hand print depressions. They will come out with a few days in the sun. Anyhow, all you have left to do is trim the edges with some sharp scissors and the upholstery part is done! Now all that is left is to install the board back in the car and enjoy having head room once again!
Here's mine after installation: Note the color is not a good match, but I got 3 yards for $20 after a 40% off coupon at Jo-Ann Fabrics, so I couldn't really complain.
Here is my driver's door assembly and sound deadening installation. I may pull this stuff back off and add Dynamat at a later time, but for now it should be OK.
Here is the mid woofer installed with an XTC Baffle (Crutchfield.com) and the Concert Sound II brakcet from a Regal. Yes, I did have to remove metal to install the speaker.

This is the raw inner door before I began.

Here is the 2 mil plastic sheeting I installed with black duct tape. Note it is not sealed to the door, but rather it is allowed to drain. This is on purpose as sealing it would create water pockets.

Here you can see my new sound deadener and heat insulation. I cut this myself from a big roll I bought. In all, I will have used 4 4x6 rolls of this material between the roof, doors, wheel wells, and kick panels. Anything left over will be glued to carpet and cut to fit the trunk floor and trunk wheel wells.

You will also note that it is trimmed to fit inside the panel clips. This is so that the panel sits flush on the door when it is installed.
Anyhow, here is how the speaker fits in the door with the Concert Sound II components.
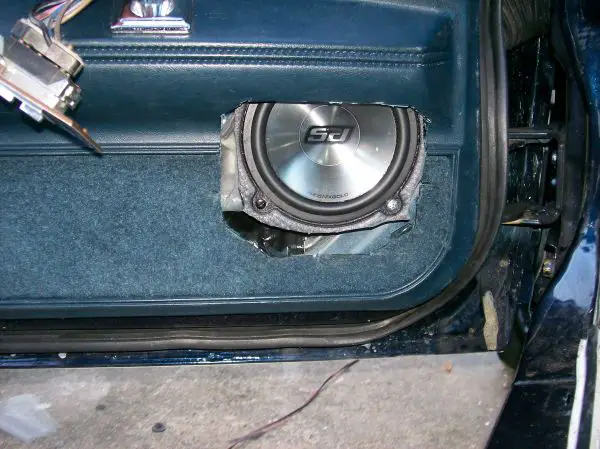
The gray foam poking out around the edges is the baffle. It is squeezed between the bracket and the speaker and seals it air tight. Baffles are basically foam cups that form essentially a sealed box for the back of the speaker. They also keep moisture from ruining the speaker. At $14 for a set of two, I bit the bullet and bought them as I figured that I didn't want to have to take the door apart again once it is together.
Here is the mid woofer installed with an XTC Baffle (Crutchfield.com) and the Concert Sound II brakcet from a Regal. Yes, I did have to remove metal to install the speaker.
This is the raw inner door before I began.
Here is the 2 mil plastic sheeting I installed with black duct tape. Note it is not sealed to the door, but rather it is allowed to drain. This is on purpose as sealing it would create water pockets.
Here you can see my new sound deadener and heat insulation. I cut this myself from a big roll I bought. In all, I will have used 4 4x6 rolls of this material between the roof, doors, wheel wells, and kick panels. Anything left over will be glued to carpet and cut to fit the trunk floor and trunk wheel wells.
You will also note that it is trimmed to fit inside the panel clips. This is so that the panel sits flush on the door when it is installed.
Anyhow, here is how the speaker fits in the door with the Concert Sound II components.
The gray foam poking out around the edges is the baffle. It is squeezed between the bracket and the speaker and seals it air tight. Baffles are basically foam cups that form essentially a sealed box for the back of the speaker. They also keep moisture from ruining the speaker. At $14 for a set of two, I bit the bullet and bought them as I figured that I didn't want to have to take the door apart again once it is together.
Here is my wonderful Oldsmobile Intrigue rear view mirror installed.

You will note that I was able to use the factory wire concealer trim piece. I had to cut it down, but I got it to fit just fine. (Hint: the wide end goes toward the mirror mount and the skinny end goes to the headliner trim).
The reason I used this mirror is that it has a bunch of neat features. It has LED map lights that work both with the dome lights and with a switch, a compass, supposedly a thermometer, and auto dimming. I detailed the wiring a page or two back if you want to use one yourself.
Here is my engine bay as of right now. I am still working on it, so things you don't see will be making their appearance soon. You will note the NOS wiper fluid and overflow tanks. I think they make a HUGE difference in the way it looks!
Here is even more crap: Seat tracks!
This is the dead single motor unit I removed. Note how rusty the seat bottom is. It sat on the porch for too long. It did not get rained on, but it is so humid here that it did a number on it. I have since ground off the rust and painted it.

Here is the new 3 motor track during testing. Note that each function has it's own motor. Bye bye plastic transmission! Also note the corner of the factory wiring manual and my $1.99 Harbor Freight DVOM.

This is the dead single motor unit I removed. Note how rusty the seat bottom is. It sat on the porch for too long. It did not get rained on, but it is so humid here that it did a number on it. I have since ground off the rust and painted it.
Here is the new 3 motor track during testing. Note that each function has it's own motor. Bye bye plastic transmission! Also note the corner of the factory wiring manual and my $1.99 Harbor Freight DVOM.
Well, I think I have reached the end of the road on this project for a little while. I just don't have the energy to continue it right now as I am too stressed out from money concerns that have left me exhausted. I will probably come back to it in a few weeks. Right now though, I gotta stop spending money.
Anyhow, today I went to the paint shop to get my vinyl dye, and they no longer had books going back that far... 😢 It's sad too, because they used to have them all the way back to the 1960's at this place. I have to bring a large flat sample for them to check it with their light gun. A pint is $31, and I sadly shouldn't spend it right now. So, with the car 90% ready to go labor wise, I have to stop here. It's time to pay the bills, do maintenance on the truck, and work on the house again. Maybe I'll just take a big rest for a while until money picks back up.
Anyhow, today I went to the paint shop to get my vinyl dye, and they no longer had books going back that far... 😢 It's sad too, because they used to have them all the way back to the 1960's at this place. I have to bring a large flat sample for them to check it with their light gun. A pint is $31, and I sadly shouldn't spend it right now. So, with the car 90% ready to go labor wise, I have to stop here. It's time to pay the bills, do maintenance on the truck, and work on the house again. Maybe I'll just take a big rest for a while until money picks back up.
Dammit, I can't stay away. So, I guess I will just avoid spending cash on it instead. Life gets very boring when you spend all your time alone or at work, and have nothing but one channel of TV, and a pirate WI FI connection to pass the time.
Tonight, I went on a hunting expedition for my 6x9 adapter mounting bales, and came up empty. I did, however, find my right side marker light, one of those round things that covers the front seatbelt bolts, and a bracket for the header panel that is better than the one that is on there now. I also found 3 good passenger's side arm rests, but only one driver's side, and it was not good enough to use. Oddly enough, all that was found inside the house and not the garage. Also, we had moderate rain today and the floor stayed dry. It is supposed to rain tomorrow too, and if we get a good storm and it is still dry then that will mean that I can finally put in the carpet Thursday evening, if it is not too hot out. Otherwise, I will just stay in bed all day. Yes, it's a year after I started this thread and I am still suffering from bad insomnia and a deep depression.
Tonight, I went on a hunting expedition for my 6x9 adapter mounting bales, and came up empty. I did, however, find my right side marker light, one of those round things that covers the front seatbelt bolts, and a bracket for the header panel that is better than the one that is on there now. I also found 3 good passenger's side arm rests, but only one driver's side, and it was not good enough to use. Oddly enough, all that was found inside the house and not the garage. Also, we had moderate rain today and the floor stayed dry. It is supposed to rain tomorrow too, and if we get a good storm and it is still dry then that will mean that I can finally put in the carpet Thursday evening, if it is not too hot out. Otherwise, I will just stay in bed all day. Yes, it's a year after I started this thread and I am still suffering from bad insomnia and a deep depression.
Today, I took a trip to the hardware store for some E clips, speed nuts, nylock nuts, bolts, and I guess that's it. Total cost? $4.76. BTW, use your local independent hardware stores. These places are a gold mine of stuff and if people don't use them, they will go away. Plus, for small stuff they are WAY cheaper than buying stuff in those blister packs at the parts store. The best ones are the old ones that have been open for a long time, and have not seen a coat of paint inside since before the Eisenhower administration. We recently lost our best hardware store ( a place called Davis Hardware in New Port Richey) and it is sorely missed. Anything you needed they had it. Need a hydraulic hose made? See the guy in the back. Need an obscure fitting? Right over there. Now that it is gone, all that is left are the big box stores ( Lowes, Home Depot) and Ace. Ace isn't too bad, but it isn't Davis.
At any rate, today I managed to break one of my rare, unobtainable NOS front fender trim clips!!!!! I tried to force it in the hole and it broke off the tabs. Why? Well, they hole had become smaller due to a buildup of paint and primer. I wound up grinding the holes open again with a small carbide burr and a Dremel, then painting the holes with a Testor's paint marker. What did I do about the broken one? I used a push clip in the hole, and glued the middle to the car with weatherstripping adhesive. Since the edge is held under the wheel arch trim, I figure it should still hold just fine with one hole properly secured, and the clip glued in place. It is a word to the wise though that these things are very sensitive to the size of the hole.
At any rate, today I managed to break one of my rare, unobtainable NOS front fender trim clips!!!!! I tried to force it in the hole and it broke off the tabs. Why? Well, they hole had become smaller due to a buildup of paint and primer. I wound up grinding the holes open again with a small carbide burr and a Dremel, then painting the holes with a Testor's paint marker. What did I do about the broken one? I used a push clip in the hole, and glued the middle to the car with weatherstripping adhesive. Since the edge is held under the wheel arch trim, I figure it should still hold just fine with one hole properly secured, and the clip glued in place. It is a word to the wise though that these things are very sensitive to the size of the hole.
jeez i remember i had a broken taillight on my 86 supreme,i got a spare from a pull it and this was so long ago that i didnt know how sensitive the plastic taillight was and i decided to try to swap the red olds emblems in the middle of the lights.Long story short,as i tried to force the good emblem from the broken taillight onto the good one,i used a bit too much force and CRUNCH,the middle section of the red lense broken through.The good taillight now was the even worse taillight then the broken one originally,stupid me eh?
And depression huh?I've had chronic depression since about 2 years ago :| ,before i dealed with my cutlass supreme....and the tailight episode .It really sucks,but life's been ok since about this summer,you just gotta find the good things in your life,like say,your awesome cutlass,expert knowledge and this huge *ss build thread!
And depression huh?I've had chronic depression since about 2 years ago :| ,before i dealed with my cutlass supreme....and the tailight episode
.It really sucks,but life's been ok since about this summer,you just gotta find the good things in your life,like say,your awesome cutlass,expert knowledge and this huge *ss build thread!- Status
- Not open for further replies.
Similar threads
- Replies
- 0
- Views
- 97
GBodyForum is a participant in the Amazon Services LLC Associates Program, an affiliate advertising program designed to provide a means for sites to earn advertising fees by advertising and linking to amazon.com. Amazon, the Amazon logo, AmazonSupply, and the AmazonSupply logo are trademarks of Amazon.com, Inc. or its affiliates.