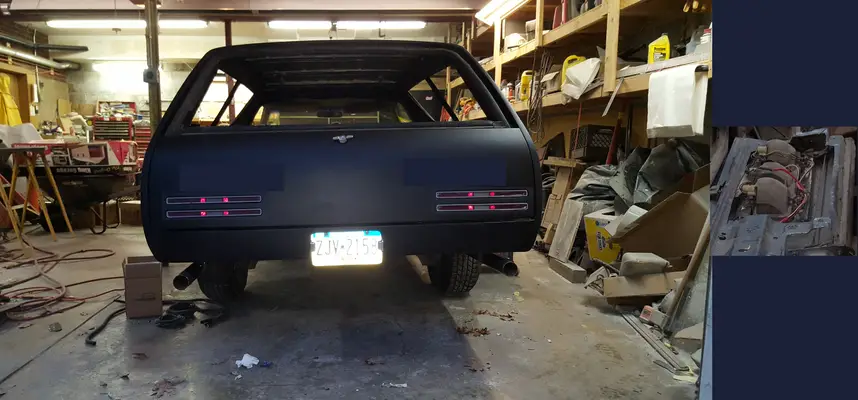
Elco 300 Utility Wagon

Status
Not open for further replies.
Next up is the console I made, the 96 leather Camaro power buckets and Lokar Muscle Car shifter. I started the console with the box from an 80s S-10 then built onto that with fiberglass to have the 3 gauges, 2 charging ports and 2 cupholders. The seats (only the drivers is power BTW) are neutral in color which of course Chevy had 2 variations of that year. I took a piece of the seat trim to my paint supplier. He matched it perfectly with a SEM mix. The Lokar is a visual copy of the Muncie 4 speed shifter that was in Corvettes and most 60s GM muscle cars and later as an automatic shifter in my brothers 74 Nova. I always liked the look so I was glad when Lokar made it an option on just about any of their shifters. The passenger seat bolted right up, but the drivers seat was different. I welded on some 1/8 steel bars and drilled holes where they needed to be. I found a perfect dashboard but that will happen this spring/summer.
A7AA4D99-E6E5-4334-B2E1-7CE19153303A.jpeg
387AFFE0-906D-4B6B-A3D9-24F56CD3D7CC.jpeg
3B6D6349-AF6A-451E-86C6-9EDC18789824.jpeg
283E4C59-6AD6-407D-9805-6B092D320982.jpeg
5BBA3D25-60E7-4376-BFA4-AD0F334E1A7C.jpeg
C45915CD-B083-4A71-9EF5-44EFF7514324.jpeg
 
Next was the 2nd generation Trans Am fender heat exstractors. I found some fenders on EBay that were rusty and CHEAP. I contacted the seller and told him if he didn’t make a sale, I’d pay his asking price if he’d cut those sections out to save big on shipping. So thats the story of how I acquired them. Once I cut them to shape/fit, they welded in nicely. I used a modern adhesive to permanently attach the scoop part to the welded in framing. Then just smoothed it off with a little metal to metal body filler .
10BD38D7-627F-42AB-8F82-D11EBE8BDBE9.jpeg
92CE46AC-259C-4B8F-A90F-B4458013362D.jpeg
C8E6E526-DF4C-4495-AB5E-85546F0E2554.jpeg
C5A3C78B-F9E3-485A-9160-CB4FEF562057.jpeg
 
Very cool!

I was wondering why the taillights were so... "Centered" I thought they would look better just a little lower and towards the bottom left and right corners.. but then I saw the back-side and what you were dealing with behind it, and saw that was not going to be possible. Makes me want to learn how to weld... heh

-Gonz

**Edit: Something like this is what I was talkingabout... but then I saw the other pic and went "aahhh... I see why now"

taillights.png
 
The inner bracket pretty much mandated the positioning. As I said, I never liked how low the lights came from the factory. Imagine in bumper to bumper traffic, how can your brake lights be seen. I sure don’t want to have to repair/remake ANY part of the back end again. A 3rd brakelight was out of the question. As far as learning to mig weld, if you can photo edit on a computer, you can learn. Start with an inexpensive mig with argon, start with thick steel, angle iron, old bed frame. Once your use to the process, turn the welder down and practice on sheetmetal. When you’ve got it down, sell the small one and buy one big enough to handle any part of a project you might encounter.
 
3rd brake lights were required in '86 (ask me how I know... heh)

I understand the concern, really.. I like the heat vents on the front fenders too.. maybe thats because I had a 78 Bandit many moons ago, but... heh...

Well done!

-Gonz
 
  • Like
Reactions: fleming442
Most of my talent was developed doing ALOT of Pennsylvania rust repair in the 70s-80s . I took it as a challenge when I started. One I remember, in 83 was a 73 Cadillac Eldorado convertable that I had to replace from the body side mouldings down. Front wheel opening to rear bumper. With new flat sheet metal, angle iron, vise grips, hammers and dollies. The talent can be learned with practice, patience and persistence
 
Now to the Choo Choo nose. This is one main part I visioned when I first thought up a 2 door wagon. It would have to have the Choo Choo nose. While changing it I also got some good easy to install LED headlights. Glass housings single bulbs. In the one pic, LEDs are on the drvers side, new halogens on the passenger side. Since the nose didn’t have provisions for side marker lights, in P
B180E557-7708-4AC9-B9C8-938FBEA99983.jpeg
14DC5411-D63E-4860-BDE0-F460733EF7AC.jpeg
82CDA73E-01AC-488D-BB50-A34075CB1137.jpeg
F8C3771B-D735-4288-9E9F-A0BD9A5618FE.jpeg
031225E4-7A09-4D20-873F-E73958589E60.jpeg
9675D55B-B267-4616-8EC3-09F0FD658D01.jpeg
a you don’t want to eliminate any safety lights. I cut the bowtie shape out on each side and bought some 81-87 Silverado marker lights and mounted them inside.
 
A week after I bought the car (12/16) I met a new friend that just happened to have a freshly built 383 just sitting in the garage waiting for a new home. It had all the good performance parts including Dart aluminum heads and air gap intake. I saved for a year and a half while also buying other parts and bought the engine. As I’ve learned all 383s are not the same. The space my crank took up meant I couldn’t use the mechanical fuel pump or stock oil pan. Needed to buy a 400 harmonic balancer. Longer spark plugs with the Dart heads. The biggest problem with the Hooker SS long tube headers was the second bolt install on the first tube. The tube had to tight of a bend to even get the bolt in the header. I massaged the tube and hole then started the install with that bolt. Real PITA!!! The Holley 750 he had just wouldn’t let the car run right even with a rebuild and new distributor. So i bought a Summit 650. Runs great. I installed a March serpentine low rider system, a Champion 3 row rad with their dual electric fans and shroud. Everything new in the H-vac. I bought a Cutlass A/C condenser to have all the A/C on the right side, also the stainless rad hold down. Installed the 87 GN steering box with the Jeep shaft. I bought a Performance Automatic Stage 2 Street Fighter TH 350 with a 2400 T/C .
7DC644BA-A913-4397-BBB2-391788CD9982.jpeg
BC096A86-0167-4D0B-92E4-C03B73DC41CD.jpeg
873B39A7-607A-4730-B7F2-B50C18A071FB.jpeg
3B1E9498-E8D3-4553-BE09-F8D6B83423FA.jpeg
D0358692-9561-4EA4-A889-30518CEAA2CE.jpeg
5666E03A-352D-4501-875E-A7BF205C0A17.jpeg
EE3C3F96-A3C7-46B8-AAAD-DB3DF8C9C3B9.jpeg
A89FC22E-8EEB-41FB-AB68-39468ECE5F43.jpeg
DD51C16F-63DB-4FDC-8224-134B96EDB2B1.jpeg
96BF003B-8C13-488D-8C47-A41629DF923A.jpeg
441C6442-A6CE-4292-A4FF-724DCC480347.jpeg
 
Status
Not open for further replies.

GBodyForum is a participant in the Amazon Services LLC Associates Program, an affiliate advertising program designed to provide a means for sites to earn advertising fees by advertising and linking to amazon.com. Amazon, the Amazon logo, AmazonSupply, and the AmazonSupply logo are trademarks of Amazon.com, Inc. or its affiliates.

Please support GBodyForum Sponsors

Classic Truck Consoles Dixie Restoration Depot UMI Performance

Contact [email protected] for info on becoming a sponsor