How to remove the warning light cluster?

Steve 82 Elly

Greasemonkey
Feb 2, 2020
105
110
43
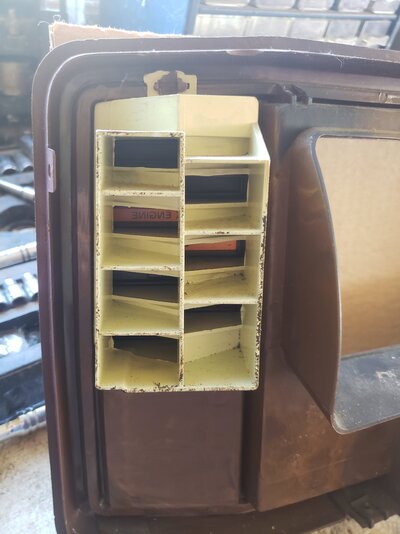
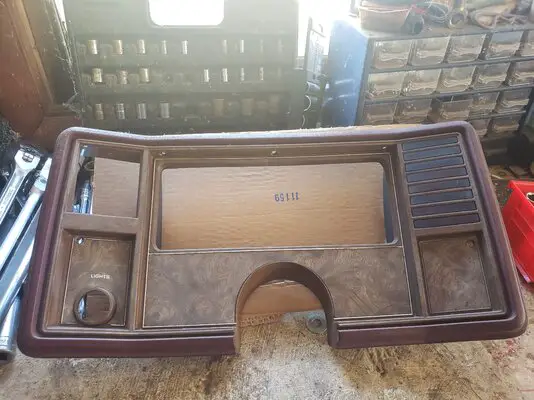
Hi guys, I want to paint my gauge cluster (?) but if I remove the warning light lens' then how do I re-install them? It looks like they held in place by melting the plastic. Somebody must have done this before right. If anybody has any tricks or tips I would really appreciate it. Somebody please help me. Thanks dash front.jpg dash back.jpg
 

O. D. Showtime

Comic Book Super Hero
Feb 6, 2009
3,008
3,537
113
Regina Sask. Canada
I painted a bezel a number of years ago, and what I remember doing is carefully cutting/filing the top and bottom edges of the heat staked portions. I was careful to not remove too much material from the center portion so I would have enough to restake it after. once you have enough removed you should be able to lift of the tell tale housing.

I have no pictures of the removal process as I was just playing around to see what the inner section of the bezel would look like painted...here's a pic of it after painting.


1000001176.jpg
 
  • Like
Reactions: 4 users

Ribbedroof

Comic Book Super Hero
Supporting Member
Jan 4, 2009
4,904
7,013
113
Wellston, OK
If you’re not up for trying to remove it and reinstall it you could buy some 3M fine line tape to cover up the lens slots.

Although it is a shame to paint that hard to find Burlwood bezel which appears to be in really nice condition
 
  • Like
Reactions: 3 users

Steve 82 Elly

Greasemonkey
Feb 2, 2020
105
110
43
I painted a bezel a number of years ago, and what I remember doing is carefully cutting/filing the top and bottom edges of the heat staked portions. I was careful to not remove too much material from the center portion so I would have enough to restake it after. once you have enough removed you should be able to lift of the tell tale housing.

I have no pictures of the removal process as I was just playing around to see what the inner section of the bezel would look like painted...here's a pic of it after painting.


View attachment 236589
Thanks for the info. What you described is what I was thinking I would need to do, its good to hear that its been done successfully (yours looks great). I have an extra one that I may use to practice on. Thanks again
 
  • Like
Reactions: 1 user

565bbchevy

Geezer
Aug 8, 2011
9,614
12,683
113
Michigan
I did mine similar to O.D. Showtime where I removed as little as possible and re-staked it after painting.
I also made aluminum inserts for the gauges prior to painting everything and moved my defrost switch to the opposite side.
I painted the dash with SEM Landau Black and the aluminum inserts with low gloss engine enamel.

IMG_0456.jpg
IMG_0473.jpg
 
  • Like
Reactions: 2 users

Steve 82 Elly

Greasemonkey
Feb 2, 2020
105
110
43
I did mine similar to O.D. Showtime where I removed as little as possible and re-staked it after painting.
I also made aluminum inserts for the gauges prior to painting everything and moved my defrost switch to the opposite side.
I painted the dash with SEM Landau Black and the aluminum inserts with low gloss engine enamel.

View attachment 236633 View attachment 236634
That is super cool!
 
  • Like
Reactions: 1 user

GBodyForum is a participant in the Amazon Services LLC Associates Program, an affiliate advertising program designed to provide a means for sites to earn advertising fees by advertising and linking to amazon.com. Amazon, the Amazon logo, AmazonSupply, and the AmazonSupply logo are trademarks of Amazon.com, Inc. or its affiliates.

Please support GBodyForum Sponsors

Classic Truck Consoles Dixie Restoration Depot UMI Performance

Contact [email protected] for info on becoming a sponsor