

BUILD THREAD JRP's '87 Regal Thread
- Thread starter joesregalproject
- Start date
You are using an out of date browser. It may not display this or other websites correctly.
You should upgrade or use an alternative browser.
You should upgrade or use an alternative browser.
- Status
- Not open for further replies.
"Original coupon must be presented" may pose an issue.
Thats a crock of bs the coupons are digital.
Coupon worked fine. Thanks John. And I found an old spot blaster in the shed that I had from when I did a set of Oldsmobile wheels a while back. It didn't work very well back then but I didnt have half the compressor I have now. We'll see how it works. I'm not ready for the giant mess in the garage that is gonna happen when I do the firewall but I have some smaller parts I can do in a rubbermaid bin outside. Pens vs. Caps is on right now so nothing is gonna get done for the next hour or two.

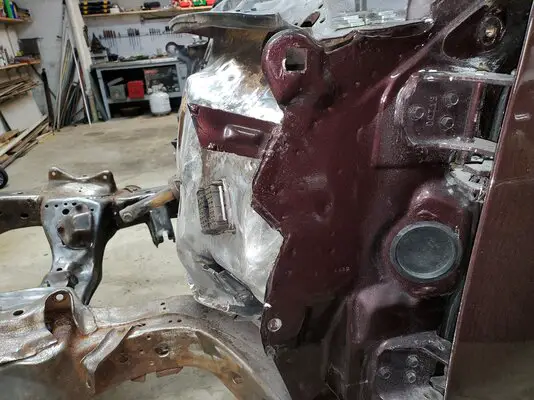
After the Pens lost (f*ck!) I decided to start out working on the firewall anyways. I used the spot blaster and it worked good on some spots, not so good on others. Wasn't doing much for the pits I needed removed. And I made a pretty good mess in the garage with the media. I expected that. As I began working on that top left corner again trying to get the metal clean, I wound up poking a few more holes in the firewall. It was now looking pretty bad over an even bigger area. So I decided it was gonna be best to go the more invasive route and remove the wiper motor bracket and replace the section of firewall behind it. I really didn't want to have to do this. Believe me

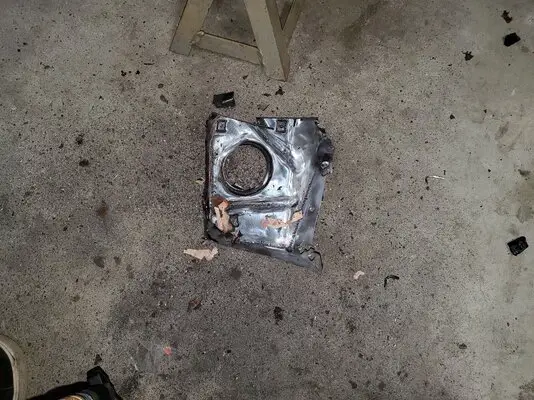
But with as many holes as I was poking I know the metal is thin and this is gonna be the best method to repair it. In removing the wiper motor bracket, my main goal was to preserve the paint adjacent to it on the lower part of the a-pillar. And I think I did a fairly good job of it. As to how I'm going to reattach a replacement wiper bracket to the firewall/a-pillar pinch weld, I haven't thought that out yet. Anyways that's the update.


But with as many holes as I was poking I know the metal is thin and this is gonna be the best method to repair it. In removing the wiper motor bracket, my main goal was to preserve the paint adjacent to it on the lower part of the a-pillar. And I think I did a fairly good job of it. As to how I'm going to reattach a replacement wiper bracket to the firewall/a-pillar pinch weld, I haven't thought that out yet. Anyways that's the update.
Attachments
Gotta do what you gotta do. Just remember how it worked out for Cool Hand when he tried to right all the wrongs.
Gotta do what you gotta do. Just remember how it worked out for Cool Hand when he tried to right all the wrongs.
I'm not thrilled about it but may as well do it once and not think about it again. I am pretty happy about not messing up the paint on the a-pillar.
You perfectionist's sure do find ways to never make your cars mobile again😁. Seriously, these cars rot everywhere, I just would have used those holes to route wires through😚. Your firewall will be nicer than any part of my car👍
You perfectionist's sure do find ways to never make your cars mobile again😁. Seriously, these cars rot everywhere, I just would have used those holes to route wires through😚. Your firewall will be nicer than any part of my car👍
Lmao I know I'm being picky
 . I know it's a firewall that no one will likely ever even take a second look at, but the reason I'm kinda going all out on it is just because this isn't really "bolt on" stuff that can be swapped out later if I don't like it. But really I'm just glad to be working on it again in any capacity.
I know it seems like not much has actually gotten done on the car itself in the past months, but I have been doing things around it to attempt to minimize distractions and force my attention towards the Regal. I'm down to just two other cars, neither of which really need anything, I got bogged down there for a while with the chickens, but now that the coop is built and I've had it set up for a while, I've pretty much figured out what works and what doesn't and it requires pretty minimal effort, filling up the feeders once a week and cleaning out the bedding every couple months. I also replaced the older tractor with this newer one which is in immaculate shape and I went all through it and put seals and everything in it, so it should need nothing. I just sold the old tractor this past weekend so I've just got the one now.
And I've been clearing out things in the garage and organizing around it, I added the lights and just picked up that compressor which has helped out tremendously. I'm still on the hunt for a decent used tool box to organize the clutter a little more, but that's just a matter of Craigslist hunting. Anyways, I'm working on it, and bit by bit, it's coming together.
Okay here is what I got done today. The only way I was going to gain access to all that nasty rust under the cowl was gonna be to remove the cowl itself. Don't fret, it's just some spot welds. Yeah it's not really fun, but I think it was the right move. I did have to drill into some paint in the door jamb, no one should see it though and if have to I'll mix up some paint and touch it up with a detail gun.


I've got it ground down and there are still some nasty pits in it, but not nearly as bad as the wiper motor area. I'm not gonna use it die grinder to grind all of these pits out because it would take forever so I'm gonna Rust Mort all of this before I prime.


Here's the cowl tag, I don't know what any of this means. I'm guessing 71L is the paint code?

And here's the cowl panel, it'll clean up just fine.

I've got it ground down and there are still some nasty pits in it, but not nearly as bad as the wiper motor area. I'm not gonna use it die grinder to grind all of these pits out because it would take forever so I'm gonna Rust Mort all of this before I prime.
Here's the cowl tag, I don't know what any of this means. I'm guessing 71L is the paint code?
And here's the cowl panel, it'll clean up just fine.

Okay, looked around at decoding that tag for fun and here's what I've found.
H11A-?
4G- 4=Buick, G=G Body
J47- Regal Coupe
037003-? Sequence number?
71L- Rosewood Metallic
79D- Claret Interior
AM6- 60/40 Seat
C04-?
79T- Dark Red Poly Vinyl Top
Edit: Just found C04- Washer & Wiper, Pulse W/S
H11A-?
4G- 4=Buick, G=G Body
J47- Regal Coupe
037003-? Sequence number?
71L- Rosewood Metallic
79D- Claret Interior
AM6- 60/40 Seat
C04-?
79T- Dark Red Poly Vinyl Top
Edit: Just found C04- Washer & Wiper, Pulse W/S
- Status
- Not open for further replies.
Similar threads
- Replies
- 0
- Views
- 316
- Replies
- 4
- Views
- 530
- Replies
- 0
- Views
- 204
GBodyForum is a participant in the Amazon Services LLC Associates Program, an affiliate advertising program designed to provide a means for sites to earn advertising fees by advertising and linking to amazon.com. Amazon, the Amazon logo, AmazonSupply, and the AmazonSupply logo are trademarks of Amazon.com, Inc. or its affiliates.
