LS1 front brakes on G body spindle

81cutlass

Comic Book Super Hero
Feb 16, 2009
4,708
13,832
113
Western MN
LS1 front brakes on a G body is a pretty common upgrade. I have about 2k miles on my mostly homebuilt setup. Has been sucessful and thought I would do a how to with all the info in one place.

I wanted to go with a blazer setup but I priced it out and in dirt car territory, I couldn't justify it. It was cheaper to go with the stock spindle and 4th gen stuff. If you are anywhere where dirt cars are running up north where 2wd's rarely sold, it is tough to find the parts. Could have bought spindles from someone down south, but $200 there, $200 for wheel bearings, getting calipers and rotors, it added up. I figured $500ish by the time I was done.

Looked into C5 fronts but I want to still run 15" skinnies up front for drag use. Many 4th gen people do it and you can either a) grind the caliper or b) run a 1" spacer and steel wheel. I have heard reports of monte SS or T type aluminum 15" wheels fitting over LS1 front rotors. It's not the wheel "barrel" that hits the caliper, it's the wheel center (for me at least with a 15x6 pontiac ralley) that lightly rubbed the caliper face.

General big brake info thats awesome
https://lukeskaff.com/projects/car/third-gen-f-body-brake-upgrade/upgrade-options-and-measurements/


On to the project!

Flynbye sells this kit for about $1000. Can be done for under $500 and if you are super cheap and have tools $150 is no problem.

Need tools of course
M8x1.25 Tap
Grinder
Saw
Drill and bits
Beer or beverage of choice
Vise or press for studs
Caliper
Square
Center punch
File
Basic hand tools
I'm sure there's more but all normal stuff.


What I used for parts. I am missing brake line parts for the alternate line since mine came with the calipers.
1532646740224.png


Add $10-$50 for brake pads too. I got lucky again with the calipers I bought and they had virtually new pads in them. That is another benefit to the 4th gen caliper, good quality sticky pads are available at larger variety than the blazer stuff.

You are looking total at $120ish for the cheap way and about about $430 for the mostly everything new purchased route. Pretty comparable to the blazer setup cost with a gain of 1" on the rotor diameter if you get everything new for both.

Started with pressing studs out of stock rotors. Thread stock lug onto stud to prevent damage
IMG_20180529_194639.jpg


Drill and tap dust shield bolts for M10 bolts.
IMG_20180530_193921.jpg


Sawzall the factory ears off
IMG_20180530_200512.jpg


If you have a lathe (I do) or a friend, cut the rotor off the hub! Turn OD to 5.87" for the LS rotors

https://lukeskaff.com/projects/car/third-gen-f-body-brake-upgrade/hub-fabrication/
IMG_20180610_150325.jpg


IMG_20180610_152129.jpg


IMG_20180610_152245.jpg


Install studs. Don't crank on them super tight! I had a hairline crack in the one I took an impact to. Use a ratchet or breaker bar and stop when it gets seated. People say to drill the hole out, I wouldn't. It's the difference between a cast and steel hub and ductility. The cast is strong but just breaks easily with vibration and impact. I did the other 9 by hand and no cracks.
KyAYo_z_UaQ6U1mD6U-Oz47wEw7hGfnyO4_-QY4mFDfonXT_zwR32llRsS7rh_SUWr2khoZ-anSq2nsBe7d2orQhHDWPaLFJBfodwQkQZ0J1pNzz6Z7VAWBPshahWKxPayydkWT3ealJssC7d0r2ZyOmdcGjhpXkGwefx_rux4xk8NJ5Yax6yUrkMJ3OYi5kKB7hqdbaEavu_9Upitsx_qKLPuKEb3F_lRGN7mCbV1odn1e7tmtg4ePYmag5CAg2EGBpgVgff4zNNRToA-BaatLBfGG7OOIrIN3nhCcvMPovsllph_zc4IMGmjqJuHcEQYcKTew3iqn4-s1cf1nntHQIQssfcVniRI9tVMBCskwLxzii5WrQgwoY_jie1R4oYzEC7cxPlfIm-qblsJQDyqPPa1hbXw4CZw2ndXmai455IVADBejZsu_9HsNjls0l7Z3qC-kPK1PH1B0YN7vc5_kM1hHuyON7sITJq19O-HzQwwVHaIf7KYjE2rJOQ-tTePJnsugv6KBrTIKUAzLvQkMWgqQNS1VW5f0MzYKrw8YpidPWxfQiQXAUYaez25iQqCBe0KpMTiMQ7pBYO63J4UiRY1eYiGxAgZ8B6HM=w944-h708-no


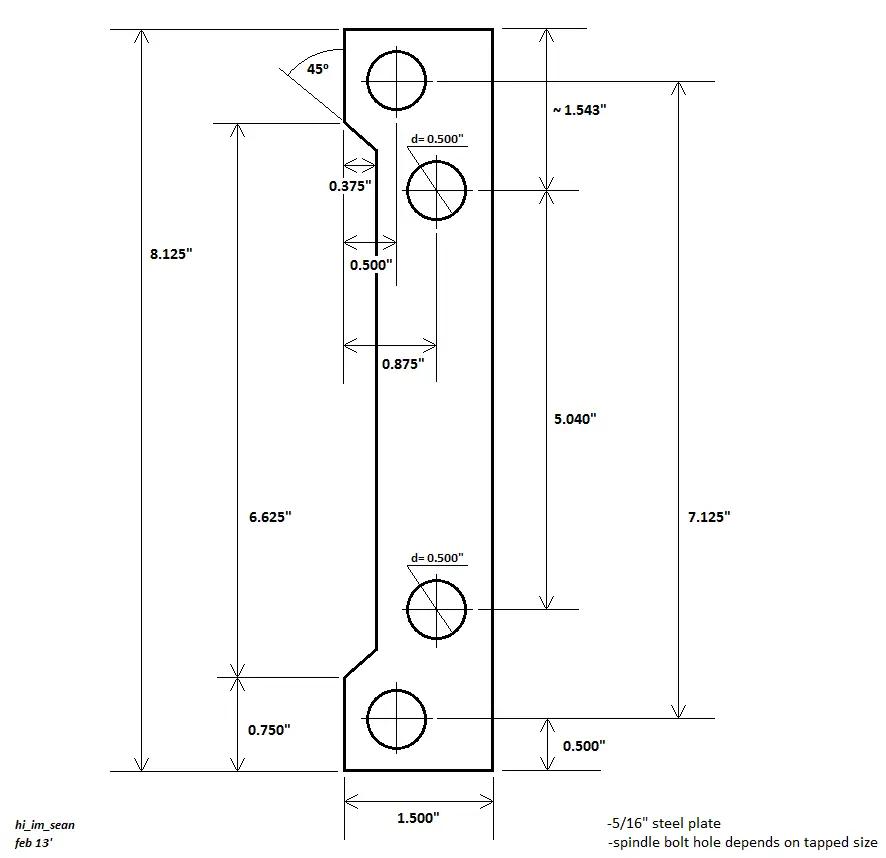
Brackets! If you want to save a bit here, use this drawing and some 3/8x2 flat bar. Don't drill both holes out to 1/2". Do the M10 holes to 3/8" or so. 1/2 is sloppy
ls1bracket_zpsd9d07dea.png


I found out, ignore most of the curves in the drawing. Cut triangle out like my photo, notch corner, it fits. Make them mirror image and it works. I also grounded the rear here and there to clear the spindle and leave as much material on the stock spindle as I can.
YZ_irySrN9losNS61sasTyqb3AjW3tClawsLMK2dXZrzGUYPfVaHHt6hxmy0MI_C-mBGa3eieR6s6EP6jZ2UJu0FbfP2oIQ-iyYcieBfkS3uTnUZ4UbaB-LGNAqzyKlXjKfdRnzw2fL8uMEbt0QOiNgH80SZnCZN18v9GhKA_eiq4O5Ab8zdQLzTVwl2on-lGAjcz7PSNVfeiJYDGtuzmjdDN3InRTG3acTJEO7ADkNFk5HoQ7ivuXOVZRjj_34aUH1Y4YTdIuCvQYDpCsh1EOIL9p94ywfc8nKCOEu_HD4gN-ZC3n6jTzO_A-KwiggsJyX5YGf4Q7QoKQdJKe_ZWJyXVpNkMYtgRBjm09s2oLbqvVlOKWPk26-k72B8S-IHUZZyTM9OLsR1SxRFN6kHwT4l0GERwptKcRYPebym1y5HkqpHzJN_fdVDkfc9lLPeO_qJIVq-9VBSWus9kHeWOeGZ2gCDFCfur3tFs9A09QAzsfdpJRpJ2l8X8X9qgI6ju9SCuQdsUIR9cYVElQw-8PP98mcuNSTEpCyjDKkUXYJQQiR1WAqQ5nTMe2AmVKrIejUO3g5dy06SSDMN9qNjorU3A0T9s3-Xc2o4y10=w711-h947-no

QowSOMggVJjbKMOo5eYJq95hCH-S5ma-IYhiOA99opp6G6ZCoinO_X8bxH7lGXo9b178vN7pM-IGUNqEBA_oDJUjthyMYr6Adx6p1LDkPScuUNrMr3vqIr81LSS7vMr9nohXqGDath_-vfr3_l_tkJ_FQpDjXboGJ3_2vfdjwDV0AVY3jTLpt1uSKjH_Eo-uzgyw3K5gT8FKMpqBVZdLJJ3RggZg5dQRhxr5lX-cutFeaBEP64nMATjyHLXI1SZPEb2PzlNUtXmpE25E0vbfnfvOUTViW2TcA9DCRmEDbe7Pf7u9cNpXjJpclrxtxoaIabw0uhEn3HpAXM8L_ZbZgKroYmCJvZvluR7qv93g0vSfYZALiex4HLCSj3YAuvTngTJ0QRBKvKxq-ib1M38sW9gNCvVi0NVx8exzck_4wP_plNd6ceQs_GY0KRMDC0b60fnJrC0dz2Iw6RZ5ZH0Ig0cCrmcIKtXwPBik2NUBvl629RjMhhbjJGZyRcsaCnHoKUYR-OGWrhVlxF84udl7vK3i4cySEMHDd-AefmcaKeLN2LzNDDlpMDM2-o63FmliJcA5DWDLiEeMnrWmfbdU1UKJWqgxVMclWwhkC9s=w711-h947-no
 

Attachments

  • IMG_20180530_204213.jpg
    IMG_20180530_204213.jpg
    158.1 KB · Views: 790
Last edited:
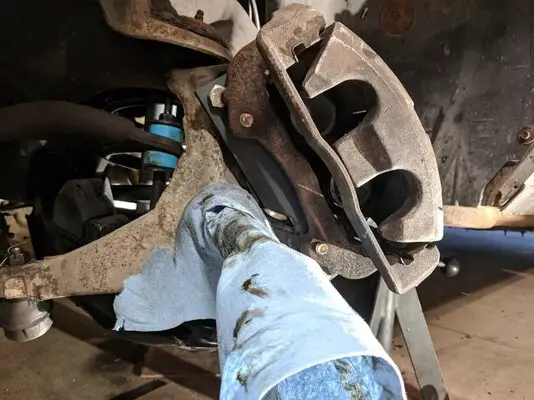
Caliper bolted on, tough to get the bolts in. Process here is attach the bracket to the caliper, and then bolt the bracket to the spindle. Have to do some grinding (next photo)
oaQIcIWyqKkUCzTfXB0Qizx_PEzl3fIsOP9ECfBpf7Ww6u2zCMCSAHAWKrn_Fgo1XKy0XZrw4VgQ8JsLOvQE2BzrGJyXDkwz_R3AprnoZFw9kiGgeK9BcXSFyNovRsKpf5BREEc6XthmiKhPwPHzobFkhM5gBdWBirPL6-_G-XRMq7RIBaMZ3xbCHpsUatYKyVIUdsDpX6unrCmAzTxLkEq75Cz2HChVaEqBzsd3ko5q1ijL7cy2eJWdQMhrepXB5iXUwzEYsPNUzpaLYcC831NC1rpVTfJxQk5JCkO7wiAHqOIVs_bYXlxP32bxGRKz14K7apswBS-14KBfWOI4HaPHVSPKaiwdUdjRxKFf_tJJGl9ebSvrbKYoMT48aQn_hmsbrcrP1SLYjfUQv3KAiIOKPG1w8lTB4hcSFl7HqjNNh7TDy6WMY2cyDIf0cfgVZV96Qay4b3bucR_szClg_vvF4NQC1gePWvTHtB-wPdv5qeKaC7R0QbPZ35U_mq1EGgrWnHqRchoFjnoNhDJJxzAsG7vFLRAlyqb85LgQ-4uqVJXIe0E974rpC7igzlOqLfs1ORFeLlv7QDDYPkK4pNUCcC2u_3eoB1eaq4o=w1112-h835-no

Grind radius where the casting had either a machining locator or a part of a runner or gate.
uJu63Pc293a6saB_Tyo5EiJP2ivAksbGOoTw_5cfhtAhIDjMO8VwSaHo_X1DXhKTz4kKf_se3PCGZ0yv_b2tGT10tI-Qki0TcJAR2cPEf6_8mK_WJTToCudSoJrUMtbix9Y-EJ7uyPP-b_YCQ6H_97bTVgwM0irG2DihGG0YZaYJfEPv8J_OOnYxQWSCFE8o-_pkgnjCJcYjM4i70nJRqX7a3NtxJ_q8d0Fc0emE5jdVnQXRZPgQuJqmYdw18fu7S4dTZDaCzakw7voLqsAxFtbJDpd4TrQ2ddil0j32Mg2wIFEqSUQFjdoLCs9e4CEfWRPySRHESW14So8t43Hgvx6aBGjWj3UTDBIaOjAiYcKPjQ_advdaQWJo8E-rgOB3eMH5s_hzTkynrwu2_8X3HBpQ56Xn2HlGKkraIzPHfQMKEjvGpwEo3ooBdR6pqaA8GgxGz3-VjJYsmKp-L6OoX7Rw6X08jsDqfTXy6mITiplfm-yZeBytuVVMSX3SpMCF0VH7MukAZWpI1l9QB94l22oWdn1FLfBi5Xe98WrJ27dASA-jnyTplQnmIRMS3oulW2VpEmQ6ccQ32zDtWYgsXI2M6SQ3AJjNtKGTfIk=w944-h708-no


Said socket access
T419CLoC6DbMzG_fJZg_bU8TJItGHeIg3HYfnCCxThdpkK-Ku7CtWWb4xMvfI0uAnfhcMf2rHqutWPzgS_20vf1HdGfTZBpq9I9kzP2JxtmW5nYqwJQEyd2hoxLCJxmfY-8kG46QNFJmfTHhbUtnF2_OTaGnBPyvtNp7UilZ3dAFmK26GY92DYA1FkX8eRM0uePfop1DkFlb-5QUcQnQkmIs5vE2yowaTpSJC5mkIeADcGpMh2P4DHo0w7wYaCNc2q9KlEgWAgzeREdoSPYG399isEQR4NKwzlL69IMW3u-koD5GgvZ_DxrRQNrpoJl5-r9FfgMYYu7OzIO9syO5RUOjn1SOrbO_G-1ze3R2tj0pWYXl7KiGZGEMaxyS_NSSSw2G2dY-8uUQcAjN4nKT_RTjDsevs6Q9LOYZQipABkEYEoACuirmFZtGebV8tvUt6Wfw_9xdGo9m_Ncor-wb4u3zlXORBwY3FDj-F8dweHxw652CP8C1vEkkw60RTY8JNgEZ6-GS8I8yXXWwEv3aDY8mECPv9XL1pP2Ii5pR0-zVg-1SSKmLV67NRSI0m6WoO3Lm11LYiHyGiEk8Aie9U8r6EgSG65zp3N5XpSc=w944-h708-no


Bolts in perfectly, even spacing on both sides with no spacer needed.
ALaCxrXcXdpEGBPfCCPtrLTZn951OYIpZ1rZRvxCyz3GkF32DDpoPcDrMN1OdqDOHsraZxxYI56vPQyDTgua3wjNv2hYmMNMq0RikCXCcCqaCqS9_1eiusSg7rh969L6-zyCiXOcB6IOFN-hh0s2O22wFgOxhV3aOk6sZ57_SLcz5ALB6D6QJhlTzTw207BiXw0k9yBeGDcHk9O-e41jKzU3ARRNAV7X1oO4ebNWtHe5o5jHSvdJQFYek162LyFRrybYwUPbJ2hsnvG_5DD1ukf6emQDjMShNJeT1As-9rPsPWGl5-6BOD8DZqhoNy9Eh5-iFrbNj7yhzT5pS-uvEUBTi_KX-sMwp_EuenQAE0p8cCyRm4NCyKggxQJIBSi3Uf_oMYewbtp9mEc0dX81T1viz5K0FN68PGKQ4kG05HJFKopsFENcFFZiP4JYCugyiC5FhRhfE06Ek5_aBAH2d3wiEHZZfela2qsYymqw7NQ9ZVRR46by0lmYIZz03-9fpD0HvzYUwJJj8hh9h2CF8zuHusxYo8g5FCgCmIYTJ5WIcZk0-o1JV42iFVIMjKCzq6wfL47AqHAs1an5DynHkky8Nt3gqNUKAherPEs=w944-h708-no


mAq3xAZhMRzJ0KigYAFdECtuSnBfTBHsr6F6kNm7Y3n-JehFfHhYkru8JJMsqLxBWlFYCyDA4UAl7zV3NTnOS2AvQTWanaRewnJr_1cy8bav8jmCgd_gMAqDy5Bbd9dEQtMOzG9VJnzohd0s1hTQsWbYRJkRMNPVoLmrNzXjanPyWMHBY5qOm4qrsOBtzqbUczHtOLRekH0wl0bnFUYFVxtQzMN7G0v1uC6U4GnJl2A4-wtg0Fqn8fk4QK2XashXE_LRwmEgA-34gK7wiwyK3quWz7mpZYnIae2cO24d-4X_X1Ei6_1bvdjGB24KsbE2ZrM5SmZMaga3uyeW0ph_uKR5vDVy19OZOnGObNRN04dyVCy0WVMwR2wkxJA98FtC20LdIY9de-lfU_DSvHsiInMacYL2ey27LkcJGV6CFkO7KinLsACZ9b8E7OiTzX8pbKvCvVhM6I8yqQu33KY_nkYVc6sBH6aJGLk3fTeKtWoFaDDCQEemu4zupJTk4yDqi1o4FySMgxS87vjtSMMT-wBU51pMSic5KCJZ-4Bwu_20DCqd-AAM1e_UGhaCGepVs8jv8Uuir81QSD_zEIGkrvOjr2aTGFzZz9a9t7k=w944-h708-no

ZDvirQ9k_HBdES5tW8N355sUUWz9DzBqkaFQq2Y7YVfxcOgOUWcckEnYAA5inhrNGauf9uI5mTB-VyPd1urf5muUYu5sR_BIO2L2DXErTAN-YJfnzKqaOQND0INqOBf1mxVfj_PY7XWDwyT_9_rJ-8H36QZx2w65culK2cX3q1ZwdRiZa2HdzvFzCDDmdTP922p2uHAbshxzp6WuUghk8N5qKYB2M3OILbbYivTMuWSdw8PriMQ4dxAf6LSi5EuEmCvaPmsKvmPuTyqRGNTkkhTnICkMTB7A9eiqR1TtGxf6r8BAj5-Hi9M6W1QclbTmhoPZQl3wD8-5GBxtFLzZeh16qqF18LoF7szFFgTWvwPmCLL6-l5F7E1TUNTUz6Go_OAnenQURIsc4M2PrpRGA0pJPSESBNNDV_3V0wE2SobyMF09_McO1t0akM-bDlFmi026QaSiXr3dWOLnuzfr3Yz3K2JBaJmOd9sefXUs0AKtkvXzHGxdF8zQszYNIcLB3xT8z2nRIXdaQ0PadlgT0VUWAF_YLp8c0SEurOU-jyajayuJJp7SzSoih3K53kDPo5o5FziGsIghGAR8CposJ-SuyqSOzXzQ_1grBH0=w944-h708-no


15x7 pontiac ralley, 2" spacer. Can use 1" spacer. The only reason the spacer is in is because I run 17x8.5 front C5 corvette wheels.
jTU4L95xXhL6msOWtnVjJn5rjr2m0yi1jnP2WyQsIBmE6ZXME3yaRe_pUfX6M_jUP5CCjdU805IKkDOz4TU9Zi-3_BgeCi6jWtdKDRYcGB0n0-hCaTFuN2kYh9BcTmKmTSvfxUg14_AO-tVqb4Bus8XyqI6GVV2vt5HZj764aitkERNs7-AtUgaWn1h4OWh93eCALTWiYuqQ288bdhGlKoke3LPB08q8LeKOXKNW5HxVMjJRQHzWwpjUB3KtjLSBbNlkGa4A9NzkRMYQUXJ4oCH_0ori3eYVa1-XJm2VL9Qp-91RIl6qhhyyJgLHAeSZVA7r34vuCbDq2UuVxxjZfHIrRKGziHL-xMZcXCIYo03ECERNvm8pb4AGB7DL4nVas3mmjKK5KMitatITPr1PXX0lBSg6x-VCcdu6dQKPZgOwMctMkD6ITOo6ZQ1PeBq1eOGlYF6YyoArvL3VqmiAJFLBZF9tpMm-yOtFRmmD6Ke-t3-DinoYYkiY8h13Y7ar-RtIPQlL804rtPmLYFCgHfPorVJ_SuDoiU9y3dBISo0jhAivuc7-xXiW5n8hlMsApdl5sJij0-rXZ8nufPCVyAvgUF2DO8_9PI18BnI=w711-h947-no


Used stock F body brake hose, re-flared G body double flare to metric bubble flare on the car side.
_mEsWBlVu3plr0yTkgxwMR_StCVzlR5wSiyy_3fl5S9zk6FMQ1bB8RLO8yhi0b_9BS9zRVVu5pzj5OzOQP8x5-oRipBwg6nZqKEPCJGl36BSY33XZ-RSeXY4-_MwRzhB_QMNAcHCbZIjpWpr_k1v5KQV7CehuuYdMxbzC7Av4j-3O0nqC0FwD1kIIoO212GhRRaeqs-0te3aiDzxdiDoFkKevb5cnCAx2cm-gh8SLOiAbWGtJ5FHTdoG7cHNRDtWwNN5NYDa5a1DobgfJktcaEByqKaL-Z5c-F4wHHZWtl3lLkd_G3YTY7X0Ue3Jx33NLLY5_5LS4f9Bv2fAGtffhuSteFvjDmU6_wluMUTa8nIr2w6HZij5BEvO8asUeF8zSliSsU-mRSOSIIrGxTooy-67QyJ8MEWX453IJPbJiHwyjSxaMlbb2VoBZFF98JfK1PE9UErKoAYLCmN_Ol4TLvfTqBXyd8kdQfp667HwOe0UiO-gKGMlQhlS-TQ1X2_1uTZ9kFWX_uOOs5wi1SXWZf8DZ_8GR-mbnj3vdIU12qlvkYtzwK36c8ja6Qo-srSqaVLPjHXCHsKpiCGK-XtoRKm3iBbCWReJXAQEkH4=w944-h708-no


Also had to lightly grind the upper control arm for the caliper bolt. The caliper would hit the arm on full lock.
CSARFHQmzq95N-jlxOwFQbVUt3IDv4tv7isaKfNeJEaXNNuM0oxVGUT9d3IZmWme_dhRaDrwkT89MMJJxnpUYm7hM7rR4x84yx1p5_1mjHNUK0uDE4BV8Q2RxpaIfCxdeqzcUaiK_FSAQIKuuldKlqZ788NBpkwu_JFU1NGc_oqPnliOjOSAFyo5s6fnNZjFaoyBlgpAoz-qTJ6iaqzMTLSCczOz0sxfPCoQYc96gyJkzXYzk1rrhuLZTyDsNldWy7DbPMvYFGDDAFplauJC4BUWfnzdf1-_uI9ocVcXykZ41aRVw0RGHUR4VtLUtJepfV-y-XaE3l9TcESh6bsVGAbLqVasc6cFArELqbPGtV3UB5FQ7zJuh7X7IUTX2DHFQ4mok3L3WT709ZBe8nmmYetgCAmdE69UAQCsTGa5hw63cvxez9P3hiwbpuYTarSif4tZNpI836k7d-PHD8WauZzPjo4MGhNdUMyKVtAYk18BOhRudY-I6ReHpBhaBpG4hHgpFH6jvDSOh37azfph_SJgnYu959EiKWwDZmkN17Z4pdbzDL3ZXshuIfaIbLf-ZWu978_lQurcHyO4E94waiPB44Zy8atFk_zJXFI=w711-h947-no


Stock hose showing off how perfect it fit with full lock
HaiuFA5MtmVvhimgaIS9iazqR_zmePnUVIgAU1fbd8oNsSDewJ0oyQpSvBEJX9ABc0HfxJ8QKWWAkI64nC6FSOyGEvhAyB5oTSm0nGVPP6R65B89oydy8ilB8wZEZwN3OOlJ-6hy1JroNVd4GUl1lqYr5PKqX4BnEs7nTjcu4rj3nJ1K_9zA837NLOdaViswPFB_ug7Pf92HCQCRqOj_SYrgx-QcXLVTk2mI0qoBfh-jVL0AqtNktc3Vk1YNHeIQXqKvD72FSzXCknhfTmi782Chef-Y840ZoAp896raUoaCkkuuquPK42koXVlFemg1eKp_qRDhvgMDOn9P-bo5jMgCdfP2Ms_wwESfXVAqrDt50i98vZn6JrLKDd_GO44XB-Uzdqh3xco5SSCTZ9o3f2xfuk15CE6Fo4OplrOKA34XP-c8Y1RFn3kyQYjxP1BcNjZFrrXeN24yIb93Ok3rt7le5iBYvI3pIaflLDLD3gyKYVvCrsHSM4VgS5bymlmO93l5Au5iJ6u0ZLajMWtTPKwDmca2YExhej6aiyQXMD61JgohB0u16ZqPNn6RHPPHFxpdIgjSgudNCJgzbFK_Zrs4fi45RWbuWLgzMLg=w944-h708-no


Results- Will lock up 275/40/17's from a 30 roll.

Additional brake stuff, I upgraded to a 80's B body master cylinder with larger bore 28.6/40mm size when I went to rear disks due to lack of flow. Stock 86 pontiac booster and eve disk drum prop valve. I tried a disk disk prop valve and it leaked from day 1. It actually has perfect bias as is now somehow so I have left it alone.

Very happy with how it turned out for ~$115 and greatly increased confidence driving. Brakes were always soft on the car even well bled and with the better booster and rear disks.
 
Last edited:
LS1 front brakes on a G body is a pretty common upgrade. I have about 2k miles on my mostly homebuilt setup. Has been sucessful and thought I would do a how to with all the info in one place.

I wanted to go with a blazer setup but I priced it out and in dirt car territory, I couldn't justify it. It was cheaper to go with the stock spindle and 4th gen stuff. If you are anywhere where dirt cars are running up north where 2wd's rarely sold, it is tough to find the parts. Could have bought spindles from someone down south, but $200 there, $200 for wheel bearings, getting calipers and rotors, it added up. I figured $500ish by the time I was done.

Looked into C5 fronts but I want to still run 15" skinnies up front for drag use. Many 4th gen people do it and you can either a) grind the caliper or b) run a 1" spacer and steel wheel. I have heard reports of monte SS or T type aluminum 15" wheels fitting over LS1 front rotors. It's not the wheel "barrel" that hits the caliper, it's the wheel center (for me at least with a 15x6 pontiac ralley) that lightly rubbed the caliper face.

General big brake info thats awesome
https://lukeskaff.com/projects/car/third-gen-f-body-brake-upgrade/upgrade-options-and-measurements/


On to the project!

Flynbye sells this kit for about $1000. Can be done for under $500 and if you are super cheap and have tools $150 is no problem.

Need tools of course
M8x1.25 Tap
Grinder
Saw
Drill and bits
Beer or beverage of choice
Vise or press for studs
Caliper
Square
Center punch
File
Basic hand tools
I'm sure there's more but all normal stuff.


What I used for parts. I am missing brake line parts for the alternate line since mine came with the calipers.
View attachment 92930

Add $10-$50 for brake pads too. I got lucky again with the calipers I bought and they had virtually new pads in them.

You are looking total at $120ish for the cheap way and about about $430 for the mostly everything new purchased route. Pretty comparable to the blazer setup cost with a gain of 1" on the rotor diameter if you get everything new for both.

Started with pressing studs out of stock rotors. Thread stock lug onto stud to prevent damage
View attachment 92931

Drill ad tap dust shield bolts
View attachment 92932

Sawzall the factory ears off
View attachment 92933


If you have a lathe (I do) or a friend, cut the rotor off the hub! Turn OD to 5.87" for the LS rotors

https://lukeskaff.com/projects/car/third-gen-f-body-brake-upgrade/hub-fabrication/
View attachment 92935

View attachment 92936

View attachment 92937

Install studs. Don't crank on them super tight! I had a hairline crack in the one I took an impact to. Use a ratchet or breaker bar and stop when it gets seated. People say to drill the hole out, I wouldn't. It's the difference between a cast and steel hub and ductility. The cast is strong but just breaks easily with vibration and impact. I did the other 9 by hand and no cracks.
KyAYo_z_UaQ6U1mD6U-Oz47wEw7hGfnyO4_-QY4mFDfonXT_zwR32llRsS7rh_SUWr2khoZ-anSq2nsBe7d2orQhHDWPaLFJBfodwQkQZ0J1pNzz6Z7VAWBPshahWKxPayydkWT3ealJssC7d0r2ZyOmdcGjhpXkGwefx_rux4xk8NJ5Yax6yUrkMJ3OYi5kKB7hqdbaEavu_9Upitsx_qKLPuKEb3F_lRGN7mCbV1odn1e7tmtg4ePYmag5CAg2EGBpgVgff4zNNRToA-BaatLBfGG7OOIrIN3nhCcvMPovsllph_zc4IMGmjqJuHcEQYcKTew3iqn4-s1cf1nntHQIQssfcVniRI9tVMBCskwLxzii5WrQgwoY_jie1R4oYzEC7cxPlfIm-qblsJQDyqPPa1hbXw4CZw2ndXmai455IVADBejZsu_9HsNjls0l7Z3qC-kPK1PH1B0YN7vc5_kM1hHuyON7sITJq19O-HzQwwVHaIf7KYjE2rJOQ-tTePJnsugv6KBrTIKUAzLvQkMWgqQNS1VW5f0MzYKrw8YpidPWxfQiQXAUYaez25iQqCBe0KpMTiMQ7pBYO63J4UiRY1eYiGxAgZ8B6HM=w944-h708-no


Brackets! If you want to save a bit here, use this drawing and some 3/8x2 flat bar. Don't drill both holes out to 1/2". Do the M8 holes to 3/8" or so. 1/2 is sloppy
ls1bracket_zpsd9d07dea.png


I found out, ignore most of the curves in the drawing. Cut triangle out like my photo, notch corner, it fits. Make them mirror image and it works. I also grounded the rear here and there to clear the spindle and leave as much material on the stock spindle as I can.
YZ_irySrN9losNS61sasTyqb3AjW3tClawsLMK2dXZrzGUYPfVaHHt6hxmy0MI_C-mBGa3eieR6s6EP6jZ2UJu0FbfP2oIQ-iyYcieBfkS3uTnUZ4UbaB-LGNAqzyKlXjKfdRnzw2fL8uMEbt0QOiNgH80SZnCZN18v9GhKA_eiq4O5Ab8zdQLzTVwl2on-lGAjcz7PSNVfeiJYDGtuzmjdDN3InRTG3acTJEO7ADkNFk5HoQ7ivuXOVZRjj_34aUH1Y4YTdIuCvQYDpCsh1EOIL9p94ywfc8nKCOEu_HD4gN-ZC3n6jTzO_A-KwiggsJyX5YGf4Q7QoKQdJKe_ZWJyXVpNkMYtgRBjm09s2oLbqvVlOKWPk26-k72B8S-IHUZZyTM9OLsR1SxRFN6kHwT4l0GERwptKcRYPebym1y5HkqpHzJN_fdVDkfc9lLPeO_qJIVq-9VBSWus9kHeWOeGZ2gCDFCfur3tFs9A09QAzsfdpJRpJ2l8X8X9qgI6ju9SCuQdsUIR9cYVElQw-8PP98mcuNSTEpCyjDKkUXYJQQiR1WAqQ5nTMe2AmVKrIejUO3g5dy06SSDMN9qNjorU3A0T9s3-Xc2o4y10=w711-h947-no

QowSOMggVJjbKMOo5eYJq95hCH-S5ma-IYhiOA99opp6G6ZCoinO_X8bxH7lGXo9b178vN7pM-IGUNqEBA_oDJUjthyMYr6Adx6p1LDkPScuUNrMr3vqIr81LSS7vMr9nohXqGDath_-vfr3_l_tkJ_FQpDjXboGJ3_2vfdjwDV0AVY3jTLpt1uSKjH_Eo-uzgyw3K5gT8FKMpqBVZdLJJ3RggZg5dQRhxr5lX-cutFeaBEP64nMATjyHLXI1SZPEb2PzlNUtXmpE25E0vbfnfvOUTViW2TcA9DCRmEDbe7Pf7u9cNpXjJpclrxtxoaIabw0uhEn3HpAXM8L_ZbZgKroYmCJvZvluR7qv93g0vSfYZALiex4HLCSj3YAuvTngTJ0QRBKvKxq-ib1M38sW9gNCvVi0NVx8exzck_4wP_plNd6ceQs_GY0KRMDC0b60fnJrC0dz2Iw6RZ5ZH0Ig0cCrmcIKtXwPBik2NUBvl629RjMhhbjJGZyRcsaCnHoKUYR-OGWrhVlxF84udl7vK3i4cySEMHDd-AefmcaKeLN2LzNDDlpMDM2-o63FmliJcA5DWDLiEeMnrWmfbdU1UKJWqgxVMclWwhkC9s=w711-h947-no
I have a quick question your drawing for the spindle bracket is not the same as the bracket you have on the car I was wondering if you drew the blueprint before or after making the bracket itself?
 
I have a quick question your drawing for the spindle bracket is not the same as the bracket you have on the car I was wondering if you drew the blueprint before or after making the bracket itself?

That bracket drawing was from a forum post of a swap a guy did on a S10 which uses the same spindle as a G body. I did not draw the bracket, but it works for the hole locations. My intent was to use the bracket drawing entirely, but most of the cutout shapes on it are not required for function, they only make it look nicer. The notched corner and cut out triangle shape was all that was needed for it to clear.
 
I like that design and it is very ingenious of you to modify the spindle and hub to install the caliper. I really like that you kept the spindle and hub to use the stock bearings. I have never seen the stock bearings fail but I have seen the sealed hubs fail, I replaced both of mine on my Jeep that had less than 180,000 miles on it while my GP has at least twice that milage on the bearings.
 
  • Like
Reactions: Sweet_Johnny
Bout damn time someone has a nice neat up to date thread on this old subject, thanks for posting it. Some of those old S-10 forums threads are an absolute dragged out mess.
I got a set of calipers & lines years ago, drilled some brackets with extra lightening holes in them{ to look cool also}, and never got around to the project. I think I can both cut and turn down the stock rotor/ hub in place or on another spindle with a good 4 1/2" grinder & years of skill using them. Installing studs before turning down hub was an option some did to help prevent cracking I may consider.

Don't remember noticing having to modify G-body steel line before. So you just cut off factory flared end and did newer style flare with flare tool, leaving g-body connector in place behind flare?? Line flaring is one of my weaker skill areas and I need to either buy or rent a tool. Maybe Oreilly's, Autozone or Advance Auto may have a worth while tool to rent or buy? Don't feel like spending $200 plus on some of the professional models.

Now, one change I'm planning on making when I do finally get around to mine::: larger rotors. I have 18's so I could get either stock or aftermarket 14" z-06 vette rotors for not too much more money from Rock Auto.. Not sure if the in & out disc to rotor mount spacing is any different, but I think all I'd have to do is move caliper bracket holes out an inch. OR, 1/2" for some 13" c-5/6 rotors.
A sidenote of interest here, A friend recently told me our local Oreilly's store would now price match rock auto.
 
Last edited:
That bracket drawing was from a forum post of a swap a guy did on a S10 which uses the same spindle as a G body. I did not draw the bracket, but it works for the hole locations. My intent was to use the bracket drawing entirely, but most of the cutout shapes on it are not required for function, they only make it look nicer. The notched corner and cut out triangle shape was all that was needed for it to clear.
Thank you very much.
 
81cutlass: I don't mean to bother but on the brackets does it have to be 5/16" I found a piece of 1/4 will that work with maybe a washer with it?
 
Too many people are buying the Blazer stuff just to use it to upgrade to Camaro or Vette brakes when they can both be added to the factory spindle.

Someone always wants to argue it, but a standard spindle set up with two taper roller bearings is much stronger than a sealed unit. Especially the factory forgings.

Even if it wasnt stronger (whats it matter we dont reach that threshold anyways and guys beat the piss out of these spindles) timken bearings are under 30 bucks for all 4 bearings on rock auto at last check
 
  • Like
Reactions: Sweet_Johnny

GBodyForum is a participant in the Amazon Services LLC Associates Program, an affiliate advertising program designed to provide a means for sites to earn advertising fees by advertising and linking to amazon.com. Amazon, the Amazon logo, AmazonSupply, and the AmazonSupply logo are trademarks of Amazon.com, Inc. or its affiliates.

Please support GBodyForum Sponsors

Classic Truck Consoles Dixie Restoration Depot UMI Performance

Contact [email protected] for info on becoming a sponsor