This may be moot/may have relevance, I'm by no means a subject matter expert...read through this entire thread with no mention...off the top of my head, I know of 2 clutch fork ball studs that screw into the bell housing, a standard height and one that is known as a "truck pivot ball" that is .300" taller than the standard. Measuring from the top of the pivot ball to the back of the engine block, a standard bell housing depth should measure 4.75". Any deviations could be corrected with an adjustable ball. I know my Lakewood scatter shield measured 4.85" and add in the block plate ~.120 (I need to measure this to reverify) but this .220" is what prevented me from getting a complete disengagement at the bottom with pedal play or adjusted the other way full disengagement but no pedal play not to mention shifting issues. Although not perfect, it was the .300" taller pivot ball resolved that issue. Another thing that comes into play is the standard thickness flywheel of .960". Varying the thickness is probably the easiest way to a light/heavy flywheel but does affect the 4.75" dimension as mentioned and can be corrected in the same manner. Thinner add and thicker subtract from height of pivot ball. All this should be done prior to installing but one can just assume if you're using all oem parts. I have no experience with the rhyme or reason for tall/short TOBs but I'm all ears.there are three heights of clutch fork ball stud that screws into the bell housing.
Manual linkage install help
- Thread starter Baker7888
- Start date
You are using an out of date browser. It may not display this or other websites correctly.
You should upgrade or use an alternative browser.
You should upgrade or use an alternative browser.
- Status
- Not open for further replies.
Good info here. The kit did come with 2 pivot balls. I am wondering if this would be accessible thru clutch fork opening.This may be moot/may have relevance, I'm by no means a subject matter expert...read through this entire thread with no mention...off the top of my head, I know of 2 clutch fork ball studs that screw into the bell housing, a standard height and one that is known as a "truck pivot ball" that is .300" taller than the standard. Measuring from the top of the pivot ball to the back of the engine block, a standard bell housing depth should measure 4.75". Any deviations could be corrected with an adjustable ball. I know my Lakewood scatter shield measured 4.85" and add in the block plate ~.120 (I need to measure this to reverify) but this .220" is what prevented me from getting a complete disengagement at the bottom with pedal play or adjusted the other way full disengagement but no pedal play not to mention shifting issues. Although not perfect, it was the .300" taller pivot ball resolved that issue. Another thing that comes into play is the standard thickness flywheel of .960". Varying the thickness is probably the easiest way to a light/heavy flywheel but does affect the 4.75" dimension as mentioned and can be corrected in the same manner. Thinner add and thicker subtract from height of pivot ball. All this should be done prior to installing but one can just assume if you're using all oem parts. I have no experience with the rhyme or reason for tall/short TOBs but I'm all ears.
I'm showing my age here but there were three pivot ball heights and three throwout bearing heights available many moons go. Each was specified by whatever the type of OEM clutch equipment used. But the last time I needed a taller ball stud the speed shop [S-K] called it the "straight 6 Chevy" stud. That stud was used with a flat finger diaphragm pressure plate and was also how my 1981 Malibu 229 V-6 was equipped. Now the last time I had my Saginaw transmission out for a rebuild I wanted to put a new disc in. I kept the used bent finger diaphragm pressure plate and used flywheel and just added a new disc. Doing that caused my linkage to be all out of whack. I could not get full disengagement. Nothing would fix it until I relocated the spot on the Z-bar where the upper push rod attached about an inch lower. That gave me less leverage but more lower push rod travel per upper rod travel. Now I get full disengagement and kept my 1" pedal free play . It also made my push rod require a lower hole spot in the firewall but small price to pay.


Last edited:
Wow ok thanks for the info. I guess i gotta keep working towards start up and then see if/where my engagement issues areI'm showing my age here..
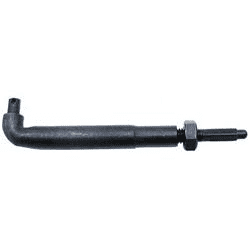
Is there any reason why I shouldn't cut down the threaded pushrod to achieve proper clutch pedal throw?And don't forget the adjustable clutch fork ball stud. For when the normal ones don't cut it. View attachment 205532
If I was to install the stop, the clutch would be partially engaged while hitting the stop.
I feel by shortening the threaded pushrod down I can correct this.
Last edited:
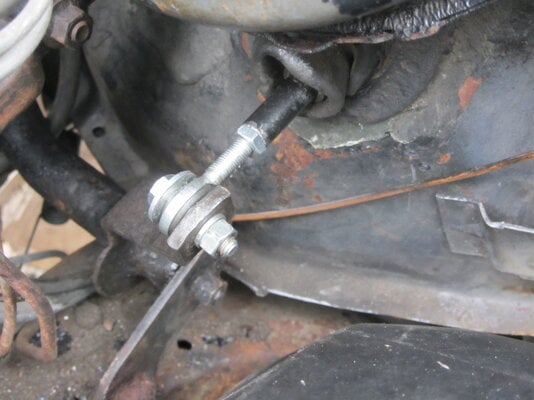
When I had the M20 in the Monte, I ran the stock lower but also had fashioned up my own upper rod similar^^^as depicted with the exception mine didn't have that bend. With that said, the above set would seem to be adjustable to some point of you wanting to cut yours.I also hated the cheapola lower push rod that GM used. I prefer the Big Block Chevy style.I also got tired of replacing the upper clutch pedal push rod which wears out fast at the contact points. I sprung for the spherical ball end rod set. MUCH stouter and they don't wear out like the stock rod.

One other detail that I've seen, is the mention of the recommended clutch fork which appears to curve down. My understanding is that clutch fork is to be used in conjunction with the correct bellhousing which has the pivot ball location relocated further down as compared to other bellhousings.
...but with all said, my setup was probably a crap shoot with the Lakewood bell, a-body clutch linkage and a who knows which clutch fork I had in there!!!
Last edited:
Ok, i am running the g body fork and bell already. I *thought* i had the correct ball stud and TOB but i guess i could be wrong. Also the clutch may be different. It is a coarse spline which came in 63 vette, same as the T10 I am running.When I had the M20 in the Monte, I ran the stock lower but also had fashioned up my own upper rod similar^^^as depicted with the exception mine didn't have that bend. With that said, the above set would seem to be adjustable to some point of you wanting to cut yours.
One other detail that I've seen, is the mention of the recommended clutch fork which appears to curve down. My understanding is that clutch fork is to be used in conjunction with the correct bellhousing which has the pivot ball location relocated further down as compared to other bellhousings.
...but with all said, my setup was probably a crap shoot with the Lakewood bell, a-body clutch linkage and a who knows which clutch fork I had in there!!!
I think I can get the geometry correct by cutting down the pushrod between the clutch fork and z bar. The "complete" clutch kit I used was good athough maybe questionable, such as it includes the wrong fork. I think they also sell a "g body" bell which does not have the drop ball stud, therefore not actually g body. So I guess i am not sure how much I can trust the kit to be plug-and-play
I can get the geometry correct by cutting down the pushrod between the clutch fork and z bar.
You could do that easy enough. Even if just to prove the point. I ended up using the Speed Direct kit. It is totally adjustable, much stronger, and the Heim joints will not wear like the stock linkage parts.


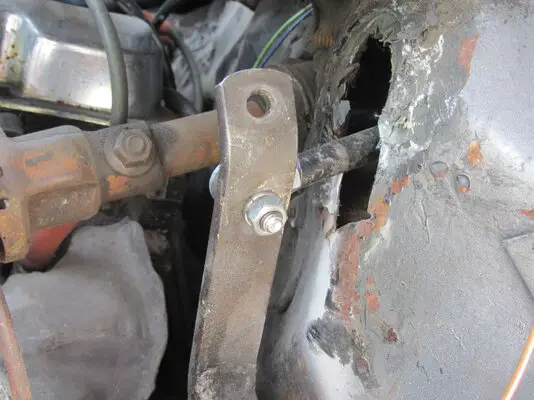
Ok guys I ended up cutting the pushrod down. Only the tip of the female part is threaded which i had to cut beyond that to get it short enough. So i cut even shorter and then welded a nut on. I think I’ve got it correct now. The clutch pedal is just a touch higher than the brake pedal, with about 1” of free play and I’ve got the stop in.
- Status
- Not open for further replies.
Similar threads
- Replies
- 5
- Views
- 324
- Replies
- 7
- Views
- 273
- Replies
- 1
- Views
- 133
GBodyForum is a participant in the Amazon Services LLC Associates Program, an affiliate advertising program designed to provide a means for sites to earn advertising fees by advertising and linking to amazon.com. Amazon, the Amazon logo, AmazonSupply, and the AmazonSupply logo are trademarks of Amazon.com, Inc. or its affiliates.


