Manual linkage install help

Status
Not open for further replies.

ELCAM

Royal Smart Person
Jun 19, 2021
1,114
1,249
113
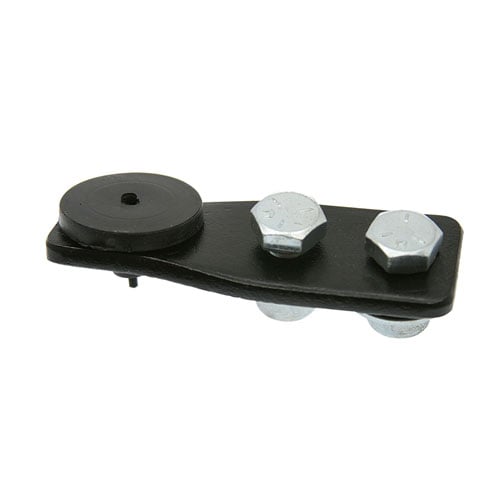
First install the stop, then you can get the linkage squared away.

This is the reproduction version of the stop. Might find it cheaper elsewhere though lots of places seem to be out of stock.

 
  • Like
Reactions: 1 users

Baker7888

G-Body Guru
Dec 3, 2021
665
115
43
Maine
First install the stop, then you can get the linkage squared away.

This is the reproduction version of the stop. Might find it cheaper elsewhere though lots of places seem to be out of stock.

Looks simple enough to make except at $15 might be easier just to order it
 

Baker7888

G-Body Guru
Dec 3, 2021
665
115
43
Maine
First install the stop, then you can get the linkage squared away.

This is the reproduction version of the stop. Might find it cheaper elsewhere though lots of places seem to be out of stock.

I will get the stop. But in the meantime .... i have the linkage turned all the way in (cant go any shorter) it made a difference and there is a small amount of clearance felt at the fork now.

In the cab, there is still a fair amount of force required to push the pedal, in otherwords, if i was to install the stopper, in my opinion, it would have the clutch partially engaged at all times (obviously i could be wrong -- first mechanical clutch here)

Do i need to file the linkage pushrod down or something ??
 

ELCAM

Royal Smart Person
Jun 19, 2021
1,114
1,249
113
What linkage kit did you get? Pictures would also help.

Edited to add.
Did you put the linkage rod in the safety switch hole?

Safety switch.jpg
 
Last edited:

oldsmobile joe

Royal Smart Person
Nov 12, 2015
2,067
3,053
113
mpls
Two things.
What throw out bearing are you using? There's two types, long and short. Sounds like you have a long throw out bearing, but need a short one.
Also, the factory clutch pedals always sat higher than the brake pedal.
 
  • Like
Reactions: 1 users

Bonnewagon

Rocket Powered Basset Hound
Supporting Member
Sep 18, 2009
10,538
14,217
113
Queens, NY
There's two types, long and short
This is key. Also the pressure plate fingers may be taller than expected. Then there are three heights of clutch fork ball stud that screws into the bell housing.
1657839757591.png
Along with the right TOB you need the one that positions the fork right yet it does not hit the fork window in the housing. Right now I am using the adjustable stud because I modified my linkage geometry to get more throwout bearing travel.
1657839829815.png
As for the lower push rod there are several kinds. I prefer the BBC style for strength
1657839058697.png
but the regular type has a LOT more adjustment.
1657839072625.png
The pedal spring is a tough one. I use a long thin spring like an old fashioned screen door used. I hook one end to the clutch pedal and the other I thread through all the wiring and crap to find something solid up behind the dash to hook it to. I think I used the steering column supports. Look at it this way- if everything is stock correct, then it should all fit and work perfectly. BUT- anything even slightly off will affect the way all this works. Then you can either substitute parts, or modify things to connive them to work together. Since you are assembling all this from scratch I think you are doing great. Even at my age I get stymied by things and have to get creative.
 
  • Like
Reactions: 3 users

Baker7888

G-Body Guru
Dec 3, 2021
665
115
43
Maine
This is key. Also the pressure plate fingers may be taller than expected. Then there are three heights of clutch fork ball stud that screws into the bell housing. View attachment 202577 Along with the right TOB you need the one that positions the fork right yet it does not hit the fork window in the housing. Right now I am using the adjustable stud because I modified my linkage geometry to get more throwout bearing travel. View attachment 202578 As for the lower push rod there are several kinds. I prefer the BBC style for strength View attachment 202575 but the regular type has a LOT more adjustment. View attachment 202576 The pedal spring is a tough one. I use a long thin spring like an old fashioned screen door used. I hook one end to the clutch pedal and the other I thread through all the wiring and crap to find something solid up behind the dash to hook it to. I think I used the steering column supports. Look at it this way- if everything is stock correct, then it should all fit and work perfectly. BUT- anything even slightly off will affect the way all this works. Then you can either substitute parts, or modify things to connive them to work together. Since you are assembling all this from scratch I think you are doing great. Even at my age I get stymied by things and have to get creative.
Ok I am using The Parts Place kit. I am using the TOB that came with the kit. Kit came with two ball studs. I acquired a used G body 606 bell that came with a fork and TOB. I am using that fork. I matched up the new ball stud and TOB with the old stuff. I am using the correct hole (not safety switch hole) but as mentioned I do not have a stopper. The clutch action feels nice and smooth. Only issue is it's high. (Good point on that it's supposed to be higher than the brake - that helps - i did not know that) I think I will get the stopper and then re-assess as suggested earlier. It sounds like you guys are doing whatever it takes to make it work for you. That, I can do.
 

ELCAM

Royal Smart Person
Jun 19, 2021
1,114
1,249
113
I would first make some kind of stop for the clutch pedal. Disconnect the linkage on the bottom. Use a short box end wrench as a temporary stop fasten it with a bolt and nut to the pedal frame thru the box end of the wrench then add a shim of paper or cardboard taped on to simulate the rubber pad.

Then see if you an get the linkage to align with the hole in the Z bar at all.

If that will line up then see if you can get some play between the clutch fork and throwout bearing.

etc.
 
  • Like
Reactions: 1 users

Baker7888

G-Body Guru
Dec 3, 2021
665
115
43
Maine
I would first make some kind of stop for the clutch pedal. Disconnect the linkage on the bottom. Use a short box end wrench as a temporary stop fasten it with a bolt and nut to the pedal frame thru the box end of the wrench then add a shim of paper or cardboard taped on to simulate the rubber pad.

Then see if you an get the linkage to align with the hole in the Z bar at all.

If that will line up then see if you can get some play between the clutch fork and throwout bearing.

etc.
Sorry I have to admit i have gotten side tracked by other areas of the car but am getting close to coming back around to the clutch linkage (getting close to start up) i still need to fab or buy the clutch stop. In a factory car, how much higher than the brake pedal should the clutch pedal rest ?

Edit - i did order the stop so just waiting on that to come in ATM..at $15 it's cheaper to buy than make.
 
Last edited:

CopperNick

Comic Book Super Hero
Supporting Member
Feb 20, 2018
3,347
3,011
113
Canada
Don't know as if there ever was a specified height for where the clutch/arm/pedal should sit at rest. Figure that, generally, it should lie about the thickness of the pedal higher than the brake. The difference in heights is there more as a safety precaution as it keeps your right foot from missing the brake pedal and landing on the clutch pedal by mistake.


Nick
 
  • Like
Reactions: 1 users
Status
Not open for further replies.

GBodyForum is a participant in the Amazon Services LLC Associates Program, an affiliate advertising program designed to provide a means for sites to earn advertising fees by advertising and linking to amazon.com. Amazon, the Amazon logo, AmazonSupply, and the AmazonSupply logo are trademarks of Amazon.com, Inc. or its affiliates.

Please support GBodyForum Sponsors

Classic Truck Consoles Dixie Restoration Depot UMI Performance

Contact [email protected] for info on becoming a sponsor