Marriage: 1980 Grand Am and 2005 GTO Build Thread.

Status
Not open for further replies.
Build cost and part numbers so far:

Fuel tank. Holley Sniper 19-144. = $710

transmission crossmember 12644HKR-1. = $320

transmission crossmember add bracket 12647HKR. = $71

4l60 transmission attachment plate 11655HKR. = $37

transmission mount 71223029HKR. = $56

Engine mount. 12643HKR. = $208

Clamshells. 71221014HKR (2) for $32 each. = $64

Clamshell inserts, 71221004HKR (2) for $22 each. =$44

LS2 Gbody oil pan. Holley 302.2. = $527

Complete set of nice HW 15x7 Rally IIs with SS trim rings and caps. $596

Hellwig G Body frame box kit 11104. = $748


TOTAL: $3381 so far.


Eventual Gbody 9 inch $3000ish with disc brakes. Eventual Sniper TermX Max 550-919 for $1700ish
 
Last edited:
Build cost and part numbers so far:

Fuel tank. Holley Sniper 19-144. = $710

transmission crossmember 12644HKR-1. = $320

transmission crossmember add bracket 12647HKR. = $71

4l60 transmission attachment plate 11655HKR. = $37

transmission mount 71223029HKR. = $56

Engine mount. 12643HKR. = $208

Clamshells. 71221014HKR (2) for $32 each. = $64

Clamshell inserts, 71221004HKR (2) for $22 each. =$44

LS2 Gbody oil pan. Holley 302.2. = $527

Complete set of nice HW 15x7 Rally IIs with SS trim rings and caps. $596

Hellwig G Body frame box kit 11104. = $748


TOTAL: $3381 so far.


Eventual Gbody 9 inch $3000ish with disc brakes. Eventual Sniper TermX Max 550-919 for $1700ish
Man, Holley is super proud of their stuff.
This isn't me knocking your plan, but just throwing my .02 in where it wasn't asked for.
You can definitely repair that rail with the body on, in fact imo it's the way to do it. If you don't have a jig setup, how will you know at what height to put the rail? But if you loosen the right side. Take out the left side and lift it about 8" to cut out the rail. Then lower it back down in place so you can tack the new rail in, then you know for sure it's right. Lift the body back up to weld it out.
Also if you use por15 on non rusted metal you have to follow the directions to the letter or it will peel off, even then there's quite a few horror stories on the interwebs about using it on fresh metal.
A frame off is opening a can of worms imo. Depending on where your car is from, be prepared to fix body mounts.
If you do pull the body off completely, aligning it back together is easy. Get 2 5/8" rods(I used lightning rods) and install in the 2 alignment holes. By the driver #2body mount, and passenger #6 body mount. Lookup hutchhiperf on youtube he has a video on it. And everything else your about to do. Awesome car BTW, you don't see those everyday.
 
Al good RHSS and i totally agree about Holley being proud of it.

I paid up for convenience thats for sure. But also for clearance. Im hoping to avoid headers and only do over axle ex fabbing....ill give up a little power to not have to deal with headers. The GTO ex sys looks tight but possible. I wont know until i set the LS2 in it. Am concerned about alt clearance with the steering box too, but again wont know until i know. If Holleys system saves either, it paid off...if not, well not so much.

As far as the frame rail goes im going to tack it then use the gantry system to double check using the body and bumper as final fit. Im only going to section it where i have to. My goal is to use whats left as a guide and be damn careful with distortion. I may be off a little but worst case itll be close and ill have to play with the bumper mount area...ill test my level, tape, and plumb bob for sure. Im honestly more concerned about the boxing than the rail. Before any cut or weld is made ill ratchet strap and brace it all in, then spread out the welds....itll take alot of time but i enjoy it...bonus is my son is a pro welder so its quality time spent on moms ride. Hes worked on both the GA and my Torino with me.

Good points by all in this thread. I appreciate it a bunch.
 
  • Like
Reactions: RabbitHoleSS
2 rear 245 60 15 BFG Radial TA tires, $410 mounted and balanced.

Clearance is 3/8 in the left 7/16 on the right. Its close. Ill run 1/2" spacers.

Waiting to clear out garage space before pulling body.

20230725_174927.jpg
 
Didnt get any more garage time in. The heat was just too much. Cleaned up and showered. Sat down and caught a little of Stroker Ace. As bad as that movie was/is i plan to watch it soon to play i spy Grand Ams. They ran Grand National and Cup back then. I did catch one of the movie cars on pit road tho. Back out to the garage this morning to beat the 100+ garage temps.

Also did a little research. The Grand Am weight is 3388. GTO 4491. 1103 pounds lighter. GTO is 13.3/4.8/170. Figure 300 pounds of add to her GAm with the swap, net weight loss for the drivetrain is 800 pounds ish. On paper her GAm should run 12.5s all day.

Her body tag is faded. Can someone with an 80 GAm post a pic of your body info tag showing weight? Im skeptical of the 3388 number but i know her GAm is the lightest of the G bodies.

She is going to smoke my Torino lol. Im trying for hi 12s....4500lbs ish...so low 13s prolly.

View attachment 223642

View attachment 223641
The weight on the GTO door tag is GVWR which is the Gross Vehicle Weight Rating. That takes into account maximum weight with passengers. In reality the 04-06 GTOs have curb weights between 3700 and 3800. The Grand Ams with air conditioning and bucket seats and other accessories end up within 100lbs of the newer GTOs.
 
  • Like
Reactions: Streetbu
Thanks Gnvair. Very important info.

Doh....

Looks like her Grand Am wont be 12mid-hi.

Changes my gear selection. I was thinking 5-600lbs lighter than the GTO after swap so a 3.00 would be about right. GTO uses a 3.46 to run 13.3s. If i go 3.00 thats hi 13s at +/-3800 llbs after drivetrain, frame adds, and 9 inch.

Even though itll lose some out of the hole, the 3.00 is more than enough to light the hides.

Frame boxing just became less important. But will do it anyway. If add power or gear later itll handle it.

Thanks again for pointing that out.

Screenshot_20230728-233142_Samsung Internet.jpg
 
Project creep.

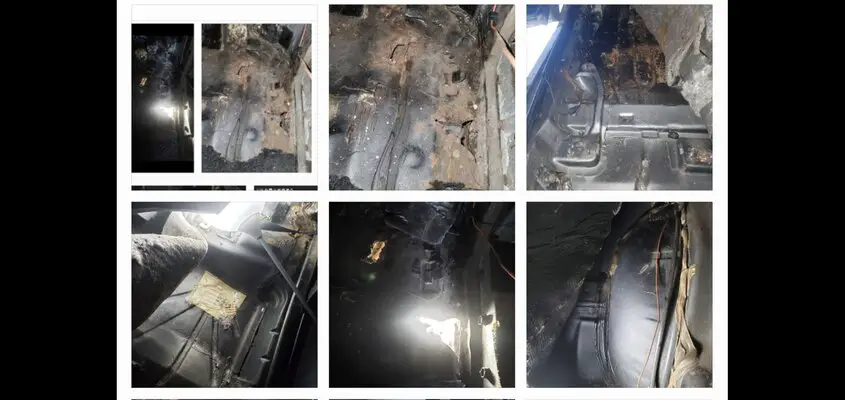
Drivers side floor pretty solid except right at the B pillar body mount area. Rust claimed the floor and the inner rocker. Also the 1/4 in front of the rear tire. I wont know how badly the body mount is rusted until body is off but it feels pretty bad.

There is some much less damaging rust on the passenger side.

Getting deeper than i wanted to go now. No choice but to move through it and finish assessment. Looks like a sectioning project.

Deck, rear bumper and some of interior pulled today.
 

Attachments

  • Screenshot_20230729-190700_Gallery.jpg
    Screenshot_20230729-190700_Gallery.jpg
    919.2 KB · Views: 72
  • Like
Reactions: Streetbu
Horror Stories indeed. I personally use POR15, into a project right now that it is being used on, and the major criteria for using it is that the metal surface is, to some degree, rusty. Not to the extent of having huge rusticles and pieces of plate rust falling off at the lightest touch but rust has to be present for the POR15 to bond to. That is not to say it won't bond to bare metal, but new metal has to be grease and oil free before it can be applied and get some degree of success and it won't go over a coating like EDP; nothing to bite into.

Since I am almost in a perennial death match with rust. how I personally generally go about working with POR15 is to use whatever methods work best to remove as much overburden as possible. Then I use a wire wheel or coarse stripping wheel to get down to bare metal. The pits and acne can be too deep so some judgement has to occur on how far to go with the surface prep. Then I apply a layer of Rust Mort, which is a rust neutralizer. You can tell if it has worked when the metal turns black/grey in areas where some rust has remained. Too much surface rust and it won't change color so that tells you more metal prep is necessary. Just did the rad cradle in my S-10, posted elsewhere, and it took multiple passes with an air drill fitted with various wire wheels to dig into the crevices and seams and get them willing to accept the MORT.

After that came a coat of the POR15 and another will get applied tomorrow. They do get along, as one is a neutralizer and the other is an encapsulator. The difference being that encapsulation does not eat the rust out or kill it, it only isolates the rust from accessing the oxygen it needs to keep the process of oxidation going.

For myself, the final layer will be a couple of coats of Flat Black Krylon Anti-Rust. POR15 is U-V sensitive and even when cured is soft enough to be damaged by abrasion. So it gets a top coat of paint as a defense against damage. Why Krylon? Location, location, location. The rad cradle is mostly buried behind the grille, bumper and lower fascia. The factory color was black, so back to black it shall go.

If you do go the POR15 route, follow the instructions and either use clothes about to be tossed out and burnt, or hit the big box hardware store and get a cheap pair of painter's tyvek coveralls. Do be aware that POR15 can soak through cloth and coverings if they get soaked or you lay in the stuff by accident. Beware the fine print on the can, once POR15 dries on skin, no regular method of removal will take it off. Only two methods that will work are time, and sandpaper (or a 4.5 mini grinder) Not even greasy chicken fat, which will remove almost everything, will make much of dent in the stuff. There is a solvent sold as a thinner for if you want to gun shoot the stuff but have never really worked with it so can't say.


Nick
 
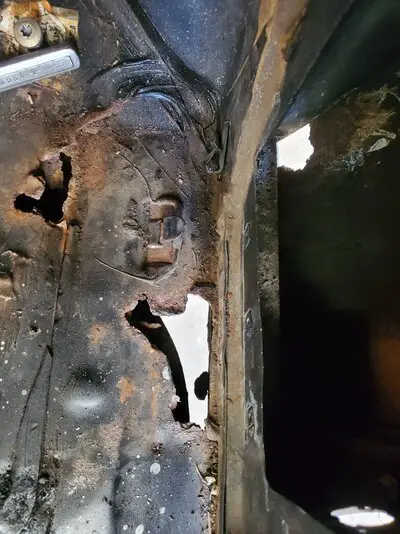
Exploratory screwdriver surgery followed up with a hammer. It could be worse. So far im looking at fabing up patch panels, the cancer didnt spread much and the areas around the holes in the floor are solid.

The 1/4 has a thin layer of bondo. Rust goes into the lower rear wheel lip. So far it looks like a 6x6inch patch.

The inner has a halfdollar sized weak area.

The question is the body mount. Cant see it. That is a biggie. So far i can handle what ive found. That body mount area and its replacement is an unknown to me.

Rust sucks. But its 43 so for how old it is im ok so far
 

Attachments

  • 20230730_114908.jpg
    20230730_114908.jpg
    1.8 MB · Views: 82
  • 20230730_122009.jpg
    20230730_122009.jpg
    1.5 MB · Views: 88
Thanks for the info guys.

Ive been seriously considering a turbine paint unit. Practicing on the frame and now the underbody is a very appealing thought.

Primer and painted...rust prevention too, but im not sure which application ill go with. But spraying is probably going to happen.

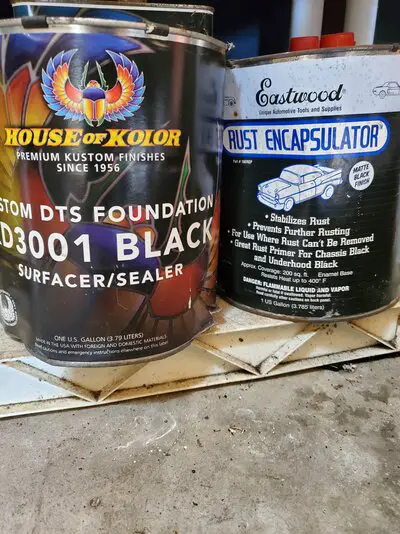
The old Eastwood rust encapsulator formulation was good stuff. I did my weak Torino rear floor pan about 15 years ago with it. It added strength to it where i had pinholes. I used the newer stuff on my cowl and could tell a major difference. They changed it and not for the better. But i kept an unopened gallon of the old stuff....assuming when i pop the lid it isnt rock thats what ill use in the bad spots and as a preventative along the body's perimeter/known gbody weak spots.

The rest of the pans on her pontiac appear to be solid. A few question areas but for the most part good. So im thinking the old school eastwood on the perimeter and something else inboard. Then primer all of it and paint the entire underside body black.

Still exploring it....once the body is off ill figure out a plan.

Plus i have 2 gallons of HOK primer with reducers and activators that have been on the shelf for 5+ years when i was going to attempt the paint job on the Torino. My plan was to use this on the frame. Now itll be underbody too.

The frame is going to be painted silver. Bolt ons a mixture of black and red. Underbody black.

Laying down practice coats on the frame/underbody is a penalty free way to figure out that turbine system for later.

Project creep...
 

Attachments

  • 20230730_123956.jpg
    20230730_123956.jpg
    2 MB · Views: 64
Status
Not open for further replies.

GBodyForum is a participant in the Amazon Services LLC Associates Program, an affiliate advertising program designed to provide a means for sites to earn advertising fees by advertising and linking to amazon.com. Amazon, the Amazon logo, AmazonSupply, and the AmazonSupply logo are trademarks of Amazon.com, Inc. or its affiliates.

Please support GBodyForum Sponsors

Classic Truck Consoles Dixie Restoration Depot UMI Performance

Contact [email protected] for info on becoming a sponsor