Ah, thanks man! I appreciate ya thinking of me. What I used is a stock replacement 1600-1800 rpm "Corvette" converter. I think it's a Dacco and it either came from A & Red's or The Torque Shop years ago. I was using it in a '77 C10 and broke the trans case by using the rotten stock engine mounts with a new poly trans mount.I was in process to send you a better TQ, but figured trans would be in by then.
BUILD THREAD Sweet Johnny & Gina: A Love "Two Large" To Fail
- Thread starter Sweet_Johnny
- Start date
You are using an out of date browser. It may not display this or other websites correctly.
You should upgrade or use an alternative browser.
You should upgrade or use an alternative browser.
Sorry this update is a little behind, there's not enough hours in the day! Sadly, I don't have any pics of the completed install but I'll be sure to post some soon. I think you're all familiar with what R&R-ing a transmission is like but have you ever tried doing it one handed? Me neither, until now. While help was offered, I elected to fly this mission solo for multiple reasons and I learned a few things about what I can and cannot do anymore. So the task might've taken a bit longer than it should have but I got 'er done before I had to go back to work today, and even had time to drive for groceries before hanging it up last night.
Removing the th350 from Karma began with getting her up in the air and level. That required adding a few blocks of wood, stands, and utilizing multiple jacks, and the end result was essentially an El Camino with a 20" lift. Following that was the typical struggle to remove the headers, etc. before finally separating the desired gearbox from the engine that once made its world go 'round. But wait... I could take all the spark plugs out to make it possible to turn the engine by hand or I could use the starter to make it easier: too bad it was stuck engaged with the flex plate and I couldn't get it free with a screwdriver or pry bar to save my life. So I borrowed Gina's battery, rerouted a previously poorly executed ground strap on Karma, and bumped the key to place the TC bolts where I could get to them after I loosened and reattached the starter to free the drive gear. There were many trips to the tool box and I always seemed to be on the opposite side of the car compared to the tool I needed, but the underside of this car is clean save for some rust so things went fairly smooth as I pillaged. Access to the top bellhousing bolts was difficult from below due to the poly trans mount adding a bit of height but I got what I wanted, cleaned up, and that concluded Monday evening.
Tuesday was absolutely non productive. It started with P.T. and that combined with the prior day's activities relegated me to a recliner all day and I was NOT happy about it. On Wednesday I swung by Harbor Freight after more P.T. and commenced putting another G Body up in the air now that I had a way to keep it there. I really should have taken a picture but it'll be in the same place again soon.
You'd think doing the same job on another G would be a nearly identical task, however, with one being 100% bone stock and the other being a modified setup things were quite different. Mostly the fasteners, how badly they wished to stay attached, and how much sand, dirt, and rust fell into my eyes as I worked. Luckily, I bought some power tools last year as well as a myriad of extensions, wobbles, and other nifty things to aid in the removal process. I also had to call on Coleman for a little thermal persuasion to get the darn TC bolts out. The propane torch loosened things quickly but I had a mild panic attack as an errant flame singed the carpet peeking out at me through the floor pan. One quick huff 'n' puff extinguished the tiny ember immediately and we were back on track. I struggled with 1 of the bellhousing bolts (top left) and it took everything I had to not mess up the fittings for the cooler lines but again I managed to accomplish my goal without breaking anything or making a gigantic mess. I did shout every expletive in the book and came up with a few new ones though. This time all the tools stayed on the floor instead of being put away, but I did drag the 350 under the Cutlass on a piece of carpet before resting it atop my transmission jack so I could hit the ground creepin' on Thursday.
When I removed this metric guy:
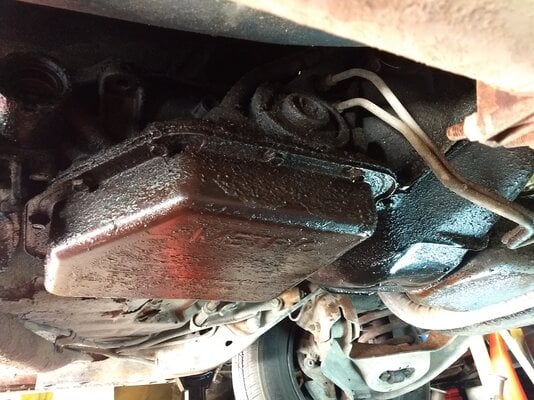
these things fell out:
Putting things back together was a bit less frustrating because while I had the access I took the opportunity to spray some oven cleaner on the trans tunnel before wiping and rinsing it with a spray bottle of water. It didn't come close to getting rid of everything but it did make a major improvement on the overall cleanliness under the car and therefore meant less debris in my eyes. I blew out the cooler lines, flushed the converter I intended to use, and set about marrying the th350 to the stock 305. You might not have noticed in the picture I posted before but the 350 is wearing a Summit deep cast aluminum pan with a drain plug that's oh-so-handy, and a shift kit resides inside. Any other mods are unknown to me.
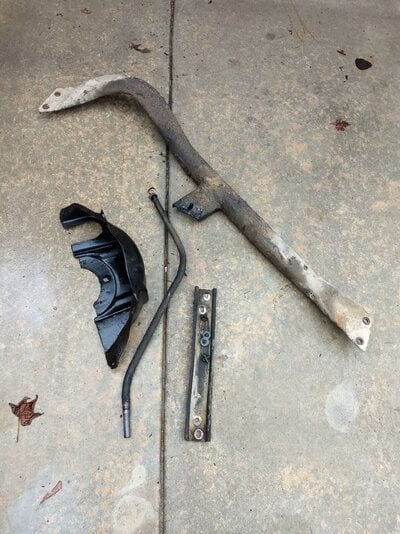
I also took these from the El Camino, and them already being clean sped up the installation process:
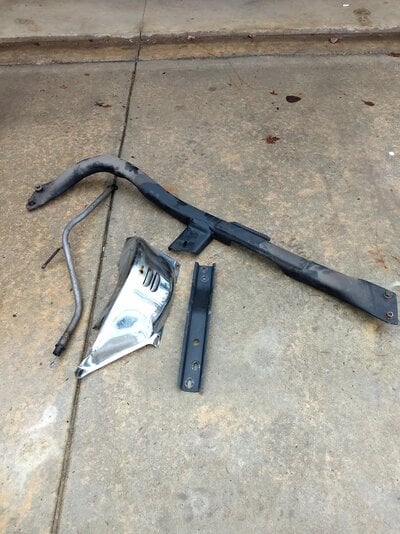
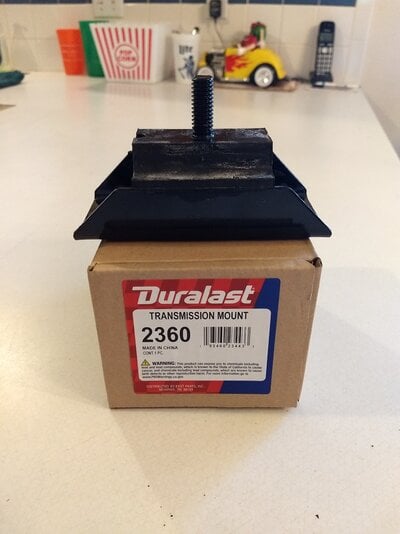
The crossmember was modified by the previous owner by cutting it with a torch and adding rebar for support- it was about as stable as an old diving board. When I swapped engines I widened the opening and added bar stock inside and out before demanding more clearance on the passenger side as well, and I achieved that by making some cuts and using a mini sledge before welding it back solid. Looking back I should have modified it "in car" by using a bottle jack, but I've had nearly 20 years to think about it now. Since Gina's engine is still rocking rubber mounts I bought a new one for the trans.
The chrome inspection cover needed trimmed to stop making contact with the crank as it spun so it was installed numerous times while I inched my way to clearance. After checking everything off my list I reinstalled the driveshaft, complete with the factory u-joints. Don't judge me, it's on the other list. Ya know, the long list.
Wouldn't ya know it? I overfilled the trans a little so I loosened the plug to drain some out and I saw a bit of glitter. That shiny sh*t had to have come from the cooler not being flushed but merely blown out, as that transmission had just relieved itself of pristine fluid. So I drained out 3 more quarts since that's how much fresh AC Delco Full Synthetic I had left after filling it the first time. I thought about it and I still wasn't happy so I secured 2 more gallons of conventional Valvoline D/M and did it again. I also changed the motor oil since I was on a roll and used a Mobile 1 filter this time just for fun.
Finally, I got to test drive my work to see if it was roadworthy and everything went perfectly which made me nervous. I mean it was perfect- the governor weights, the speedo gear, even the fluid level. I quadruple checked the whole car from top to bottom and all was well. The situation has remained the same since, and I'm loving the new gear spread compared to before.
Removing the th350 from Karma began with getting her up in the air and level. That required adding a few blocks of wood, stands, and utilizing multiple jacks, and the end result was essentially an El Camino with a 20" lift. Following that was the typical struggle to remove the headers, etc. before finally separating the desired gearbox from the engine that once made its world go 'round. But wait... I could take all the spark plugs out to make it possible to turn the engine by hand or I could use the starter to make it easier: too bad it was stuck engaged with the flex plate and I couldn't get it free with a screwdriver or pry bar to save my life. So I borrowed Gina's battery, rerouted a previously poorly executed ground strap on Karma, and bumped the key to place the TC bolts where I could get to them after I loosened and reattached the starter to free the drive gear. There were many trips to the tool box and I always seemed to be on the opposite side of the car compared to the tool I needed, but the underside of this car is clean save for some rust so things went fairly smooth as I pillaged. Access to the top bellhousing bolts was difficult from below due to the poly trans mount adding a bit of height but I got what I wanted, cleaned up, and that concluded Monday evening.
Tuesday was absolutely non productive. It started with P.T. and that combined with the prior day's activities relegated me to a recliner all day and I was NOT happy about it. On Wednesday I swung by Harbor Freight after more P.T. and commenced putting another G Body up in the air now that I had a way to keep it there. I really should have taken a picture but it'll be in the same place again soon.
You'd think doing the same job on another G would be a nearly identical task, however, with one being 100% bone stock and the other being a modified setup things were quite different. Mostly the fasteners, how badly they wished to stay attached, and how much sand, dirt, and rust fell into my eyes as I worked. Luckily, I bought some power tools last year as well as a myriad of extensions, wobbles, and other nifty things to aid in the removal process. I also had to call on Coleman for a little thermal persuasion to get the darn TC bolts out. The propane torch loosened things quickly but I had a mild panic attack as an errant flame singed the carpet peeking out at me through the floor pan. One quick huff 'n' puff extinguished the tiny ember immediately and we were back on track. I struggled with 1 of the bellhousing bolts (top left) and it took everything I had to not mess up the fittings for the cooler lines but again I managed to accomplish my goal without breaking anything or making a gigantic mess. I did shout every expletive in the book and came up with a few new ones though. This time all the tools stayed on the floor instead of being put away, but I did drag the 350 under the Cutlass on a piece of carpet before resting it atop my transmission jack so I could hit the ground creepin' on Thursday.
When I removed this metric guy:

these things fell out:

Putting things back together was a bit less frustrating because while I had the access I took the opportunity to spray some oven cleaner on the trans tunnel before wiping and rinsing it with a spray bottle of water. It didn't come close to getting rid of everything but it did make a major improvement on the overall cleanliness under the car and therefore meant less debris in my eyes. I blew out the cooler lines, flushed the converter I intended to use, and set about marrying the th350 to the stock 305. You might not have noticed in the picture I posted before but the 350 is wearing a Summit deep cast aluminum pan with a drain plug that's oh-so-handy, and a shift kit resides inside. Any other mods are unknown to me.
I also took these from the El Camino, and them already being clean sped up the installation process:

The crossmember was modified by the previous owner by cutting it with a torch and adding rebar for support- it was about as stable as an old diving board. When I swapped engines I widened the opening and added bar stock inside and out before demanding more clearance on the passenger side as well, and I achieved that by making some cuts and using a mini sledge before welding it back solid. Looking back I should have modified it "in car" by using a bottle jack, but I've had nearly 20 years to think about it now. Since Gina's engine is still rocking rubber mounts I bought a new one for the trans.

The chrome inspection cover needed trimmed to stop making contact with the crank as it spun so it was installed numerous times while I inched my way to clearance. After checking everything off my list I reinstalled the driveshaft, complete with the factory u-joints. Don't judge me, it's on the other list. Ya know, the long list.
Wouldn't ya know it? I overfilled the trans a little so I loosened the plug to drain some out and I saw a bit of glitter. That shiny sh*t had to have come from the cooler not being flushed but merely blown out, as that transmission had just relieved itself of pristine fluid. So I drained out 3 more quarts since that's how much fresh AC Delco Full Synthetic I had left after filling it the first time. I thought about it and I still wasn't happy so I secured 2 more gallons of conventional Valvoline D/M and did it again. I also changed the motor oil since I was on a roll and used a Mobile 1 filter this time just for fun.
Finally, I got to test drive my work to see if it was roadworthy and everything went perfectly which made me nervous. I mean it was perfect- the governor weights, the speedo gear, even the fluid level. I quadruple checked the whole car from top to bottom and all was well. The situation has remained the same since, and I'm loving the new gear spread compared to before.
It's not car related but I feel like I should clarify something just so there's no confusion: the issue regarding the use of my left arm is not 100% permanent, at least I hope not. In addition to the aforementioned misplaced rib my labrum is severely torn and will likely require surgery to repair and 6 weeks in a sling. My new permanent limitations are caused by my C3 - C6 and L4/5 vertebrae being blown out, S.I. joints being toast, and spinal stenosis that has caused radiculopathy. The arthritis is just a bonus. Supporting the weight of my fat head while straining to loosen or tighten bolts from a creeper now effects me for days, as many things do. I'll repeatedly be getting cervical epidural steroid shots in my neck, radio frequency ablation to burn nerve tissue in my back, and I'm hoping to avoid a laminectomy. But I ain't dead yet.
Again, sorry for getting personal but I thought it was important to be clear so people don't get the wrong idea. With that said, the weather forecast is promising so I'm looking forward to being productive again this week when I'm free.
Again, sorry for getting personal but I thought it was important to be clear so people don't get the wrong idea. With that said, the weather forecast is promising so I'm looking forward to being productive again this week when I'm free.
I was cleaning and painting a few things in the garage and that led to me taking the front sway bar end links from my El Camino to see if they were worth saving- the ones on the Cutlass have been flopping around since before I purchased it, as indicated by the mounting holes in control arms being wallered out. For the last 6 months you could hear me coming from a mile away as my end link washers rang like little bells with every tiny bump. It's been many years since I first installed the links in the Camino and I only drove a few hundred miles before parking it, so theoretically they were still good. With a little cleaning I turned what's on the left into what you see on the right in the following photo.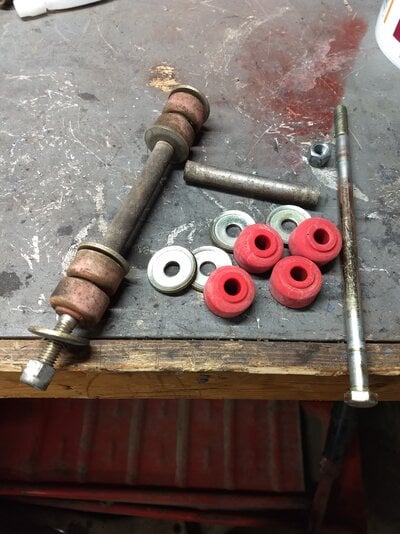
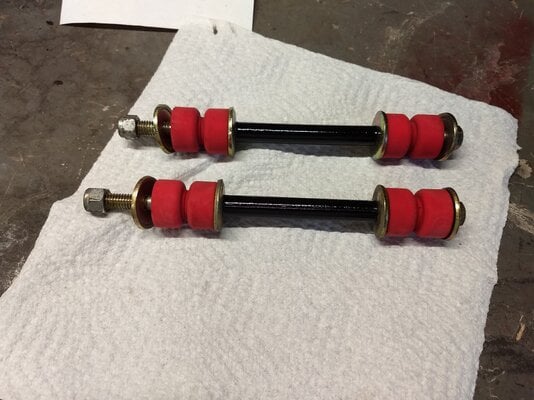
After that I lightly scrubbed the metal sleeves with Scotch Brite and alcohol before squirting them with primer and topping them off with black engine enamel, then applied heat along with some chemicals to try and rejuvenate the polyurethane. Here's what I was left with after very little effort, and I'm glad I didn't simply go buy new ones- these work perfectly.
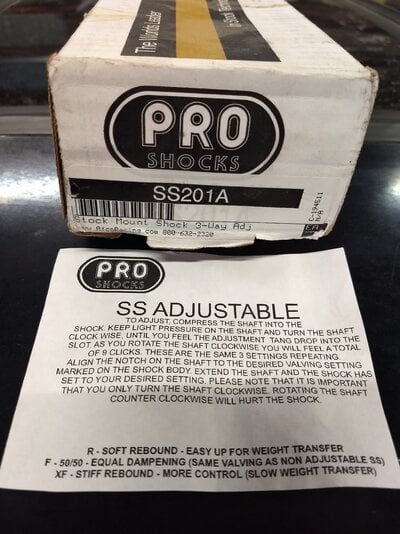
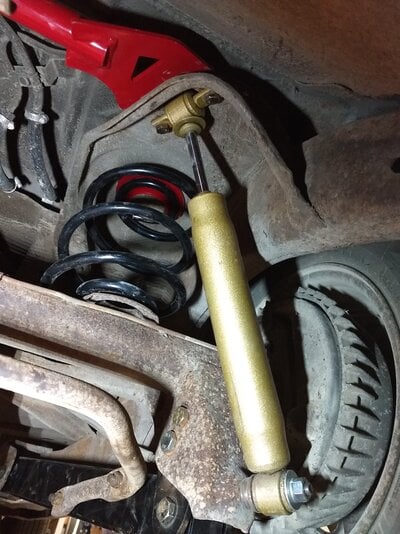
Since I had Gina up in the air I figured it was a good time to swap the rear springs to the 130# (5401) units I had in the El Camino, and paired them with new Energy Suspension polyurethane spring isolators (3.6108R). I also relieved Karma of her Pro Shocks (Afco SS201A) 3 way adjustable rear shocks which seem to still be good, and stuffed them into the Cutlass along with a shock tower brace from UMI. This required removal of a factory exhaust bracket, and that meant using a 17 mm wrench to turn a 13 mm Astro socket in very cramped quarters.
Things were cooking along nicely and I was in the spirit so I decided to go ahead and mount the Lakewood Lift Bars with their corresponding brackets, and that entailed drilling a 1/2" hole in each to securely mount them after mocking things up and verifying pinion angle. The pinion angle should be at 4-6° so after loading the suspension I used a super fancy magnetic based angle finder from Harbor Freight and was able to add 2 + 2 and see a total of 4°. After final assembly the lower control arms aim up at a 5° angle towards the nose but it's important to note that pinion angle and LCA angle are not the same thing.
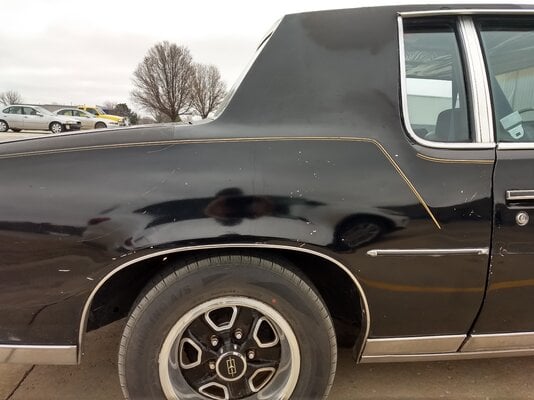
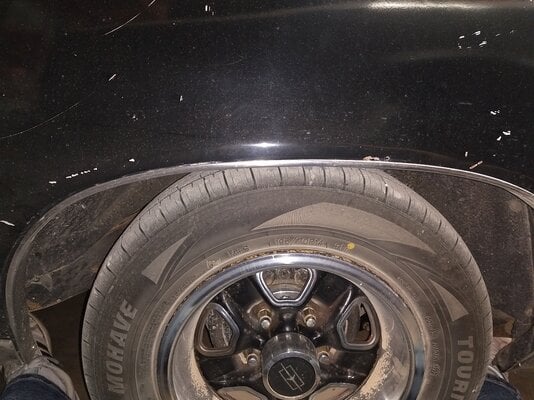
I'm not a huge fan of the factory rear sway bar since it introduces loads of bind, especially in conjunction with the poly mounts in the Lakewood bars but I put it back in with the spacers provided anyway. The bar will definitely get changed to a Spohn Touring 22 mm and the springs need tweaked because the right side sits 3/8 - 1/2" lower than the left- I believe a slight twist to reposition it will work. The entire rear easily sits a solid 1" lower than stock due to the shorter free height of the springs, but it's not far from where the saggy springs had been riding. I don't think the factory 142# units are completely shot but they feel more like 120# at this point.
Before / After

After that I lightly scrubbed the metal sleeves with Scotch Brite and alcohol before squirting them with primer and topping them off with black engine enamel, then applied heat along with some chemicals to try and rejuvenate the polyurethane. Here's what I was left with after very little effort, and I'm glad I didn't simply go buy new ones- these work perfectly.

Since I had Gina up in the air I figured it was a good time to swap the rear springs to the 130# (5401) units I had in the El Camino, and paired them with new Energy Suspension polyurethane spring isolators (3.6108R). I also relieved Karma of her Pro Shocks (Afco SS201A) 3 way adjustable rear shocks which seem to still be good, and stuffed them into the Cutlass along with a shock tower brace from UMI. This required removal of a factory exhaust bracket, and that meant using a 17 mm wrench to turn a 13 mm Astro socket in very cramped quarters.

Things were cooking along nicely and I was in the spirit so I decided to go ahead and mount the Lakewood Lift Bars with their corresponding brackets, and that entailed drilling a 1/2" hole in each to securely mount them after mocking things up and verifying pinion angle. The pinion angle should be at 4-6° so after loading the suspension I used a super fancy magnetic based angle finder from Harbor Freight and was able to add 2 + 2 and see a total of 4°. After final assembly the lower control arms aim up at a 5° angle towards the nose but it's important to note that pinion angle and LCA angle are not the same thing.
I'm not a huge fan of the factory rear sway bar since it introduces loads of bind, especially in conjunction with the poly mounts in the Lakewood bars but I put it back in with the spacers provided anyway. The bar will definitely get changed to a Spohn Touring 22 mm and the springs need tweaked because the right side sits 3/8 - 1/2" lower than the left- I believe a slight twist to reposition it will work. The entire rear easily sits a solid 1" lower than stock due to the shorter free height of the springs, but it's not far from where the saggy springs had been riding. I don't think the factory 142# units are completely shot but they feel more like 120# at this point.


Before / After
Last edited:
On Sunday I had a little trouble getting the engine to fire after work but chalked it up to the weather and the leaky valve seals. I probably shouldn't have considering that it wasn't the first time, but I drove home without incident just like any other evening and pulled up to the garage before placing the shifter in Park and stepping out to unlock the doors. Just as I finished raising the garage door I heard the engine stall out, and nothing else. Not a thing. I repeatedly tried to start the engine again but it just wouldn't come to life, and it didn't sound right at all: the exhaust tone and cadence was wrong and the compression sounded "off" as well. After pulling the air cleaner housing I saw a wet carburetor so I stared at that while turning the key and was rewarded with a fountain show second only to the Bellagio Hotel. Interesting.
I then enlisted help to engage the starter while I peered into the carb to try and determine if the gas was being forced upwards by air or was merely the result of a sunken float, bad gaskets, and the pump was squirting it out of every orifice. This would also serve as an attempt to narrow down an exact source. Apparently I was looking from the wrong angle which only resulted in gasoline coated eyeballs. I did see heavy fuel vapor coming from the accelerator pump discharge holes after the fact though, and this was repeated with each attempt. Still perplexed but not wanting to start a fire I called it a night so things could air out. I did just finish a 12 hour chit show at work after all...
Monday was a lost day. Tuesday I once again tried start the car as normal and again it seemed like it wanted to, got real close, but never did. I pulled the passenger valve cover off to see what the valvetrain was up to and thought perhaps I'd find a broken valve spring, stuck valve, or a stud that backed out but saw nothing. I then systematically checked the cranking compression of all 8 cylinders and found them to vary by about 30 psi (140-170). While doing this I was unable to watch the rockers as I cranked but knew they were moving due to checking their position before and after cranking. With all of the spark plugs out I could clearly see that they were fouled (duh) but not just with gas- there was oil present from the bad valve seals. That's fine, but the burn patterns weren't the same and only 2 cylinders had plugs that looked good to me. I cleaned them all.
This is where it gets more interesting. As I continued to check things the symptoms commenced changing slightly: my fountain show got smaller, the exhaust got much quieter, and the engine cranked easier. This happened even after I reinstalled the plugs and wires. Were my lifters collapsing? Cam going flat? Pushrods turning to pretzels?
Knowing that I had air/fuel and compression I suspected that I was now lacking spark, which I certainly had earlier because I heard combustion in the tailpipe. Ignition is something I thought I'd covered previously by changing the plugs, wires, cap, rotor, and applying fresh thermal grease to the module so this problem was unexpected and still wouldn't explain my fountain. I removed my pretty blue distributor cap and used a mirror to watch the rotor spin while I electrified the starter, only to be severely disheartened when it remained stationary. I then used the same mirror to watch all of the rockers not rock at all, and it was clear that was the day the music died.
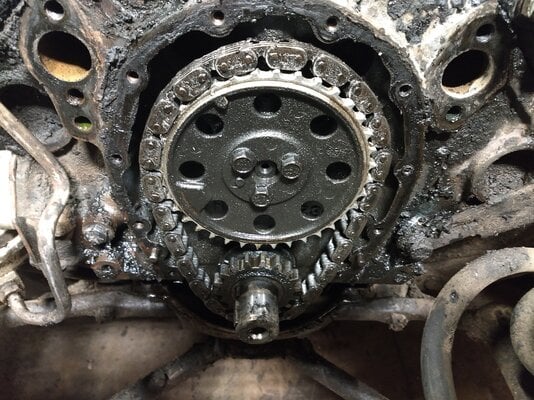
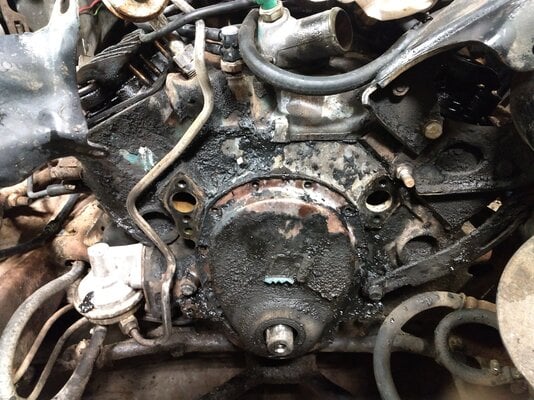
I have concluded that my initial hard start and rough idle was due to the timing chain stripping a plastic tooth off of the factory gear set. The chain then continued to rip teeth off as I cranked the engine all afternoon until we reached a point where the cam gear simply won't turn anymore. Great.
This is the current status:

That's some good luck to make it home like that. At least you have an excuse to stab a hotter cam in there!
I can't even believe my luck on that one. Every other time stuff like this happens I'm far from home and the weather is terrible. I couldn't have picked a better place for it to die.That's some good luck to make it home like that. At least you have an excuse to stab a hotter cam in there!
376450What's your head casting number?
GBodyForum is a participant in the Amazon Services LLC Associates Program, an affiliate advertising program designed to provide a means for sites to earn advertising fees by advertising and linking to amazon.com. Amazon, the Amazon logo, AmazonSupply, and the AmazonSupply logo are trademarks of Amazon.com, Inc. or its affiliates.


