Water Pump top inlet versus Throttle body clearance

Status
Not open for further replies.
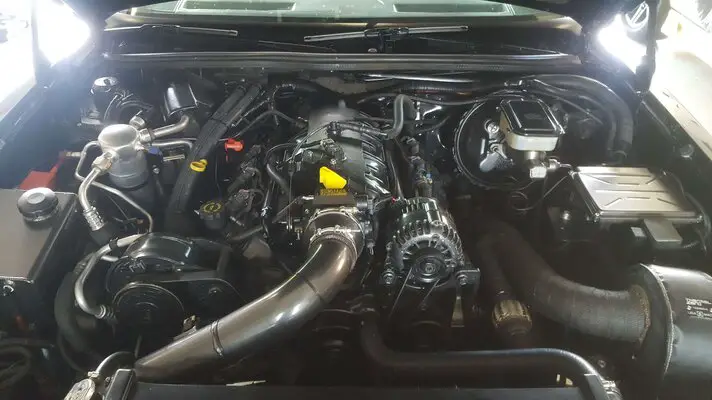
I have seen people just put a dent in the water neck on the pump and cut off a little of the channel on the throttle body and it clears.

If you do use the pickup/suv pump a 3.8 v6 upper rad hose works great if you cut a bit off each end and run a dual pass rad. I prefer it over the options that have the hose zig-zag across to the drivers side.
1662641422530.png
 
GM got a little blurry with their nomenclature at the start so some motors got called Vortecs even though they sure look like LS's. Mine decodes as an LS2 motor, LS6 Intake. Motor came from an 02 Avalanche. 5.3. Newer Pump is from an 06. This pump physically matches the pump that came with the motor as delivered. I need about a 1/4 inch of room to allow the throttle lever to come and go. A flat spacer would be simplest; next simplest would be one with some angle built into it to move the throttle body over a bit, after that it would be me with a machinists hammer, turning that curve into a flat face. Costliest would be a car pump from a Camaro or ? That would have to be brand new as they NEVER show up in local yards'; the insurance companies get them shipped down east for auction right quick now. My yard guy is smart but even he isn't into the quirks and idiosyncracies of the various LS versions. Might be able to score on E-Bay but the budget for that has moths chewing on the purse right now.

Sorry, no pictures of all this as yet, too much dust in the air from the welding and grinding getting done on the passenger's door for my Monte. Besides, I don't have three hands and would need to have at least that few to both hold the pump in place and take the shots.

And the picture above tells all. The throttle body is totally in the clear because the water pump inlet comes out straight instead of pointing up. Can't see spacing the pump as that throws the belt out of alignment unless everything else gets a spacer as well. You wouldn't happen to have a few more shots like that would you?? Great visual reference material, nice and clean and crisp.


Nick
Had the same issue with my swap. I know it's the more expensive route, but I used a 2010 Camaro water pump, same spacing as truck accessories. It also brings the water inlet/outlet to the drivers side, the rad hose looks a little better as well. Here's a pic
 

Attachments

  • 20220524_145604.jpg
    20220524_145604.jpg
    830.6 KB · Views: 135
And, in that picture posted just above this thread, is my answer to my problem. Ostrich, Dude, THANKS LARGE for not only giving me an option here but identifying the source for the part you used!!

Pure curiousity here on my part but what version/source of the LS did you go with for your swap?

Now all I have to do is beat an insurance adjuster to the wreck of a -10 Camaro and bogart the water pump before the hulk gets sent to Toronto for auction. Wonder if my yard can import one from elsewhere; probably'd want to sell it to me new.


The donor vehicle was definitely an 02, and yes it was a truck, they are the only versions that tend to appear in the local yards, and the mill decodes as a 5.3 so, if my choice of LS version was wrong, well, that's on me for trying to cuddle up to one of these metro/alphabet horror stories in the first place.


(Total aside here.............now where did I put that ball pein hammer..............)
 
Last edited:
I'm thinking he has all truck stuff and even then what's out there now, factory stuff works.

This is the fix.

View attachment 206461


I like that 2007-2013 version from a Sierra 1500 from Parts Geek, it has the top neck canted off to the side, which is interesting. Another option did get posted below which I also like because it satisfies a possible restriction on height above the motor that I may end up having to deal with no matter which candidate gets it eventually.
 
You have a parts mismatch of some type. Built6spdMCSS is a better source than my hackery recommendations. Looking at your pic definitely makes the truck accessory and ugly intake look easier.
Yep, would have been far easier to stay with the original intake and plumbing but didn't see any benefit to cutting a large hole in a perfectly good hood; apart from the ugly factor would allow snow to enter into the engine bay in the winter!
 
And, in that picture posted just above this thread, is my answer to my problem. Ostrich, Dude, THANKS LARGE for not only giving me an option here but identifying the source for the part you used!!

Pure curiousity here on my part but what version/source of the LS did you go with for your swap?

Now all I have to do is beat an insurance adjuster to the wreck of a -10 Camaro and bogart the water pump before the hulk gets sent to Toronto for auction. Wonder if my yard can import one from elsewhere; probably'd want to sell it to me new.


The donor vehicle was definitely an 02, and yes it was a truck, they are the only versions that tend to appear in the local yards, and the mill decodes as a 5.3 so, if my choice of LS version was wrong, well, that's on me for trying to cuddle up to one of these metro/alphabet horror stories in the first place.


(Total aside here.............now where did I put that ball pein hammer..............)
Coppernick, I did a 5.3L (2004) from a truck, nothing real special on that side of things. It has a turbo (76mm), I did a C6 ZO6 cam, and TBSS intake (I got from a buddy). I filled the 'egg crate' design on top of the intake with structural body adhesive, sanded & painted it smooth for a nicer look compared to the truck intake. I think you're fine with your choice, they don't have the upgraded rods (mine doesn't either), but I think things will be fine. As you proceed let me know if I can help.
 
  • Like
Reactions: Rktpwrd
Pulley is still the same. It's the angle and location of this outlet tube. Doesn't hit the throttle body if using a car intake with the truck accessories.

Smaller pulley would be spinning faster.. 😉

Another reason why I want to see exactly what he has.

View attachment 206462
I should’ve asked if the crank pulley is the same size. I assumed it wasn’t due tonight thought the pulley in Nick’s picture was larger. If they are the same size, then I guess I had my beer goggles on.

Haha
 
Just priced the two options for a water pump that will fit and the Camaro sells locally for 363.00 but only when it is available.

The sierra 1500 is only a paltry 275.00.

The idea of shaving the throttle shaft pulley is a nice one but what is actually doing the hitting is the pivot pin for the cruise control on the side of that V-sheave. Can't really cut it away and move it as that changes the tension on the cable which changes how the cruise control responds. Today has not been a good day for me.


Nick
 
And finally, in a response to an earlier request for pictures.................................................


DSCN3392.JPG


DSCN3393.JPG


So these are a pair of shots of the replacement pump that I had hoped to use on my Orpan LS project. This particular model is the truck version. and, clearly shown, the return pipe. At this point the test fit of this pump was already declared a failure and it has been removed from the front of the engine. The culprit is the return nipple because, sitting as it does at the 12 O'clock position, any attempt to move the V-sheave for throttle body butterfly actuator shaft causes the pivot pin for the cruise control to crash directly into the tube.


DSCN3394.JPG


This is my chosen alternative, the 2007-2013 Sierra 1500 version of the water pump. Instead of being located at 12 O'clock, the return tube is laid over and moved slightly to rest at around the 10.30-11.00 O'clock position. In that position, there is enough clearance room between the throttle body and the return that they can and do get along. There is a small nipple on the bottom of the throttle body that wants to come kissing close but I think with a little butane persuasion it can be deflected just enough to be able to put a hose or a block off cap on it.


DSCN3395.JPG


In this detail shot you can get a better perspective in regard to the desired relationship between the return nipple and the pivot pin for the cruise control. No touchy-no feely.


DSCN3396.JPG


And a second detail shot. This one shows the mounting bracketry on the LS-6 manifold for the throttle cable, cruise control cable, how they line up with the throttle body, and how the change in the location of the return line on the Sierra version pump puts everything into a place of its own with no arguments over location. The cute red caps are hydraulic block off items and are great for keeping debris and escaping fasteners from trying to hide.

The principal difference between this one and the F-Body version is that the return line on the F-Body is located at about the 2 O'clock position as seen from the front, and points straight out from the pump body.

The sierra version that is shown on my engine in these pictures is a "gently used" item from the shelves at my local yard. I was in the area and managed to dodge the rain drops long enough to wander into the counter sales room and ask if, per chance, Jr. had one on the shelf. He did, so I scored that one and will be returning the other one; straight swap, no shuck or jive. For those who might question the use of a previously owned part, it's ultimate fate will depend on my my budget. For now it is a place marker for the process of mocking up the front fascade. I still have to score the driver's side brackets for the alternator and the power steering pump and they may have to come from E-Gay at some point. As I noted previously, the price for a new Sierra version pump is over 3 Bills with the sales tax. The F-Body is closer to 4 !!!!

This Sierra version pump spins nice, not loose, not tight. The pump body needs to be wire brushed and cleaned. I already have new pump to block gaskets waiting for it as well as a new t-stat housing assembly. Apparently the neck and the stat are all one piece for these (Surprise, surprise, surprise!!!!) but the cost to me for a new one is actually quite reasonable. If it turns out that the mystery O-ring is actually a replacement for the existing corpse in the neck casting then I may just extract the old fogie and stuff in the new one; keep the new piece for final assembly. All the idlers on their brackets both bolt up and line up so that is a bonus.

So, and summarily, thanks to all who posted and offered their thoughts. The next step in this chain is to introduce the stock exhaust manifolds to my air driven die grinder for the purpose of shaving off all the casting flash that is left between the tubes. Getting that all cleaned out will make it easier to handle them and keep from getting slashed along the way.


Nick
 
Status
Not open for further replies.

GBodyForum is a participant in the Amazon Services LLC Associates Program, an affiliate advertising program designed to provide a means for sites to earn advertising fees by advertising and linking to amazon.com. Amazon, the Amazon logo, AmazonSupply, and the AmazonSupply logo are trademarks of Amazon.com, Inc. or its affiliates.

Please support GBodyForum Sponsors

Classic Truck Consoles Dixie Restoration Depot UMI Performance

Contact [email protected] for info on becoming a sponsor