EL CAMINO 1983 El Camino 5.3 Swap / Build Thread

JohnIL

Greasemonkey
Sep 9, 2020
131
310
63
Central Illinois
Progress continues. We've been steadily adding items to the punch list and marking them off.

  • The radiator is mounted permanently, the overflow tank is installed, the cooling lines are run, the electric fans are installed and partially wired. I'm waiting on a thermostatic controller to arrive.
  • The fuel pump wiring is done, but not yet tested.
  • Both of the factory battery trays (remember, this was a diesel) where completely rotted, so a shiny new tray has been installed with a shiny new battery. I'm waiting on battery cables and terminal distribution blocks to arrive so that all of this wiring can be connected to that shiny new battery.
  • A New throttle bracket and cable have been installed. This was a sizable pain in the neck because the cable I found didn't have an inch to spare. And, the factory G Body gas pedal had to be bent to allow the throttle to move from stop to stop. I think we got it all sorted.
  • The engine harness, ECM, and fuse box have been installed, with just a few loose wires left to tame. I'm looking for some help on what to do with the Brown alternator warning wire, the keyed 12V wire, and the brake switch wire. I have a separate thread about these wiring questions here: https://gbodyforum.com/threads/simple-ls-wiring-questions.83167/
  • Air tube and filter has been installed.
  • For his 16th birthday, my son received new wheels and tires for the El Camino. Thanks Mom! The new shoes give you an idea of the look we're going for.
I'm starting to get excited about the prospect of getting the 5.3L running. There are still some important items to finish, but the pre-startup punch list is getting much shorter.

And, now that we finally have some progress worth looking at, here are some pictures.
 

Attachments

  • ECMFuseBlockAndOverflowTank.jpg
    ECMFuseBlockAndOverflowTank.jpg
    129.3 KB · Views: 170
  • EngineDriverSide1.jpg
    EngineDriverSide1.jpg
    183.1 KB · Views: 173
  • EngineFront1.jpg
    EngineFront1.jpg
    188.2 KB · Views: 180
  • EnginePassengerSide1.jpg
    EnginePassengerSide1.jpg
    173.7 KB · Views: 183
  • NewShoes.jpg
    NewShoes.jpg
    165.1 KB · Views: 178
  • RadiatorAndFans.jpg
    RadiatorAndFans.jpg
    154.6 KB · Views: 177
Last edited:
  • Like
  • In Love
  • Love
Reactions: 3 users

JohnIL

Greasemonkey
Sep 9, 2020
131
310
63
Central Illinois
IT'S ALIVE!!!

The LS fired for the first time tonight and it was glorious!

With a little help from the experts here on the forum, we identified the last two wires needed to connect the engine wiring harness, the pink keyed 12V wire and the green brake signal wire. With this done, my son and I did some electrical testing. Power to the vehicle? Check. Power to the ECU? Check. Power to the fuel pump? Check. ODBII digital gauge? Check.

All that was left was to fill up all of the fluids and light the fuse. Unfortunately, the LS had other intentions. Before we headed out for the family Thanksgiving dinner, I poured in the motor oil, power steering fluid, and transmission fluid. All good, so far. Then, came the coolant. I pulled the upper radiator hose and poured a couple gallons of antifreeze into the block. Almost a gallon of it poured back out onto the garage floor through the front of the water pump. This was unexpected, but not very surprising. The LS has been sitting in the garage, completely dry for well over a year. The seals in the water pump were garbage. So, early this morning, I ran to the nearest O'Reilly's for a replacement water pump and more essential fluids.

Last night at Thanksgiving dinner, my son and I talked my farther into coming over today to hang out with us in the garage while we swapped the water pump. If you've been following this build thread, you already know that the my father bought this El Camino from his brother, drove it for a number of years, parked it for a number of years, then eventually gave it to my son. The last time Dad saw the car, the engine bay was empty and the LS was still sitting on a pallet on the garage floor. It was perfect timing for him to join us. The water pump replacement went pretty quickly and Dad pointed out that there was nothing left on the "punch list". My son cranked the engine to build some oil pressure. Then, we threw some gas in the tank, pressurized the fuel system and hit the key. The LS coughed once, then jumped to life. The sound of the open exhaust was so abrupt that my son immediately shut it down. Once his nerves settled (and mine, for that matter), he hit the key again and the engine fired right back up. We didn't run it for long, because there lots of details left to sort out, but we did start it, let it idle and shut it down half a dozen times.

It's amazing how easily modern engines start up. I'm used to working with old small block Chevy's with mechanical fuel pumps and carburetors. Electric fuel pumps and fuel injection could really spoil a guy. But, that's the whole point, isn't it?

Now, we have a whole new punch list. Next up is shifter linkage, drive shaft, vehicle accessory wiring (gauges, lights, heat, windows, locks, etc). We might even put the hood back on, maybe. At that point, it will be time to make an appointment at the exhaust shop and the alignment shop. With any luck, my son might actually be able to drive his car sometime this winter.
 
Last edited:
  • Like
  • Winner
Reactions: 8 users

JohnIL

Greasemonkey
Sep 9, 2020
131
310
63
Central Illinois
We've hit another milestone. Several milestones, actually.

While waiting for parts to arrive, we spent a week fixing the fiddly bits left over from sitting for 20 years.
  • Interior lights. Fuse was blown. Not sure why. With a new fuse, everything seemed to work correctly. We replaced the dome light incandescent bulb with an LED bulb. MUCH better. It's a lot brighter and a lot cooler. We've ordered LED replacement bulbs for the other interior lights. It's amazing how something small like this can modernize a 40 year old interior.
  • Replaced heater vacuum accumulator. We cracked the old one during the LS install.
  • Sorted and connected heater fan wiring and tested heater controls. Not sure why it was all disconnected. Once I sorted the wires, everything seems to work just fine.
  • New wiper blades. You can't imagine how dry rotted the old blades were. I would guess that my father hadn't changed them in at least five years before the car was parked.
  • New brake pedal pad. The original was showing every bit of the 130K miles that are on the chassis.
  • New rubber floor mats. My son bought these with an Oreilly's gift card he got for his birthday. The original floor mats were in decent condition, but they're nothing like the modern heavy duty liquid catching mats we use today. These should help preserve the factory carpeting for a few more decades.
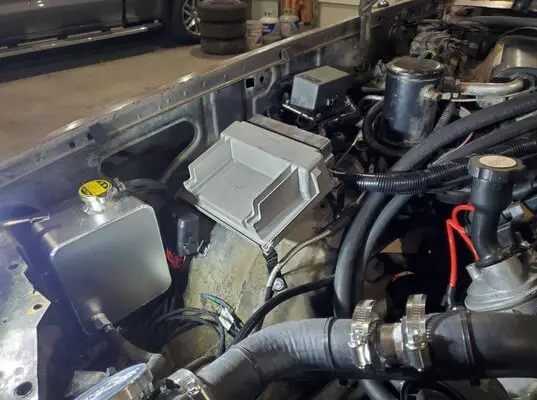
  • Installed a fuel evaporator purge solenoid delete plate. Since the LS emissions system stayed with the donor truck, the solenoid was just sitting there sticking up out of the top of the intake manifold anyway.
Then, we ran out of piddly things to fix. So, we declared Thursday night to be "hood night".
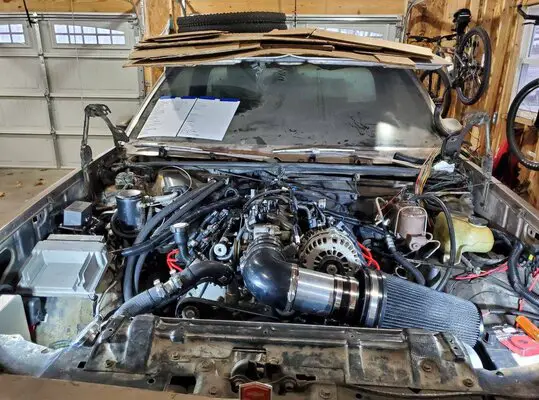
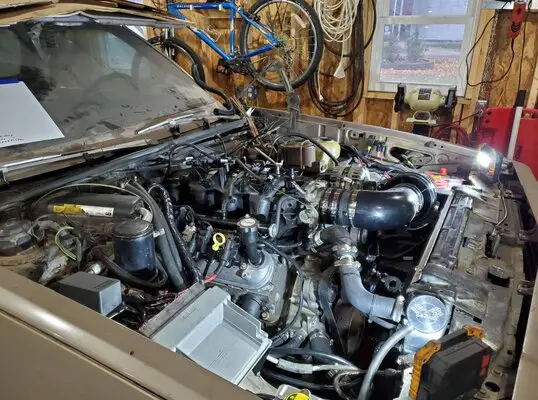
Hood Installation
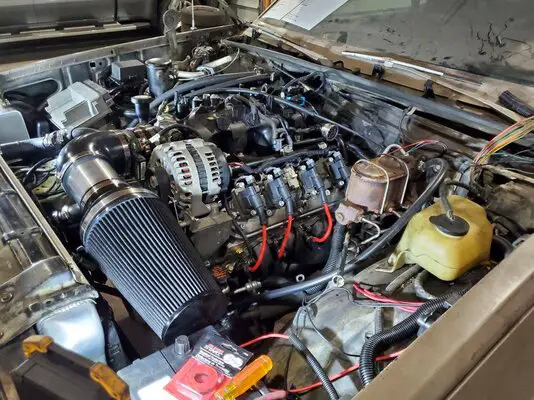
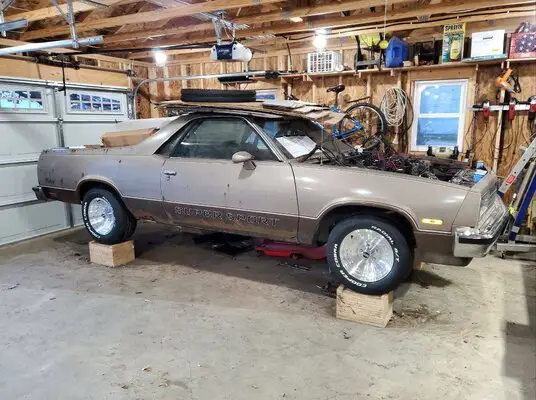
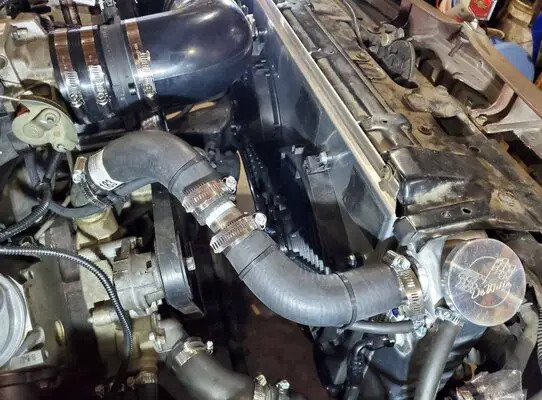
The factory hood is in amazingly good condition. It's been "stored" on the car's roof for almost two years, since we pulled the factory diesel engine. And, I've been avoiding reinstalling it because I've been afraid that it wouldn't clear the top of the LS intake manifold and front accessories. We bolted the hood back on the hinges, stuck a ball of modeling clay to the top of the highest point (the alternator), held our breath and carefully lowered the hood. As I feared, the ball of clay was smashed flat as the alternator made contact with one of the inner hood braces. But, it wasn't nearly as bad I thought it would be. The hood actually closed, but the alternator was pushing up slightly against that brace. So, out came the cutting wheel. I cut a 3" x 3" section out of the bottom surface of the brace. I left as much of the brace intact as possible. The alternator now has about an inch of headroom. As long as my son doesn't do any hood surfing (and he better not anyway!), it should be fine. This felt like a major milestone because the El Camino is beginning to look like a car (er truck?) again instead of a pile of neat looking parts. I had pretty much resigned myself that we would have to order a cowl induction hood for extra clearance. As cool as those hoods look, they're not cheap. We'll use that money for the new exhaust system. Win!

On Friday, we got back to the mechanical work. I picked up the newly shortened and rebalanced drive shaft from the machine shop and the big brown truck delivered the CPP column shifter linkage kit.

Transmission Shifter Linkage
We spent most of Friday evening fitting the shifter linkage. The CPP kit is almost identical to the Lokar kit, but much less expensive. It's a little bit like an Erector Set (if you're old enough to remember those). It comes with all of the bits you need to connect the factory column shifter to a modern 4L60E transmission, but it takes some bending, cutting, and imagination to make it all work correctly. By the end of the night, we had it all connected and dry fitted. On Saturday morning, I fine tuned the linkage and tightened everything up. The factory column gear indicator is accurate in Park, Reverse, Neutral, and Drive (now Overdrive). Below that, 3rd, 2nd, and 1st are inaccurate, but they are all selectable by feel.

Pinion Seal & Driveshaft
Now that we have control over what gear the transmission is in, it was time to connect it to the rear end. But, if you've been following along from the beginning of the build, you'll recall that I replaced the rear pinion seal early on to address a leak. The leak persisted. Stupid leak. So, I gave it another try. This time, I ran a bead of high-temp RTV around the outside of the seal in hopes that will keep it from seeping gear oil. Time will tell... With the new seal installed, the driveshaft went in. This was a another milestone. With the entire drivetrain connected, the car could theoretically be driven. Almost...

Brakes
For those of you who have been with us from the beginning, you'll remember that my father parked the El Camino 20 years ago because the brakes went out and he was tired of messing around with it. Early on in the build, we replaced the front brake calipers and the rear brake wheel cylinders. The rears were an absolute wreck. I can see why Dad gave up on them. With those parts replaced, the brakes were fresh, but we never bothered to bleed the air out of the lines, since we couldn't test the brakes anyway. So, I taught my son to bleed brakes. Bleeding brakes is a garage right of passage. I remember the day my father asked me to help him bleed brakes. I was probably 14ish years old. I was so proud that I was allowed to sit in the driver's seat and pump the brake pedal over, and over, and over, and over. Ah the memories... Anyway, after sitting for so long since we replaced the brakes, most of the air had worked it's way up to the master cylinder. Let's hear it for hydrodynamics! A couple of good burps at all four corners and the brakes were ready to go. It seemed somewhat poetic that the item that caused Dad to park the car all those years ago was the last item to check off the list before it could be driven again. The vehicular circle of life.

Actual Movement?
After sitting dormant for 20 years, it was finally time. There is, of course, a ton of work left to do on the car, but it was finally time to see if it could/would move under it's own power. Since it's his first car, I let my son do the honors. He started the engine with a mighty roar (no exhaust system yet), shifted the car into reverse, and nothing. Crap! I forgot to add transmission fluid after installing the drive shaft. Before the drive shaft, I added just enough fluid to make it dribble out of the tail housing. After adding three more quarts of ATF, we tried again. My son started the engine with another mighty roar (still no exhaust system), shifted the car into reverse, and I'll be darned if it didn't start backing out of the garage. It was clearly still low on ATF, but it was moving. After backing up about four feet, I asked my son to stop and pull it forward to verify that it the transmission worked both directions. It was at that point that the El Camino reminded us just how long it had been sitting. As he pulled the car back into its spot in the garage, a large puddle of brake fluid appeared on the concrete. The hard line from the portioning valve to the rear end burst and was spewing fluid all over the floor. Hydrodynamics revenge!

Brake lines
The hard line was no surprise. This original steel line ran right down the driver side frame rail, just below the largest rust hole in the floor pan. It's no wonder the line was rusted paper thin and burst. On the bright side, now we know that the hydroboost system and the master cylinder are in working order. On the downside, I was reminded how much I hate working on brake lines and double flare fittings. After a run to the auto parts store, I cobbled together a new hard line out of nickle copper line. That stuff is SO much better to work with than steel line. But, I still hate my crappy old cheap double flairing tool. I'm not 100% sure that the new flares will hold pressure. We'll find out when we go to rebleed the brakes later this week. If the new line doesn't hold, I'm going to order a new (and much better) double flairing tool and give it another try.

So, that's where we sit. The car moves, but it's resisting. 20 years of inactivity will do that. While I was under the car cussing at the brake line, I also discovered that one of the AN fittings on the fuel filter/regulator is weeping gas. Again, this really isn't a surprise. Those were some of the very first PTFE hose ends I ever assembled. Once I figure out which fitting is leaking, we'll give it another try. All in all, we're in a good place. A few more productive days in the garage and we'll be ready to make an appointment at the exhaust and alignment shops. Stay tuned...
 
Last edited:
  • Like
  • Winner
Reactions: 7 users

64nailhead

Goat Herder
Dec 1, 2014
5,704
1
12,209
113
Upstate NY
Wow - GREAT!!!

Please do your son a solid and replace EVERY brake line on the car.

Sounds like it’s close to a test drive though:banana:
 
  • Agree
Reactions: 1 users

JohnIL

Greasemonkey
Sep 9, 2020
131
310
63
Central Illinois
Wow - GREAT!!!

Please do your son a solid and replace EVERY brake line on the car.

Sounds like it’s close to a test drive though:banana:

64nailhead,
New brake lines are definitely on the to-do list. My plan is to replace the rotten part of the hardline (about four feet of steel line) for now. Then, we'll move forward with the rest of the shake down. After we get the exhaust and alignment done, we'll set aside a weekend and replace all of the brake lines. That will give me time to get all of the parts, tools, and materials together. Planned upgrades are fun. Emergency repairs suck!

John
 
  • Like
Reactions: 2 users

scoti

Royal Smart Person
Sep 5, 2019
1,975
3,397
113
Texas
Congrats on the milestone! Excellent progress (& a well told story btw).
 
  • Agree
Reactions: 1 user

JohnIL

Greasemonkey
Sep 9, 2020
131
310
63
Central Illinois
Congrats on the milestone! Excellent progress (& a well told story btw).

Thanks Scoti! I enjoy telling the story almost as much as I enjoy talking about the car. As far as I'm concerned, our cars and our stories are intertwined. That's the beauty of forums like this. We share each other's knowledge, but we also share each other's challenges and successes too. This place is one part technical resource and two parts group therapy!

John
 
  • Like
  • Agree
Reactions: 3 users

JohnIL

Greasemonkey
Sep 9, 2020
131
310
63
Central Illinois
More progress and a new problem to chase.

Brake Lines

I replaced all of the rubber flex lines with Russel DOT rated braided stainless steel lines. I was amazed at how reasonably priced they were. I bought them as a kit for just $20 more than the individual rubber lines from the local O'reilly counter.

I replaced the hard lines from the portioning valve to the front caliper flex lines and from the portioning valve back to the rear axle flex line with new NiCopp lines. I left the steel lines in place between the master cylinder and the portioning valve and between the rear axle flex line and the rear cylinders. I only left those in place because they are all rust free and the fittings turn freely on the lines. If they cause us any grief later, they're easy enough to replace, when the time comes.

The new hard lines were MUCH easier than I expected. I purchased new Titan double flair tools (links below) that made the flaring a breeze. This was also my first attempt at bending nickel copper lines. This was so much easier than bending steel lines. At this point, I don't know why anyone would torture themselves with steel brake lines ever again.


We now have working brakes!!!

Cooling Fans

Now that the car can be started an backed out of the garage, we were free to let the engine run for more than a few seconds without succumbing to the exhaust fumes. Once the engine warmed up, it was obvious that the electric cooling fans weren't working. So, we pulled it back inside the shut it down before the engine got too hot. We're using fans from Speedway Motors, fan relays (and wiring) from the company that built the engine harness, and a Flex-a-Lite thermostatic switch. Because these components were never meant to work together, some interpretation was required. To make things worse, the fan relays came with no documentation.

THREE HOURS of troubleshooting later, the problem was actually pretty simple. When I wired the thermostatic switch, I followed the Flex-a-lite wiring diagram, which assumed that the thermostatic switch would be powering the fan directly. But, in this case, the thermostatic switch is only triggering the fan relays. The part that I didn't know was that the fan relays were wired to be triggered by the ECU. They were expecting a ground trigger. I was feeding them a 12V trigger. Easy enough to fix, but I had to disassemble the relay wiring harness to figure out what the heck they were trying to accomplish. The wiring looked all wrong, but once I got my head around it, it makes sense, sort of.

The punchline to the whole fiasco is that the company that we bought the engine harness and the fan harness from forgot to integrate the fan wiring into the ECU. That's why we're using the Flex-a-Lite thermostatic switch in the first place! If you've been following along since the beginning, you'll remember that this company botched the harness wiring for the transmission too. I had to send the ECU and harness back to be redone. Before the harness was returned, the company went out of business and they outsourced the harness work to another shop. We're very close to getting the car on the road. I REALLY hope the transmission shifts OK. I have no idea if I could get a hold of the company if something else is wrong.

At this point, the El Camino starts, moves, stops, and doesn't overheat at idle.

Lighting Gremlins

The next order of business was to address a few lights that weren't working. Back when we first powered the car up for the first time a few weeks ago, we did a quick check of all of the lights. The headlights worked. The parking lights worked, but there were two that appeared to have bad bulbs. The turn signals and hazards flashed merrily. The backup lights were a no go. When we were installing the transmission shifter linkage, we discovered that the backup lights actually DO work, but the backup switch is out of adjustment. The lights only come on when the shifter is between Reverse and Neutral. No big deal. We'll address that later. I figured that the parking lights would need nothing more than a couple of replacement bulbs. Boy was I wrong!

I pulled the first bulb (right rear side marker). Burned filament. After replacing, it lit right up. While I was under the rear of the car, I discovered a suitcase connector on one of the taillight wires, left over from an old trailer hitch plug that is long gone. So, I removed the suitcase connector and patched up the wire. Then, I moved on to the other "burned out" bulb (front right parking/turn) light. This bulb wasn't actually burned out. I swapped the bulb, just to be sure. I got a faint glow with the new bulb. Interesting. When I tested the right turn signal, some very interesting things happened. Instead of blinking, the right turn signals stay on solid and (here's where it really gets weird), the fuel pump kicks on, even with the key turned off. Needless to say, I have some more electrical troubleshooting to do. I have a separate thread for this electrical problem here:

https://gbodyforum.com/threads/electrical-gremlins-lights-switches.83365/

If you are an 12V wizard, please read the thread and help me out. I'm WAY down the rabbit hole on this one.

Exhaust and Alignment

My son and I both have next week off so we've booked an appointment a week from today to get a custom dual exhaust bent and installed and for an alignment. After replacing a heavy diesel engine with a much lighter gas engine, changing the wheels and tires, and replacing a hand full of suspension equipment, an alignment is definitely in order. And, before my son puts any miles on the car, I want a professional to inspect the ball joints, steering rods, etc.

That gives us one week to sort out the electrical issues. I just hope we don't have to spend Christmas chasing wires!
 
Last edited:
  • Like
Reactions: 1 users

JohnIL

Greasemonkey
Sep 9, 2020
131
310
63
Central Illinois
More solutions, more problems...

Lighting Gremlins Evicted

Thanks to a lot of head scratching and some sound advice from forum members 64nailhead and g0thiac, I think I have the wiring problem solved. I think I actually had two problems, but it took a while to narrow it down to those two problems. Along the way, I installed a new headlight switch, a new ignition switch, and a new turn signal flasher. None of those new parts fixed either problem, but they were almost 40 years old and in need of replacement anyway. Eventually I (again with some expert help from the forum) found a front parking/turn signal light socket with a broken ground wire and, apparently, a dead short between the parking light and turn signal circuits. 64nailhead convinced me (and rightly so) to investigate the grounding point for the electric fuel pump behind the gas tank. I found that the ground was compromised by a thick coat of chassis paint from our underbody rust repair adventures. With that ground all shined up, everything appears to be working correctly.

While I was messing around with the lights, I swapped out the 1156 backup light bulbs, all of the 194 parking light bulbs, and the 194 license plate light bulb for LED equivalents. They're brighter and draw less power than the original incandescent bulbs. I wish we could swap out the 2057 parking/turning signal bulbs, but they don't play nice with the factory style flasher. And, quality dual-function 2057 LED equivalents are pricy little boogers. If anyone has done this conversion, I would be interested to hear your story. At some point, we plan to swap out the headlights for LED's too. That should brighten up the road significantly.

Braking System Saga Part 4

And I thought we were done with the brakes. HA! The truth is, I have "finished" the brake system three times now and I'm not really finished yet. While I was troubleshooting the wiring issues, I noticed a new puddle under the car beneath the master cylinder. Now that the brake lines hold pressure, it appears that rear seal on the master cylinder has failed. I'm pretty sure the master cylinder is just as original as the worn out headlight switch was, so this really isn't much of a surprise. O'reilly promises to deliver a replacement to my door day after tomorrow. So, more fun with brakes.

COVID-19 AGAIN!!!

We will have some unscheduled garage time on our hands for the next two weeks. My family and I tested positive this morning, so we're quarantined for at least ten days. We're all vaccinated and boosted, but that didn't stop the virus from following one of us home again. This is the second diagnosed round in our house. I'm pretty sure we had it again last summer too, but none of us tested positive that time. We just had all the nasty symptoms. My wife and I both work in healthcare, so we're exposed regularly. Needless to say, we've had just about enough of this stupid pandemic.
 
Last edited:
  • Like
Reactions: 1 user

64nailhead

Goat Herder
Dec 1, 2014
5,704
1
12,209
113
Upstate NY
More solutions, more problems...

Lighting Gremlins Evicted

Thanks to a lot of head scratching and some sound advice from forum members 64nailhead and g0thiac, I think I have the wiring problem solved. I think I actually had two problems, but it took a while to narrow it down to those two problems. Along the way, I installed a new headlight switch, a new ignition switch, and a new turn signal flasher. None of those new parts fixed either problem, but they were almost 40 years old and in need of replacement anyway. Eventually I (again with some expert help from the forum) found a front parking/turn signal light socket with a broken ground wire and, apparently, a dead short between the parking light and turn signal circuits. 64nailhead convinced me (and rightly so) to investigate the grounding point for the electric fuel pump behind the gas tank. I found that the ground was compromised by a thick coat of chassis paint from our underbody rust repair adventures. With that ground all shined up, everything appears to be working correctly.

While I was messing around with the lights, I swapped out the 1156 backup light bulbs, all of the 194 parking light bulbs, and the 194 license plate light bulb for LED equivalents. They're brighter and draw less power than the original incandescent bulbs. I wish we could swap out the 2057 parking/turning signal bulbs, but they don't play nice with the factory style flasher. And, quality dual-function 2057 LED equivalents are pricy little boogers. If anyone has done this conversion, I would be interested to hear your story. At some point, we plane to swap out the headlights for LED's too. That should brighten up the road significantly.

Braking System Saga Part 4

And I thought we were done with the brakes. HA! The truth is, I have "finished" the brake system three times now and I'm not really finished yet. While I was troubleshooting the wiring issues, I noticed a new puddle under the car beneath the master cylinder. Now that the brake lines hold pressure, it appears that rear seal on the master cylinder has failed. I'm pretty sure the master cylinder is just as original as the worn out headlight switch was, so this really isn't much of a surprise. O'reilly promises to deliver a replacement to my door day after tomorrow. So, more fun with brakes.

COVID-19 AGAIN!!!

We will have some unscheduled garage time on our hands for the next two weeks. My family and I tested positive this morning, so we're quarantined for at least ten days. We're all vaccinated and boosted, but that didn't stop the virus from following one of us home again. This is the second diagnosed round in our house. I'm pretty sure we had it again last summer too, but none of us tested positive that time. We just had all the nasty symptoms. My wife and I both work in healthcare, so we're exposed regularly. Needless to say, we've had just about enough of this stupid pandemic.
Not surprising on the master cylinder. That has happened to all 3 of the originals that I’ve had.

Regarding the Corona/Covid, that sucks (wink wink). I have 4 office guys that work for me, all out and all are sick (anti vaxxers), so I get to run the place by myself. FWIW, I can’t seem to catch the stuff and get paid time off lol. I’d go for 2 weeks paid off this time of year with the amount of car stuff I have to get done this is winter.

Make good use of your time, I’ll bet you’ll be close to having a ton of these small issues corrected by the end of your time off.
 
  • Like
Reactions: 1 user

GBodyForum is a participant in the Amazon Services LLC Associates Program, an affiliate advertising program designed to provide a means for sites to earn advertising fees by advertising and linking to amazon.com. Amazon, the Amazon logo, AmazonSupply, and the AmazonSupply logo are trademarks of Amazon.com, Inc. or its affiliates.

Please support GBodyForum Sponsors

Classic Truck Consoles Dixie Restoration Depot UMI Performance

Contact [email protected] for info on becoming a sponsor