EL CAMINO 1983 El Camino 5.3 Swap / Build Thread

Status
Not open for further replies.
Ace,
If the Muscle Rods mounts work for your LS3, they'll certainly hold down our stock 5.3! On a related note, did you have any trouble with hood clearance? It looks to me like the alternator (with the stock truck accessory brackets) will be too high. I opened a separate thread about it, but I haven't heard from anyone who has used the Muscle Rods engine mounts. Your experience is much appreciated.

Thanks.
John
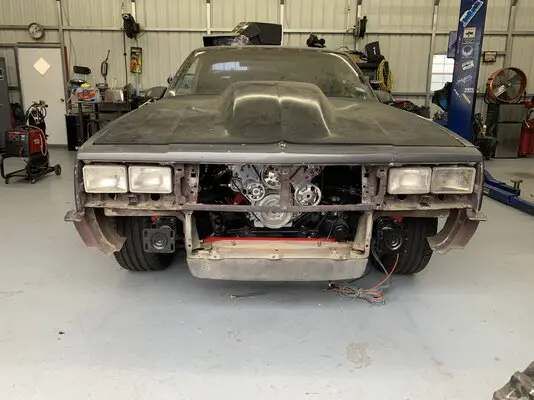
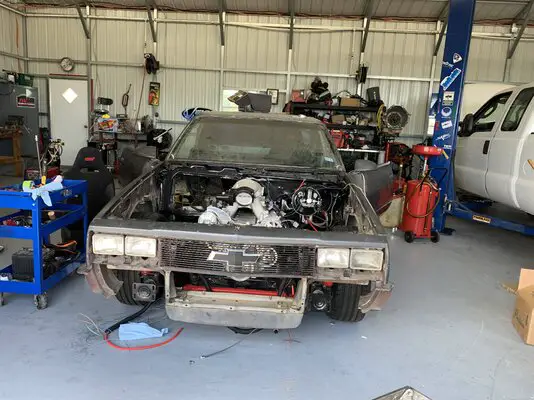
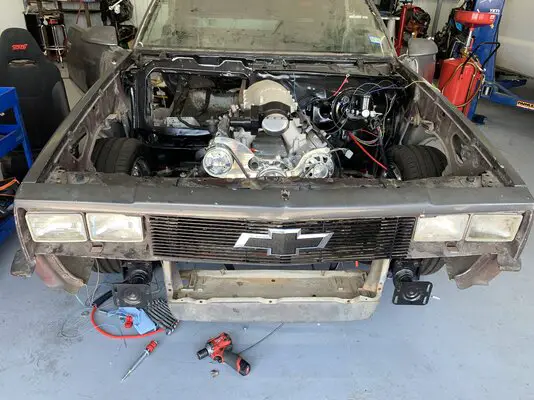
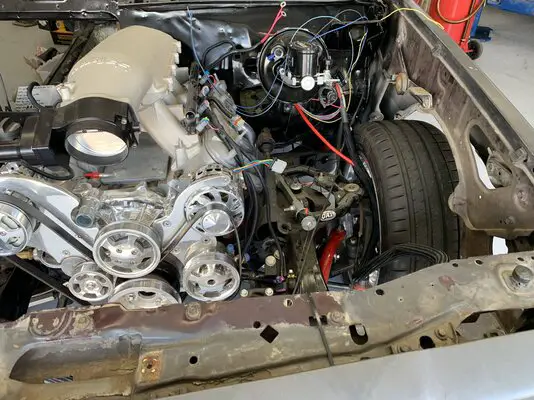
John I am building a pro touring car so pretty much nothing is stock. There are several companies that sell brackets to relocate the accessories if you need to. I am running a Holley Hiram and a glastek 5” Sunoco hood so I didn’t have and clearance issues. Once the motor was my biggest challenges were the AC system (vintage air fixed it) and the radiator. I ended up buying a griffin radiator from summit with both hose outlets on the right side that fixed that. Here are a few random pics of it
 

Attachments

  • 9E44A8B0-9118-43FE-92D3-EEB38829946D.jpeg
    9E44A8B0-9118-43FE-92D3-EEB38829946D.jpeg
    1.5 MB · Views: 187
  • 4F471DB0-4DBD-4670-98BE-659EA78C30D4.jpeg
    4F471DB0-4DBD-4670-98BE-659EA78C30D4.jpeg
    1 MB · Views: 183
  • D52BB83B-3809-46EA-845D-2352B327A7B9.jpeg
    D52BB83B-3809-46EA-845D-2352B327A7B9.jpeg
    1 MB · Views: 175
  • 95054F36-906D-4120-A4AC-3DB346AD9666.jpeg
    95054F36-906D-4120-A4AC-3DB346AD9666.jpeg
    1.2 MB · Views: 171
  • 01A5B964-4FCD-4A75-9ECF-AD6A32FDB1B4.jpeg
    01A5B964-4FCD-4A75-9ECF-AD6A32FDB1B4.jpeg
    1.1 MB · Views: 186
John I am building a pro touring car so pretty much nothing is stock. There are several companies that sell brackets to relocate the accessories if you need to. I am running a Holley Hiram and a glastek 5” Sunoco hood so I didn’t have and clearance issues. Once the motor was my biggest challenges were the AC system (vintage air fixed it) and the radiator. I ended up buying a griffin radiator from summit with both hose outlets on the right side that fixed that. Here are a few random pics of it
Thanks for the reply and the pics. That's a fun looking project! Ours will be much milder than yours. It's my son's first car, so a stock 5.3 is plenty. If we run into "severe" clearance problems, we'll look into a cowl induction hood. I like the cowl induction look, but my son likes the stock look. If he's dead set on keeping the stock hood, we will look into alternative accessory mount options. Thanks!

John
 
John I am building a pro touring car so pretty much nothing is stock. There are several companies that sell brackets to relocate the accessories if you need to. I am running a Holley Hiram and a glastek 5” Sunoco hood so I didn’t have and clearance issues. Once the motor was my biggest challenges were the AC system (vintage air fixed it) and the radiator. I ended up buying a griffin radiator from summit with both hose outlets on the right side that fixed that. Here are a few random pics of it
Looks like a hell of a build, you should have a build thread going
 
The project took a detour, but we're finally back on track. When we tried to bolt in the transmission cross member, we discovered that the tail of the transmission was offset toward the passenger side by almost two inches. I posted a separate thread on this problem and got a reply from another forum members saying that his TH350 was offset by 1" to the driver side. Armed with this information I called Muscle Rods support line. They explained that the whole drive train is supposed to be offset 1" toward the passenger side. Apparently, GM did that with all of the G-bodies to allow additional room for the stearing column and shifter linkage. You learn something new everyday. They didn't have an answer to the additional offset at the tail of the transmission. But, they did say that it is not unusual for vehicles from this time period to be significantly out of square and level. They also sent a second complete set of engine mounts, free of charge, just in case there was something out of whack with the first set. The second set was identical to the first. The problem wasn't the engine mounts, it was the car. The car has never been wrecked, as far as we know, but it is far enough out of spec that drive train was crooked. I solved the problem by opening up all of the bolt holes in the engine mounts by 1/16". This provided enough "adjustability" to bring the transmission around to the center of the trans tunnel. My only complaint with the Muscle Rods mounts is that they are too precise. There is almost no play in them at all. They were MUCH easier to install after the bolt holes were opened up.

With the engine and transmission finally in place, I move on to the torque converter bolts. That led to yet another roadblock. The ARP 10MMx1.5 bolts would not thread into the torque converter. After pulling the transmission back out to verify that we have the right torque converter, I discovered that the ARP bolts were slightly over sized. I bought replacement 10MMx1.5 grade 10.9 bolts from a local farm store. These bolts threaded in beautifully.

At this point, I feel like we've reached an important milestone. I think we finally have the drive train bolted in place permanently. Now, we can move forward with all of the subsystems that actually make the car run (electrical, fuel, exhaust, cooling, etc, etc, etc).

I started with the exhaust manifolds. I'm using Patriot H8097-B manifolds ordered from Amazon. They look like they will flow well and they fit much better than the truck manifolds that came with the engine. They are similar to the factory manifolds, except that instead of a three bolt triangular collector flange, they have a two bolt "dome" collector flange. The factory flanges hit the frame on both sides. The Patriot flanges clear everything. And, they come with short steal adapters with welded O2 sensor bungs. This will be a good starting point for welding up a custom exhaust system.

Next was the coil packs. I removed the coil packs and brackets from the valve covers to protect them from getting damaged during the engine install. And, I suspected (correctly) there would be interference problems with the condenser/heater core housing. The driver side coil bracket bolted right back on in the factory location. The passenger side didn't even come close. The front two coils were fine, but the rear two coils would not fit between the valve cover and the condenser/heater core housing. So, I altered the factory bracket to move the rear two coils up toward the intake manifold by about two inches. It all fits much better now. I repainted the bracket gloss black to make it blend in with the factory parts. I will try to post pictures of the bracket after the paint dries. It was a fun and easy fabricating project.

It's almost time for wiring. Wish me luck...
 
The El Camino is progressing nicely, if slowly. Once the drive train was settled in it's permanent location, I put together a "punch list". That made it obvious just how much work is left to do.

The first major system to be addressed was the fuel system. But, before that could go in, we needed to finish up the rust repairs under the car. So, out came the grinders and welders again. There was one rust hole near the rear tip of the passenger side frame rail, where a makeshift trailer hitch had been welded in. We cut out the rust, back to good metal, welded in a section of new metal, brushed liberally with rust converter and top coated with rust encapsulator paint. Next, we cleaned up the underside of the welds from the floor pan patches, seam sealed everything under the car, brushed with rust converter and top coated with rust encapsulator paint. with all of the "finishes" done, we could actually get started on the fuel system.

Several months ago, we dropped the factory fuel tank and installed an Aeromotive Phantom in-tank fuel pump. Now that the chassis was ready, we reinstalled the fuel tank. When we ordered the fuel pump kit from Muscle Rods, we also ordered a fuel line and regulator kit. This gave us all the materials we needed to install a filter/regulator along the passenger side frame rail and build all of the PTFE fuel lines with AN fittings. This was my first experience with PTFE lines and AN fittings. The learning curve was pretty steep, but after some practice, I can assemble a fitting in just a few minutes. We won't know if I'm any good at assembling these lines until we pressurize the system and check for leaks. Fingers crossed...

The next system to be addressed was power steering. The El Camino was originally a diesel, so it has a hydroboost braking system. Luckily, the engine donor vehicle also had hydroboost. So, the pressure line from the LS power steering pump screwed directly into the hydroboost brake booster with no modification. From there, it was bit more complicated, but nothing too onerous. We had to make up new return lines from the brake booster back to the pump and from the steering box, through a new power steering cooler, back to the pump. More PTFE lines and AN fittings.

Next was the cooling system. We're using an aluminum 4-core radiator from DeWitts. It's probably overkill, but we needed a new radiator anyway, so we went with something spiffy. We made up more PTFE lines with AN fittings for the transmission cooling lines. At this point, we took a slight detour to install a Lokar transmission dipstick, while we were working in the transmission neighborhood. Then, we mixed an matched radiator hoses from the parts store, and used off-the-shelf rubber hoses to connect the steam lines and the overflow tank. Now, we just need new rubber radiator mounting pads to arrive so we can button up the installation. Then, we can install a pair of electric fans and a shroud from Speedway Motors.

The next major system to tackle will be wiring. If you haven't noticed, I've been putting this off as long as humanly possible. The donor engine came with a reworked LS harness and factory ECM. That will help simplify things a bit. But, because the car was originally a diesel, the factory harness will need some major surgery to mesh it with the LS harness. I'm definitely not looking forward to this part...
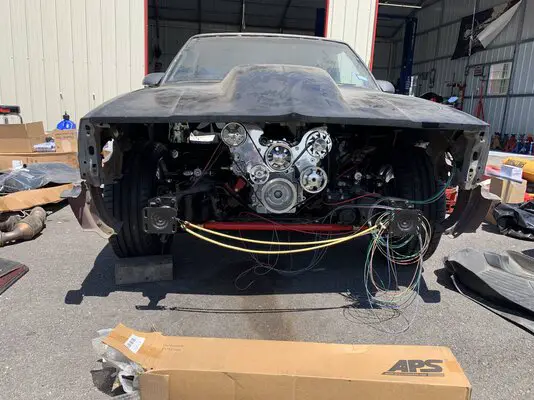
 
Last edited:
Are you installing air conditioning?
 
Are you installing air conditioning?

Maybe someday. The car had factory AC, but the LS donor didn't. I would like to add a modern LS compressor, but that will have to wait for now. The immediate goal is to get the car back on the road. My son can live without AC until some of the other work is done (bodywork and a paint job).
 
Without using the A/C, integrating the LS into the factory harness is not difficult. You need the purple wire for the starter solenoid, the red wires with fusible links that are at the starter, and the idiot light wire to the alternator. The washer/wipers come out of the same firewall plug as well as the hood harness. After that, you won't need much other than the blower motor wires.
 
Without using the A/C, integrating the LS into the factory harness is not difficult. You need the purple wire for the starter solenoid, the red wires with fusible links that are at the starter, and the idiot light wire to the alternator. The washer/wipers come out of the same firewall plug as well as the hood harness. After that, you won't need much other than the blower motor wires.
Thanks for the details. This will give me a place to start!
 
Thanks for the details. This will give me a place to start!
I'm onto my third one. It's not hard. If you can find a pinout for the firewall plug, then it becomes quite simple in terms of knowing what wires to use and which ones to tuck back into the the loom. I can't give any good input for a diesel setup, but if you had a gas setup, then you can use the pink wire, that went to the coil, to trigger anything that you need hot during crank and run - via a relay of course.

I wouldn't be concerned about this aspect of your build at all. If you can handle getting the stock PCM and harness from your donor in the car, then this will be a non-issue. Post some pics of the wire colors in the engine bay. GM used the same for everything gas, and I can't believe they created an entirely different scheme for a diesel. But....................I could be wrong.
 
  • Like
Reactions: RabbitHoleSS
Status
Not open for further replies.

GBodyForum is a participant in the Amazon Services LLC Associates Program, an affiliate advertising program designed to provide a means for sites to earn advertising fees by advertising and linking to amazon.com. Amazon, the Amazon logo, AmazonSupply, and the AmazonSupply logo are trademarks of Amazon.com, Inc. or its affiliates.

Please support GBodyForum Sponsors

Classic Truck Consoles Dixie Restoration Depot UMI Performance

Contact [email protected] for info on becoming a sponsor