EL CAMINO 1983 El Camino 5.3 Swap / Build Thread

JohnIL

Greasemonkey
Sep 9, 2020
131
310
63
Central Illinois
64nailhead asked for videos. So, here you go.

Cold Start and Idle


Give her the onions!

 
  • Like
Reactions: 3 users

JohnIL

Greasemonkey
Sep 9, 2020
131
310
63
Central Illinois
Slow progress, but progress nonetheless...

Serpantine Belt Tentioner

About a week ago, my Dad stopped by the house and wanted to hear the new exhaust system. It was cold that day (about 15 F) and the engine hadn't been started for a few days. The engine fired with no problem, but something in the front accessories was howling like a banshee. After some quick investigation, it became clear that the noise was coming from the belt tentioner pulley. It had the original GM part number, so I assume it was the original factory part with 100K+ miles on it. The cold temperature was the last straw. Luckily, it's a readily available (and cheap) part. I picked up a replacement the next day at O'Reilly and had it installed in about five minutes. That's a good thing, considering it was colder than the day before! I spent the rest of the evening hiding inside the heated house.

Stereo Console "Upholstery"

I put the word upholstery in quotes because I don't have the skills to do actual upholstery work. But, I've wrapped plenty of Christmas gifts over the years, so I figured wrapping the console in vinyl should be just about the same. HA! I'm kidding, of course. Real upholsterers have my respect. I've been avoiding this part of the project for a weeks now and it was just about as difficult as I expected it would be. The vinyl was actually kind of fun to work with. The problem was the console is small and it has tight corners and tight joints. There was no way (at least no way that I've found) to stretch the vinyl over the corners. It had to be folded, which is difficult to do well, especially on a small object.

I removed the console from the car and took it and the vinyl into my woodworking shop where I had heat and a clean workbench to work on. It took about seven hours of testing, cutting, wrapping, and wrestling, but it's finished and it didn't turn out half bad. My only concern is that the vinyl might shrink or peel. I've never done this before, so I can only hope that it's all secured well enough to stay put. If it doesn't behave, I guess we'll try it again. I'm going to keep it in the heated house for a few days to give the glue time to bond before I try to reinstall it back into the car.

What's Next

We're still waiting for the Illinois DMV to reopen. Theoretically, they're reopening today. They've been closed for over a month, so I'm sure they will be a massive backlog of customers. I'll go stand in line later in the week to get the title transferred and plates ordered. Then, finally, we can do some shakedown testing.
 

Attachments

  • ConsoleFinished01.jpg
    ConsoleFinished01.jpg
    83 KB · Views: 112
  • ConsoleFinished02.jpg
    ConsoleFinished02.jpg
    97.8 KB · Views: 115
Last edited:
  • Like
Reactions: 3 users

JohnIL

Greasemonkey
Sep 9, 2020
131
310
63
Central Illinois
Progress has been made, but not nearly as much as I would like.

The winter weather has kept us out of the garage for most of the past month. So, whenever the occasional warm day comes along, we get as much done as we can, when we can. It's slow going right now in Central Illinois.

Paperwork

At long last, the Illinois DMV reopened and I was able to get into the office to transfer the title, pay the ridiculous used car tax, and pay for the even more ridiculous license plate fees. Next was a phone call to the insurance company to add our son to our policy and to add liability insurance for the El Camino. That hurt quite a bit too. Now, with all of the paperwork done, the car (and the son) are street legal.

Electric to Mechanical Speedometer Adapter

In an earlier installment, I mentioned that the CableX box is slow to respond to speed changes. Now that the car can be driven for testing, I took it out for a series of test drives comparing the mechanical speed reading to the GPS speed app on my smartphone. After some calibration adjustments on the CableX, the mechanical speedometer is now accurate, but it's still very unresponsive. Once you get up to speed, it takes the speedometer 2-3 seconds to catch up to you. It's accurate, but it really doesn't work well under actual driving conditions. If you take off from a dead stop and accelerate (at normal driving rate, not a hard launch) and you level off when the speedometer reaches 55mph, the speedometer will continue to rise up to about 67mph. At that point, you're 12mph over the speed limit. Not good for a young driver in a car with way too much power. He's going to need something more responsive to keep him out of trouble with the nice gentlemen in the white cars with the flashing lights.

I also mentioned, I thought the VSS function on the digital gauge might have some promise as a digital speedometer. That was a complete bust. The digital gauge reads the raw VSS signal. There is no way to adjust it for tire size or gear ratio. With our gear and tire combination, it reads about 12% low. This is what I get for buying the cheapest digital gauge I could find.

So, the current plan is to remove the car-related variables from the equation and try a stand-alone GPS speedometer. I doubled down on the whole "cheapest digital gauge I could find" thing and ordered a $30 self-contained GPS speedometer from Amazon. We need to do more testing, but it looks like it might be a serviceable solution. I suspect that at some point down the road, my son will give up on the originality of the stock gauge cluster and we'll ditch all of this in favor of after market gauges all around. In the meantime, I think the combination of the multi-function OBDII digital gauge and the GPS speedometer will keep him and the drivetrain out of trouble.

Astro Van Steering Shaft

My son was thoroughly spoiled when he was going through Driver Education. My wife and I both drive new (within the past three years) GMC's, mine a Sierra 1500, hers a swanky Terrain Denali. Both have modern rack and pinion steering. That's all our son has ever known. So, when he drove the El Camino for the first time, he immediately asked why the steering was so loose. I've driven enough old GM cars that I didn't even think about it. He, on the other hand, was scared to death of the squishy sloppy steering system. So, something had to be done to tighten things up. The steering box was swapped out at some point in the distant past for a quick ratio (Monte SS) box. It's still tight with very little play. The vast majority of the slop was coming from the rag joint.

Thanks to the wisdom of the G-body Wizards here on the forum, I was pointed toward the popular Astro Van steering shaft modification to eliminate the rubber rag joint and the 40 years of wear. I found an inexpensive Astro steering shaft on eBay and followed the instructions I found here on the forum for re-clocking the upper U-joint 90 degrees to align with the factory steering column. The modification was easy and straight forward. By far the hardest part was grinding away that peen on the end of the shaft to free up the upper U-joint. Once I had it loose, re-clocking and welding it into its new 90 degree orientation only took a few minutes. In fact, it took longer for the paint to dry than it did to do the actual modification.

The results were 100% worth it. The new steering took out 90% of the slop. It still doesn't handle like a modern rack and pinion system, but is, by far, the most responsive G-body I've ever driven.

What's Next?

Heck, I don't know! We're supposed to get a couple more days of warm weather. I'll probably spend my after work hours buttoning up the last of the wiring behind the console. It will be nice to have that checked off the punch list. I also have a delete plug for the factory LS fuel regulator. Since we went with a combination regulator/filter/fuel return, the factory regulator on the fuel rail is superfluous. In fact, it's probably a liability. If the diaphragm ever failed, it would spray fuel all over the top of the hot engine. Blocking it off seems like cheap insurance. The next time we get a warm weekend, I hope to attack the rusted emergency brake cable. I don't want to disable the car unless I have time to get it all back together. Once the weather breaks for spring, we'll install the new headliner, sort through the power locks and windows, then start the exterior body rust repair. I have no idea how many years that will take, but we'll be at it for a while.
 

Attachments

  • SteeringShaft01.jpg
    SteeringShaft01.jpg
    78.7 KB · Views: 113
  • SteeringShaft02.jpg
    SteeringShaft02.jpg
    74.2 KB · Views: 107
Last edited:
  • Like
Reactions: 3 users

JohnIL

Greasemonkey
Sep 9, 2020
131
310
63
Central Illinois
More Progress and Updates...

Astro Van Steering Shaft
Over the weekend, my son and I took the El Camino out for a shakedown drive. This was his first time driving with the Astro Van steering shaft upgrade. The reviews are good. He was very happy with the steering feel and responsiveness. We encountered two interesting phenomena.

  1. Now that the rag joint is deleted from the steering system, there is a bit more vibration translated to the steering column. That part was expected and it actually improves the steering feel. You feel much more connected to the road. That's a good thing. The part that wasn't expected is that the additional vibration causes the column shifter to rattle. It's not loud, but it's noticeable. The rattle stops if you apply slight up pressure on the shifter. If anyone knows how to cushion or mute this rattle, it would be greatly appreciated. This is pretty nitpicky, but if it can be fixed, every little bit helps.
  2. The steering may actually be bit a little bit TOO responsive! At some point in the past, the stock wide ratio steering box was replaced with a quick ratio box (a la Monte Carlo SS). It takes 2 3/4 turns from lock to lock. Now that the slop is gone from the steering system, my son has a tendency to jerk (if that's the right descriptor) the wheel as he enters curves. The first time he did that, it made me chuckle. It is WAY more responsive than any of the G-bodies I've had in the past. Once he gets used to it, he'll wonder why the steering in my modern GMC pickup is so sloppy. Good stuff!
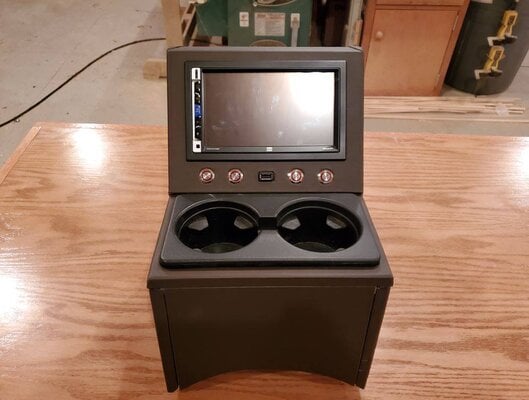
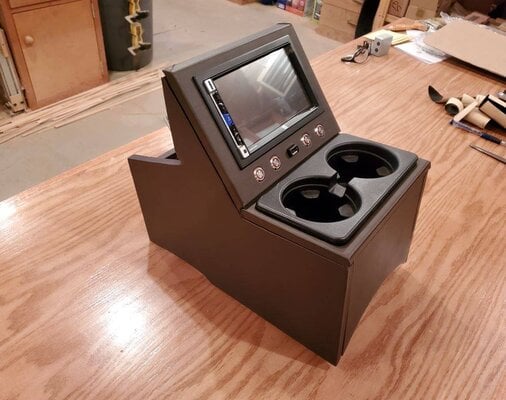
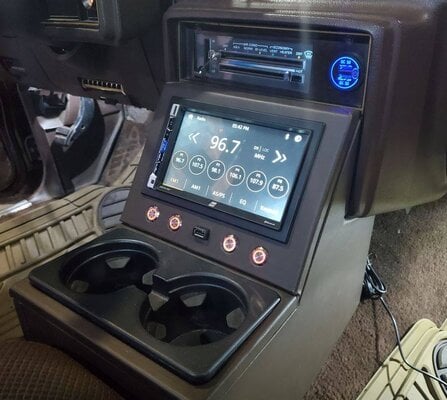
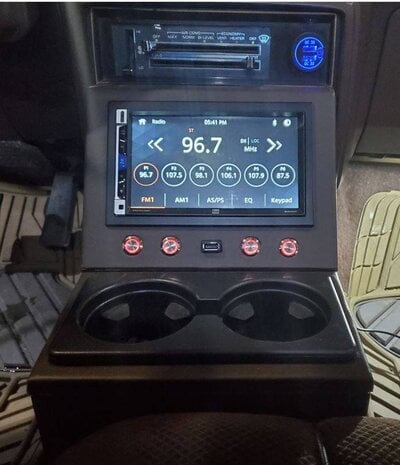
Console Wiring
We were blessed with a rare warm evening last week so I spent some time in the garage finishing up the wiring behind the console. Really, the only thing left to do was to wire up the row of push buttons below the stereo. We don't have any accessories to power yet, but I wanted to include some way to control things that may/will get added in the future. For now, they just light up and look cool.

You can see pictures of the finished console below.
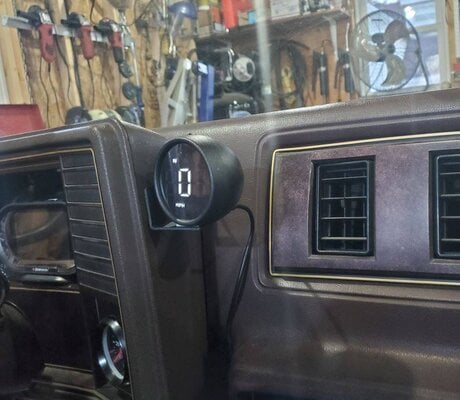
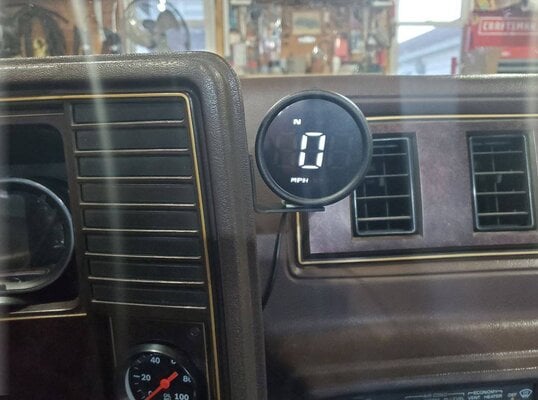
Digital Speedometer
In my last couple of installments, I have lamented the unresponsiveness of the CableX electronic-to-mechanical speedometer adapter. It works and it's pretty cool to see the original mechanical speedometer spinning, but it's way too sluggish for daily driving. I would recommend the CableX unit ONLY if you are 100% dedicated the originality of the factory gauge cluster. The CableX is almost as expensive a complete aftermarket set of gauges and the aftermarket gauges would be much more user-friendly for daily driving.

Enough grousing and onto the practical solution. As I mentioned in my last update, we were going to try to work around the CableX problem by adding an inexpensive digital GPS speedometer. Well, we did and, so far, we're very happy with it. While we were on our shakedown drive, I calibrated the GPS speedometer to match the speed app on my smartphone. Now, my son has an easy to read, accurate way to keep tabs on his speed. A very good thing for a 16 year old driver in a hopped up G-body. As a side benefit, the GPS speedo includes a digital compass. Since my son and I are both directionally challenged, this is a welcome addition.

Here's a link to the speedometer we're using.

You can see a picture of the speedometer installed below.

Just like the digital multi-function gauge, the speedometer is a cheap imported unit, but it's hard to beat the functionality for only $30. If there was an American made alternative, I'd definitely buy one.
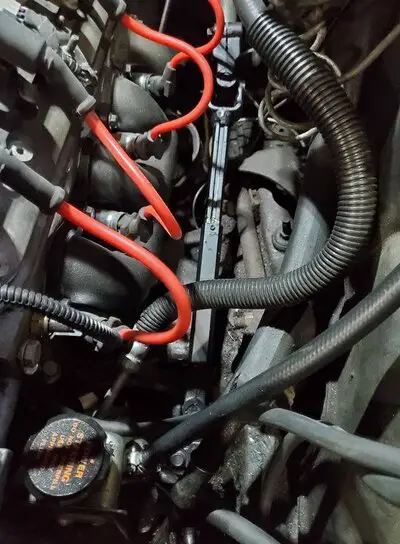
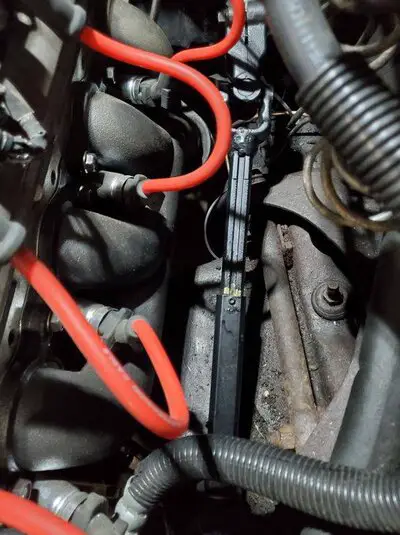
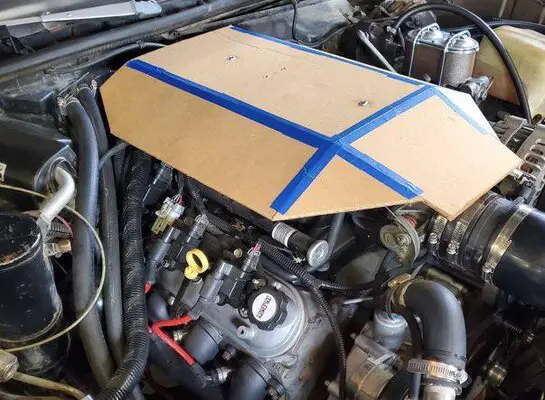
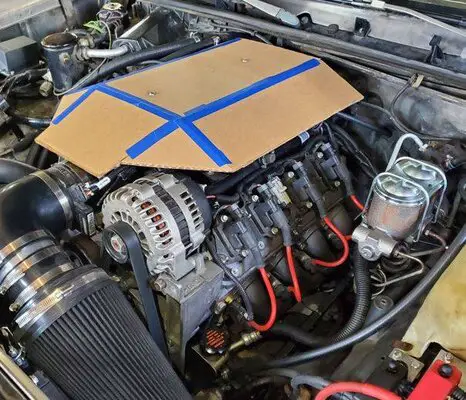
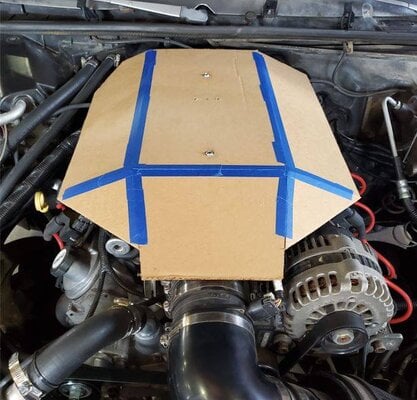
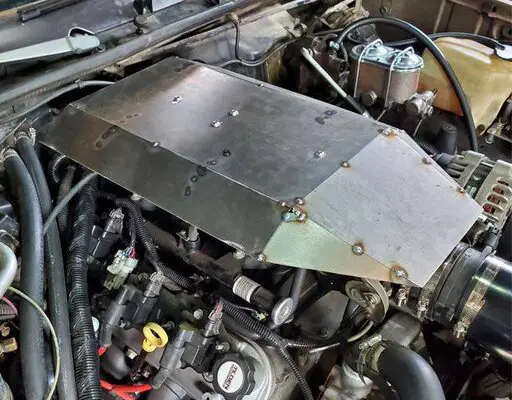
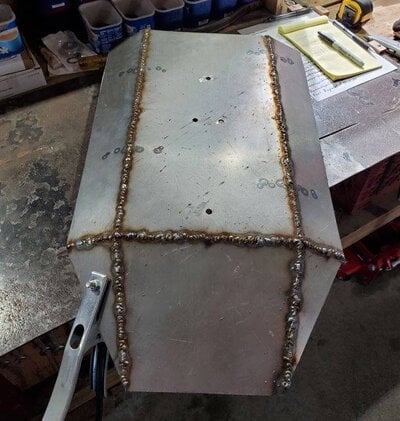
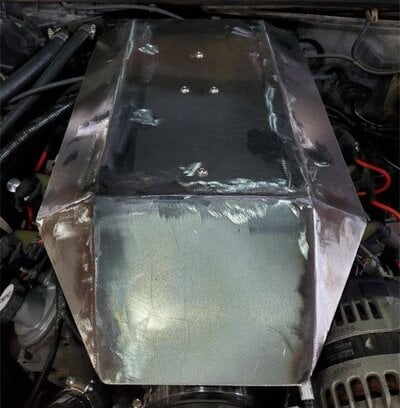
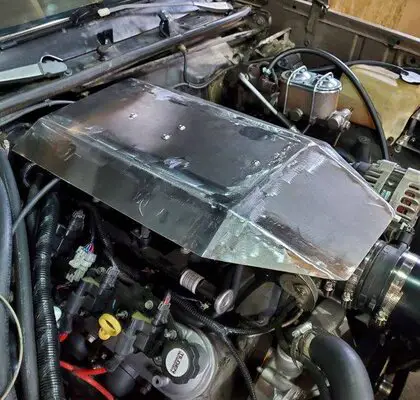
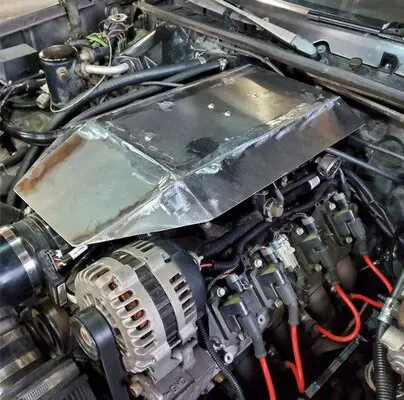
Engine Intake Cover

This one is a just-for-fun project. Someday, we hope to be able to take the El Camino to local car shows/cruises. An LS engine is a great upgrade in terms of horsepower and reliability, but they're not very visually appealing. Let's face it, stock LS's are downright ugly. Our original plan was to use a factory Vortec intake cover. Because of the height of the truck intake manifold, there wasn't enough headroom under the stock hood, so that plan was scrapped. Since we can't make it look "factory", we might as well dress it up a little.

So, I've started working on a custom intake cover. The goal is cover up the ugly truck intake manifold and some of the extensive engine wiring and to add a splash of color under the hood. When we started working on the car, my son didn't really have a "style" in mind. He liked the originality of the El Camino and the family history that came with it. But, as we've modernized the car and added aftermarket parts, he's grown an affinity for polished aluminum and red accents. We already have a number of aluminum under-hood details and he really likes the way the red sparkplug wires (of all things) changed the bland look of the engine bay.

The current plan is to build the intake cover out of 16ga-18ga steel and paint it red with aluminum "SS" stripes. We'll dress it up further with Chevrolet script logos and 5.3LS badges. The cover won't be anything too elaborate, but we hope it will make the engine presentable without spending a fortune on billet aluminum engine components.

You can see pictures of the carboard mock-up for the cover below.

What's Next?

The forecast promises warmer weather this week. We hope to spend our evenings in the garage. We'll try to get the fuel regulator block off installed. I'll probably start cutting and welding steel for the intake cover. And, my son has put in a request for a new armrest/console with storage for charging cables, garage door controller, sunglasses, etc. That all starts with another cardboard mock-up. If the warm weather holds on through the weekend, we'll probably try to get the parking brake cable sorted out.
 

Attachments

  • IntakeCover03.JPG
    IntakeCover03.JPG
    58.2 KB · Views: 88
  • IntakeCover02.JPG
    IntakeCover02.JPG
    73.3 KB · Views: 92
  • IntakeCover01.jpg
    IntakeCover01.jpg
    61 KB · Views: 90
  • GPSSpeedometer02.JPG
    GPSSpeedometer02.JPG
    81.9 KB · Views: 108
  • GPSSpeedometer01.jpg
    GPSSpeedometer01.jpg
    89.1 KB · Views: 102
  • FinishedConsole02.JPG
    FinishedConsole02.JPG
    93.7 KB · Views: 111
  • FinishedConsole01.jpg
    FinishedConsole01.jpg
    64.3 KB · Views: 106
Last edited:
  • Like
Reactions: 6 users

RabbitHoleSS

G-Body Guru
Dec 8, 2019
712
2,105
93
Indianapolis
I just read your thread and I love the execution of this build. Its perfect for your boy, Something he'll remember for the rest if his of his life. If he's burning rubber ,he won't be burning bowls. Car parts are too expensive for any other habits.
 
  • Like
Reactions: 1 users

JohnIL

Greasemonkey
Sep 9, 2020
131
310
63
Central Illinois
I just read your thread and I love the execution of this build. Its perfect for your boy, Something he'll remember for the rest if his of his life. If he's burning rubber ,he won't be burning bowls. Car parts are too expensive for any other habits.

Rabbit,
Thanks for the kind words. We've had a lot of fun with the project so far. Lots of quality time together and a cool car to show for our efforts. For me, the payoff is seeing him drive the car and gain an appreciation for the old machines I enjoy so much myself.

John
 
  • Like
Reactions: 1 user

roger1

G-Body Guru
Aug 23, 2010
537
767
93
San Angelo, TX
Just saw this thread for the first time. Nice, nice job! Congrats.
Curious though. Have you tried a panic type stop with the car yet? Can you lock up the wheels when rolling 40 or 50 mph?
Once I upgraded the wheels and tire size on my '83 El Camino. I was never happy with the stock brakes. I tried a few different calipers and brake shoes and I couldn't improve them. I even tried oversized metric calipers and that didn't help either.
I ended up upgrading to 2002 Camaro brakes (aka LS1 brakes), a 1" Riviera master cylinder and a Caprice booster. I also used the larger S10 cylinders on the rear brakes.
It all turned out to be a perfect match and now I'm totally happy with the brakes on the car.
I've also read that the Blazer front brake swap along with the S10 cylinders and 1" master cylinder is a good way to go.
 

JohnIL

Greasemonkey
Sep 9, 2020
131
310
63
Central Illinois
Just saw this thread for the first time. Nice, nice job! Congrats.
Curious though. Have you tried a panic type stop with the car yet? Can you lock up the wheels when rolling 40 or 50 mph?
Once I upgraded the wheels and tire size on my '83 El Camino. I was never happy with the stock brakes. I tried a few different calipers and brake shoes and I couldn't improve them. I even tried oversized metric calipers and that didn't help either.
I ended up upgrading to 2002 Camaro brakes (aka LS1 brakes), a 1" Riviera master cylinder and a Caprice booster. I also used the larger S10 cylinders on the rear brakes.
It all turned out to be a perfect match and now I'm totally happy with the brakes on the car.
I've also read that the Blazer front brake swap along with the S10 cylinders and 1" master cylinder is a good way to go.

Roger,
That's a good question. I haven't done a 40-50mph panic stop, but have done a 25mph panic stop and it will put you into the dashboard. Pretty much everything in the brake system is new, but stock. The only real upgrade is the addition of stainless steel flex lines, which increases the line pressure to the calipers and wheel cylinders. The hydroboost system provides plenty of line pressure to stop the car in a hurry. But, I get your point about the other brake components. I feel pretty confident in the braking system for daily driving. If my son ever gets interested in autocross, we'll have to upgrade to better rotors, calipers, pads, and probably a rear disk conversion. Now that you've raised the question, I'll have to do some more testing once the ice melts and the roads dry out. My son isn't a very aggressive driver, but that will probably change with more experience. I know I certainly got more aggressive once I had my license for a while. 😁

Thanks.
John
 

JohnIL

Greasemonkey
Sep 9, 2020
131
310
63
Central Illinois
More progress, but slow progress.

The weather has been pretty hit-n-miss. Welcome to spring in the Midwest. Over the weekend, we got a couple of warm weather days, so we made the most of our garage time.

Engine Intake Cover
In my last update, I included some pictures of a cardboard mockup for an intake cover. I stopped by my local metal supply and picked up a sheet of 20ga steel. Then, I spent a day redesigning, cutting, welding, and grinding. At one point I thought to myself, "Hey look ma! I'm Donovan!" Then, reality set in and I did a LOT more grinding to make my welds look presentable. I have a very long way to go to get to Donovan's level of mastery. The pictures below give you an idea of where I ended up. The very astute among you will notice that there are some differences between the cardboard prototype and the steel version. My son didn't like the way the passenger side of the prototype was hacked off at an angle to clear the heater hoses and he thought that the front of the cover looked like the engine had an ugly oversized snoot. I think his assessment was right on point. It's amazing what a second set of eyes can see that the first set (mine) looked right passed. We narrowed the side "wings" which negated the need to work around the heater hoses and we extended the triangular fill panels on the side of the nose to match the length of the nose itself. I think this design is much more elegant (if that term even applies to a G-body) than the prototype.

As you can see from the pictures, the metalwork is done, but it's going to need a skim coat of filler to smooth it all out before primer and paint. All-in-all, we're both pretty happy with the result. Now, we just need a couple warm days to do the filling and painting. Imagine the cover in red with aluminum SS stripes down the center and some cool "Chevrolet"-ish stuff on the sides. Oooo. Aaaa.

Parking Brake Cable

I'm mentioned before that the front emergency brake cable (from the pedal back to the midpoint of the floorboard, just behind the driver position) needed to be replaced. At some point 25-30 years ago, my father disconnected the cable at the brake pedal. When we were doing the rust repair in the floorboards, it became apparent why he did that. The worst rust hole was just below the drivers feet. Directly below that hole is where the brake cable enters the frame and turns 90 degrees upward toward the pedal. The entire length of the 90 degree bend was rusted completely solid. There's absolutely no way that cable was ever going to come lose.

So, after an hour of fighting to liberate the cable from the frame, we gave up and hacked it out in three pieces. After that, the rest of the job was quick and easy. The new cable went back in with very little fanfare. And, believe it or not, the adjuster lock nut on the rear cable bracket wasn't rusted solid. It backed off with just a ratchet and a little penetrating oil. Once it was all back together and readjusted, the parking brake works as good as new.

I've fought with parking brake cables before and I've been avoiding this job for a couple of months. It's a huge relief to have it fixed and checked off the list.

Fuel Pressure Regulator Block Off Plug

This job was quick and easy. I installed an ICT billet block off plug in place of the factory LS fuel pressure regulator. The regulator was located in the middle of the driver side fuel rail. The regulator snapped out and the plug snapped in. The factory regulator was no longer needed since we are using a "corvette-style" regulator/filter/return mounted down on the frame rail, just forward of the rear axle. The block off plug eliminates the possibility that the regulator might someday fail and start spraying pressurized fuel on top of the hot engine. The block off plug includes a port for a fuel pressure gauge. So, I moved the gauge that we already had installed at the rear of the engine. This puts the gauge in a much more readable position. ICT makes the same plug without the gauge port, if you don't need to a fuel pressure gauge.

Here's a link to the plug we used. It's a good quality piece. Highly recommended.


What's next?

Well, the weather turned cold again this week. So, everything sits until we get closer to spring. I'm hoping for better weather next week. I started mocking up an armrest/console, but I didn't get very far. And, parts have started to arrive for the body rust repair. My son is off for spring break in a couple of weeks. We're going to brave the high gas prices for a four day trip down to Mississippi. When we get home, we might start cutting into the gaping rust holes in the rear quarter panels. The bodywork is going to be a long hard slog, but I'm sure it will be worth it when we get to the paint shop.
 

Attachments

  • IntakeCover04.JPG
    IntakeCover04.JPG
    62.8 KB · Views: 92
  • IntakeCover05.JPG
    IntakeCover05.JPG
    63 KB · Views: 85
  • IntakeCover06.JPG
    IntakeCover06.JPG
    57.7 KB · Views: 84
  • IntakeCover07.JPG
    IntakeCover07.JPG
    68.9 KB · Views: 111
  • IntakeCover08.JPG
    IntakeCover08.JPG
    77.3 KB · Views: 80
Last edited:
  • Like
Reactions: 3 users

GBodyForum is a participant in the Amazon Services LLC Associates Program, an affiliate advertising program designed to provide a means for sites to earn advertising fees by advertising and linking to amazon.com. Amazon, the Amazon logo, AmazonSupply, and the AmazonSupply logo are trademarks of Amazon.com, Inc. or its affiliates.

Please support GBodyForum Sponsors

Classic Truck Consoles Dixie Restoration Depot UMI Performance

Contact [email protected] for info on becoming a sponsor